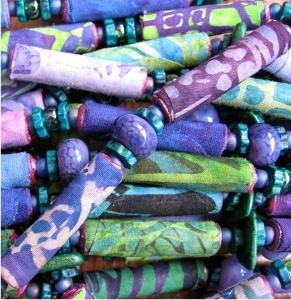
Rolled Paper Beads
Roller paper beads are a great way to recycle all that junk mail we receive on a daily basis and create some, beautiful handmade jewelry.
Materials:
- Paper- Junk mail with colorful photos works best, but you can also use plain paper and decorate it after with markers
- Scissors or Paper Cutter (An Exacto Knife and a Ruler will give you perfect edges!)
- Glue- Elmers, Liquid Paper Glue, or Mod Podge (which can also be used to varnish the beads after rolling)
- Thin Metal or Straw for Rolling the Beads- Long needle, straightened-out clothes hanger, or coffee stirrer (Just don’t use a wood stick, the glue will stick too easily to this)
- (Optional) Varnish- Mod Podge, Spray Acrylic, Clear Nail Polish
- Thin Wire or String for Stringing the Beads- You can also use thin copper wire for a different look
Instructions:
-
Cut your paper into long triangles (wide at one end, narrow at the other). The longer the triangle, the thicker the bead will be when rolled up. You can also layer several different colored triangles before rolling for added design. Make these thinner and shorter, since the extra paper triangle will add bulk.You can finally rid yourself of leftover wrapping paper scraps with this beads project!
-
To make a set of triangles of the same size, lay your sheet of paper down on the table. Put a dot every ¾ in. along the bottom edge of the paper. Measure out six inches from the bottom, and make a horizontal line across the width of the paper with your ruler. Cut along this line. Then, on the newly cut edge, make a mark every ½ in. Using your ruler, connect the dots to make the triangles, and cut apart. Perfect triangles!
-
Different shaped triangles will make different beads. If you make the base of the triangle wider, the bead will be rounder. For long, thin beads, make a wider base, and a shorter triangle.
-
Pick up your paper and roll it tightly around your needle/hanger/straw/pen refill, starting at the wide end. You can make different shaped beads based on how your roll the paper on the needle.
-
You can roll the paper more to one side for a teardrop shape.
-
Try to roll the paper directly in the middle for a symmetrical, egg-shape.
-
An interesting twist is to make a cut a long, thin rectangle out of the paper. Then, cut a triangle from one end of the rectangle, so that your paper shape resembles a pair of pants. The bead will be thicker on each end and thinner in the middle (for a thinner middle, cut the triangle higher into the rectangle).
-
Apply a tiny dot of glue at the end of triangle to secure the roll.
-
At this point, you can varnish the bead to make it hard and shiny. The bead will last longer this way. Apply the clear nail polish, varnish or spray acrylic and let dry.
-
For a great painting and drying rack, cut small notches into a shallow cardboard box, such as a shoe box. This will catch any drips when you varnish the beads. Place the long needles or stirrers into the notches to hold them in place.
-
You can also stick the needles or straws into a piece of Styrofoam.
-
You can now string the beads for necklaces, bracelets, anklets, and earrings.
-
You can use thin wire, copper wire, elastic string (great for kids), or even dental floss to string the beads.
- Earring findings, clasps, and other supplies can be purchased inexpensively at craft stores.
Read Next101+ Free Beading Patterns
Your Recently Viewed Projects
Thanks for your comment. Don't forget to share!
ladymains1 5212516
Jan 23, 2011
I make these beads ... using plastic drink straws. The glue doesn't stick to the straws, and if you cut the straws, leaving a portion of the straw inside the bead ... it gives extra strength for the bead. I've used newspaper to make beads, as well, using my "old" fingernail polish for a protective coating and it gives them a totally different look. (metallic polishes makes them look like metal). Great instructions ... with just enough "left out" to make for a fun filled day of experimenting :) Keep up the good work!!!
djhnkl 9179634
Jan 21, 2011
Pictures most always make everything easier to make. Sometimes things are just hard to imagine and are very easy if one can see exactly how they are done. Please include pictures with your suggestions. Thanks!
Netagene
Jan 21, 2011
To Christie, et al - My mother (she'll be 94 this March) also used wallpaper sample books and round toothpicks. She cut the strips the full length of the book (about 12 - 15") and an inch wide, and alternated them so that she would get more to a page. The way to use the toothpicks and not have them stick is to put a very thin coat of glue on only the last 2 or 3". She then "sealed" them with clear nail polish (sometimes the kind with glitter in it) and let them dry by standing them (still on the toothpicks) in a piece of styrofoam or florist stuff. She also added all sorts of beads and strung them on monofilament (fishing line) to which she added a drop of super glue because the monofilament tends to come undone.
Dosidobev
Mar 10, 2010
I had done this as a middle school student years ago and used round toothpicks to wind the triangles around and then as directed above glue and clear nail polish to make them shiney and somewhat moisture proof. In those days, the longer the better. I think we used butcher cord, not sure.
Pugi
Jan 02, 2010
I have written a craft column for our local paper for several years (before that I was a computer journalist and a "real" journalist. I have a hard and fast policy against suggesting any project from the Web that does not have pictures -- and, as in this case, no speciofic measurements. 6"x1" triangles will work. There are instructions for making your own template on About.com at httpfamilycrafts.about.comodmakingbeadssspaperbeads3.htm. If you Google paper beads template, you'll have more than enough information!
Arahnemis
Jan 02, 2010
I achieved great results with 4 inches long triangles. (2 inches bottom, 1 inch top). You can also use rectangles for cylindrical beads, and alternate them.
Christie Lamb
Jan 02, 2010
My grandmother used to make these beads. She used retired wallpaper sample books and greeting cards too. She strung the finished beads on dental floss and mixed in pony beads and smaller gold and silvertone beads with the beads she made. She gave each of her daughters a necklace she made and they have become cherished momentos since her passing.
Becci
Jan 02, 2010
True that a picture would be nice, but 'crafter 14414' could have been nicer saying so. There are many photos online to see what the beads will look like when complete. Thank you to whoever the creative designerauthor was of this craft.
Member 14414
Dec 25, 2009
I would never be interested or attempt to this or any other craft without seeing a picture first. Directions only are useless.
lauragalbraithrn
Dec 25, 2009
this is a great idea but i wish there was a picture to go with it because i am a very visual person it makes it easier to follow the instructions
Report Inappropriate Comment
Are you sure you would like to report this comment? It will be flagged for our moderators to take action.
Thank you for taking the time to improve the content on our site.