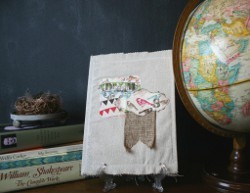
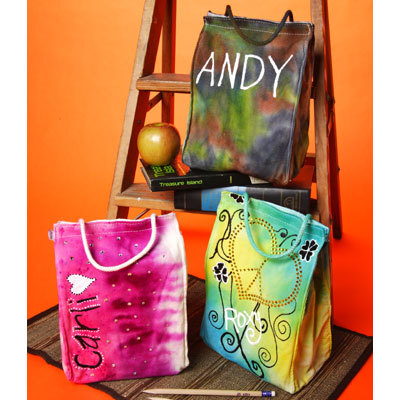
Tie Dye Lunch Bags
Decorate your reusable lunch bag with tie-dye and embellishments such as iron-on crystals. Your lunch bag with be the envy of the cafeteria. This tie-dye project from I Love to Create is a great back to school craft project.
Find this project and many more in our free eBook, How to Make Tie Dye Shirts, Decor, and More: 18 Tie Dye Patterns!

Materials:
-
Tulip® One-Step Fashion Dye™
|Fuchsia
Purple
Turquoise
Yellow
-
Tulip® 3D Fashion Paint
65000 White
65038 Black
-
Tulip® One-Step Tie-Dye Kits™
Camo Colors
- Tulip® Surface Cover™
- Tulip® Glam-It-Up!™ Fashion Art Tweezers™
- Tulip® Cordless Heat Setting Tool™
-
Tulip® Glam-It-Up!™ Iron-On Fashion Designs™
26863 Large Peace Pack
-
Tulip® Glam-It-Up!™ Iron-On Crystals™
200 Pack
- Paper Towels
- Pressing cloth
- Chalk pencil (optional)
- Cotton lunch bags: www.reusablebags.com
- Iron
Instructions:
Peace of My Heart Lunch Bag
-
Prewash bag by hand or on gentle cycle in washing machine.
-
Cover work surface with Tulip® Surface Cover™. Lay damp bag on prepared surface.
-
Wearing plastic gloves, add water to Yellow and Turquoise dye bottles. Replace caps tightly and shake until dye is dissolved.
-
Squeeze Yellow dye diagonally across middle section of bag. Squeeze Turquoise onto top and bottom corners. Refer to photo.
-
Cover bag with Surface Cover. Let sit 4 to 6 hours. Wash in a large load of water with a small amount of laundry soap. Line dry.
-
Preheat dry iron to wool setting. Peel backing from design. Position on lunch bag, plastic side up, then cover with pressing cloth. Press and hold iron over design for 45-60 seconds. Let cool. Remove plastic.
-
If desired, first use chalk pencil to write name and create swirling designs and flowers around Iron-On Design™. Start flow of Black Slick 3D Fashion Paint™ on a paper towel, applying an even pressure on bottle for a smooth line. Use Black Slick to cover over (or create) swirl designs and to color in flowers. Cover name and outline flowers with White Slick. Let dry.
Camo Time Lunchbag
-
Prewash bag by hand or on gentle cycle in washing machine.
-
Cover work surface with Tulip® Surface Cover™. Lay damp bag on prepared surface.
-
Wearing plastic gloves, add water to Camo kit dye bottles. Replace caps tightly and shake until dye is dissolved.
-
Squeeze out each color of dye randomly onto damp bag. Refer to photo.
-
Cover bag with Surface Cover. Let sit 4 to 6 hours. Wash in a large load of water with a small amount of laundry soap. Line dry.
-
Use chalk pencil to write name on bag. Start flow of White Slick 3D Fashion Paint™ on a paper towel, applying an even pressure on bottle for a smooth line. Trace over name with paint. Let dry.
Scrumptious Sparkle Lunch Bag
-
Prewash bag by hand or on gentle cycle in washing machine.
-
Cover work surface with Tulip® Surface Cover™. Lay damp bag on prepared surface.
-
Wearing plastic gloves, add water to Fuchsia and Purple dye bottles. Replace caps tightly and shake until dye is dissolved.
-
Squeeze Purple dye onto left side of bag, then squeeze Fuchsia onto the middle section. Leave the right side of bag uncolored. Refer to photo.
-
Cover bag with Surface Cover and let sit 4 to 6 hours. Wash in a large load of water with a small amount of laundry soap. Line dry.
-
If desired, write name on bag where desired with chalk pencil, then draw heart or favorite design. Start flow of Black Slick 3D Fashion Paint™ on a paper towel, applying an even pressure on bottle for a smooth line. Cover over chalk pencil or freehand write name onto bag. Use White Slick to create dots around letters and to fill in heart. Outline heart with Black Slick. Let dry.
- Use Fashion Art Tweezers™ to place crystals randomly on front of bag. Use Cordless Heat-Setting Tool™ to adhere crystals in place according to package instructions.
Read NextTeacher Appreciation Printable Art
Your Recently Viewed Projects
Thanks for your comment. Don't forget to share!
Report Inappropriate Comment
Are you sure you would like to report this comment? It will be flagged for our moderators to take action.
Thank you for taking the time to improve the content on our site.