Wraparound Sewn Onesie Pattern
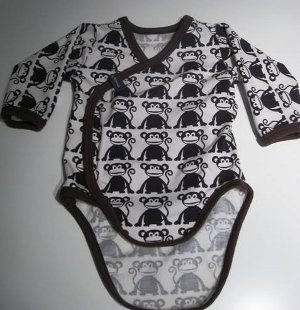
When you follow this Wraparound Sewn Onesie Pattern, you can rest assured you're creating the cutest outfit ever. Sewing patterns for baby don't get much more adorable than this simple DIY creation. Don't settle for generic store-bought duds for your precious little one - use jersey fabric (make sure it has a cute print) to construct your piece. Free baby sewing patterns are perfect for new mommies or anyone looking for a quick and fun baby shower gift to make.
Primary TechniqueSewing

Sewn byMachine
Materials:
- 1/4 meter jersey/interlock
- Ribb/Interlock to the fabric edges
- Sewing machine
- Jersey press-on buttons
Instructions:
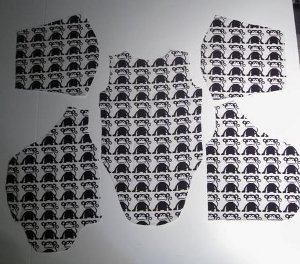
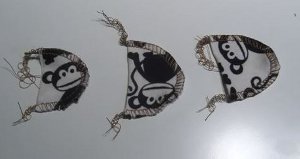
- Cut out all the pieces.
- Then you sew together the shoulder seams. Make sure you add the correct section of each pice directly against each other.

- Cut out a 4 cm strip to make the edges.

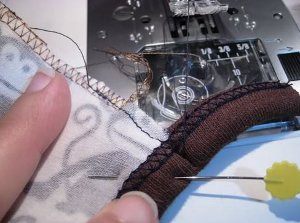
- Sewing the strip on with my cover. Up the one side, the neck and down the other side. If you just have an regular sewing macine you can sew it on like biastape but stretch it when you sew it on the first time along the edges.

- What it will look like when you are done.

- Edge the bottompiece.

- Sew the shoulder seam.

- And edge the other sleeves. (If you rather want to sew it up, remember to add this in the sleeve pattern).

- Now, make this: Fold the fabric pieces together and sew around, or pull out if you don’t have overlock. Make 3 pieces. These will sit in the side seams as reinforcement where you insert pressonbuttons on the inside.
- Pin them onto the wraps as shown here. 2 pieces on the inner wrap ....

- ...and one on the outer wrap.

- Sew the side seams and sideseams on the sleeves at once. (Do not sew all the way out on the edge, starting and stopping about 2cm from both ends).

- And now a little trick with the fabric edges. Sew straightstitch by starting at the seam that is almost completed, and sew along the edges. (Black threads here) Pin together just to make sure it will not move when you sew.
- Then you fold edges to each side and sew two seams from the front side.

- Now cut away the excess edges. Voila now you have a good ending that not makes a big lump in the sleeves and they doesn’t meet skewed at eachother, which it often does because it is so thick there. If you sew with a regular machine, you can of course sew all the way at once and do the same.

- Turn the inside out and tadaaa you have made a wraparound body.
Read NextOrton Overalls
Your Recently Viewed Projects
Thanks for your comment. Don't forget to share!
mansfieldb 7272465
Jun 30, 2015
Details on how to make the onsie is presented, but no link to a pattern visible
FaveCrafts Editor JL
Jul 01, 2015
Hi there, unfortunately this pattern is available for purchase only. It can be found of the designer's site - http://bit.ly/1U7MjLk. Sorry for the confusion - Julia from FaveCrafts
wiharubh 4326271
Jul 12, 2014
Yes, the instructions talk about cutting out the pattern pieces, but I can't find any pattern to cut out. Is there supposed to be one included? I am getting ready to have a great grandson and would love to make some of these.
Report Inappropriate Comment
Are you sure you would like to report this comment? It will be flagged for our moderators to take action.
Thank you for taking the time to improve the content on our site.