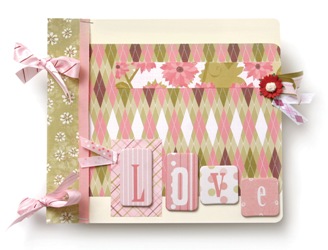
Chatterbox Love Scrapbook Album
Create this beautiful scrapbook to hold your memories or to give to a loved one. This is a great present for a birthday, anniversary, or just to show someone you care.
Materials:
- Memory Book Glue Dots on Sheets
- Tim Holtz Distressed Ink By Ranger
- Fiskars Corner Egders Scissors
- 8x8 Chatterbox Cream Refill Inserts
- Chatterbox Rosey Decorative Ribbon
- Chatterbox Rosey Embellishment Pack
-
Nook Papers used:
-
One- 3"x8.5", Garden Argyle
-
One- 6"x8", Garden Argyle
-
One- 3"x5", Light Orchard Blossom
-
One- 1"x6.5", Light Orchard Blossom
-
One- 2"x3", Rosey Nook Plaid
-
Two- 3"x8.5", Rosey Nook Plaid
-
One- 3"x4", Nook Stripe
-
Two- 3"x8.5", Nook Stripe
-
Two- 3"x8.5", Olive Nook Blossom
-
Two- 3"x8.5", Rosey Garden Floral
-
- Using corner rounder, round the 2 sides (same side) of the 6x8 Garden Argyle Paper. Ink edges of all papers.
Step 1
Using Memory Book Glue Dots, adhere 1"x6.5" Light Orchard Blossom Paper to Argyle paper about 1" down from top. Cut 3 Coordinating Ribbon 3" long.
Step 2
Fold two ribbons in half and staple to 6"x8" Garden Argyle Paper (the 6" side that has the rounded corners). Fold third ribbon and staple to lower left hand side of 2"x3" Rosey Nook Plaid.
Step 3
Adhere papers to one cream refill page with Memory Book Glue Dots. Fold in half one 3"x8.5" Olive Nook Blossom and adhere it to the left side of the cream refill page with Memory Book Glue Dots (covering holes and ribbon binding).
Step 4
Re-punch holes through Green floral paper. Adhere Flower, Alphabet Chipboard Pieces and Ribbon using Memory Book Glue Dots. (Ribbon runs vertically overlapping both the green floral and the argyle paper). Staple in Place.
Step 5
To create inside pages, fold one, 3"x8.5" Rosey Garden Floral in half and adhere over right hand side of blank Cream Refill Page.
Step 6
Cut one, 3" coordinating Ribbon and staple to 3"x4" Nook Stripe paper on left-hand side. Adhere the 3"x5" Light Orchard Blossom onto page then overlap and adhere Nook Stripe paper onto page using Memory Book Glue Dots.
Step 7
Using the same technique as the first page and this page, fold all of your 3"x8.5" (except Olive Nook Blossom) papers and with Memory Book Glue Dots, adhere the remaining blank Cream Refill Pages over the right hand edges.
Step 8
On the last page, also adhere the last 3"x8.5" Olive Nook Blossom to left hand side of page, covering holes and ribbon binding. Re-punch holes as you did on the cover and on the BACK side of the page, adhere and staple ribbon piece to cover. Round all of the right-hand corneres of the refill pages.
Step 9
To finish, layer all of the Cream Refill pieces on top of each other (starting with cover first, then inside page, then the rest of your pages and finally the last page) and tie ribbon through each set of holes.
Your Recently Viewed Projects


Thanks for your comment. Don't forget to share!
Report Inappropriate Comment
Are you sure you would like to report this comment? It will be flagged for our moderators to take action.
Thank you for taking the time to improve the content on our site.