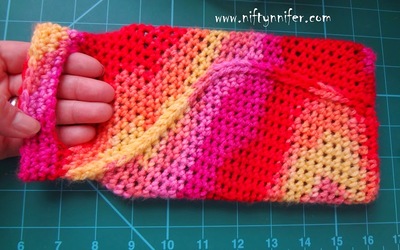
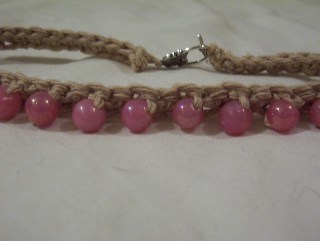
Cotton Candy Dreams Crocheted Cuff

Add a splash of color to your favorite outfit wit this Cotton Candy Dreams Crocheted Cuff. Made up of crocheted circles in a variety of colors, this crocheted bracelet is great for using up yarn scraps. You could even use this same technique to create an amazing statement necklace. Simple enough for beginning crochet fans, this handmade bracelet is great to wear no matter what the season, and it also makes a wonderful gift for a family member or friend. Show off your awesome crochet skills with this cute and colorful Cotton Candy Dreams Crocheted Cuff.
Primary TechniqueCrochet

Crochet HookF/5 or 3.75 mm hook
Materials:
- 3.75 crochet hook
- Various yarn scraps (or BonBons yarn)
- Cabone circles
Instructions:
- Begin with a slip knot on your hook.
- Push the hook down through the circle. Grab the yarn and bring it back up through the loop to where you started so you have two loops on your hook. Grab the yarn again and pull it through both loops so that you’re back down to one loop left on the hook. You’ve just made a single crochet stitch. Now do that over and over again until you’ve covered the whole cabone with neat little stitches.


- When you meet back up with where you started you’ll need to join your circle together. If you have a favorite way of doing then, go for it. I just made another single crochet stitch by pushing my hook through one of my first stitches, grabbing the yarn, and then pulling through the loops as usual. Snip your thread and pull it tight, leaving about a two inch tail.

- For your second ring and every ring after, you’ll start it just the same way. You always want to get your crocheting started before you reach a point where you’d have to join it to another ring, even if that’s only a few stitches.

- Hold the rings how you want them to be arranged on the bracelet. Once you reach a point where they’ll join up, begin just as you would a single crochet stitch. Push your hook down through the center of the ring, but when you come back up the other side, come up through one of the stitches on the other ring. Then grab the thread and pull it back up to the front and finish your single crochet as normal.

- Repeat this everywhere your rings touch, but to keep it good and stable I’d recommend at least three stitches to join each ring. When you’re all done weave in all your ends and snip off whatever threads remain.

- Once you have your whole bracelet put together the way you want it, you’ll need a way to keep it on your wrist. Luckily those cabones make perfect toggle closures all on their own, you just have to add the toggle part of it. On my last ring I joined the circle together as usual and then instead of snipping the thread I chained a few stitches. Then I threaded the yarn through the toggle and tied a great big knot.

Your Recently Viewed Projects

Thanks for your comment. Don't forget to share!
princess6860504
May 01, 2017
I just added this very unique hand crafted bracelet to my saved projects tab. I find this very interesting, indeed! I have never seen anything like this before. And it is actually SO simple to make. I love my Bon Bons yarn from Lion Brand, and this here is another inventive way to use some.
Report Inappropriate Comment
Are you sure you would like to report this comment? It will be flagged for our moderators to take action.
Thank you for taking the time to improve the content on our site.