Plus Size Knit Cardigan Pattern

Hey, your closet called... This plus size knit cardigan pattern will help you create your own handmade hug that you'll never want to take off. Whoever said you couldn't stay warm and look cute doing it, clearly never encountered a knitted sweater quite like this before. With a thick and sumptuous fabric and a hemline that ends just at the knee, a fashion-forward sweater like this won't just turn heads while you're walking down the street; it will help you stay cozy during the harsh winter months.
Cable knitting patterns tend to get a bad rep for being reserved only for the most advanced knitters. The intricate twisted and braided design adds a unique look and feel to all of your knits capable of turning a simple knit sweater pattern into a more timeless article of clothing. All you need is a little bit of time, patience, and determination. So, what are you waiting for? Add this cable knit cardigan pattern to your TBK (that means, "To Be Knit," knitters c; ) List and get ready to make a garment that embodies luxurious comfort, chic style, and delicate warmth.

Knitting Needle Size9 or 5.5 mm, Circular Knitting Needles
Yarn Weight(4) Medium Weight/Worsted Weight and Aran (16-20 stitches to 4 inches)
Gauge16 sts + 22 rows = about 4 in. (10 cm) in St st (k on RS, p on WS).
11 sts = 1 1/2 in. (4 cm) in Right Cable pattern.
BE SURE TO CHECK YOUR GAUGE.
Materials List
- LION BRAND® HEARTLAND® (Art. #136) #147 Hot Springs 6 (7, 7, 8) balls (or color of your choice)
- Circular knitting needle size 9 (5.5 mm), 36 in. (91.5 cm) long
- LION BRAND® cable needle
- LION BRAND® split ring stitch markers
- LION BRAND® stitch holders
- LION BRAND® large-eyed blunt needle
- One spare size 9 (5.5 mm) knitting needle, for 3-Needle Bind Of
- Cable Stitch Pattern Diagram
SIZE
Adult (Multiple Sizes) - Curvy Girl 1 (2, 3, 4)
Finished Bust 48 (52, 56, 60) in. (122 (132, 142, 152.5) cm), closed
Finished Hips 52 (56, 60, 64) in. (132 (142, 152.5, 162.5) cm)
Finished Length 34 (34 1/2, 35, 35 1/2) in. (86.5 (87.5, 89, 90) cm)
Note: Pattern is written for smallest size with changes for larger sizes in parentheses. When only one number is given, it applies to all sizes. To follow pattern more easily, circle all numbers pertaining to your size before beginning.
NOTES
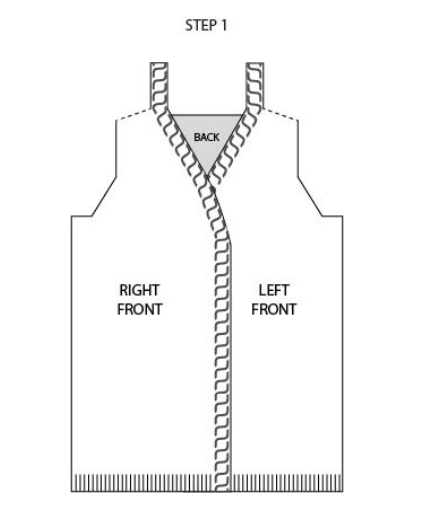
- Cardigan is made in 5 pieces: Back, Right Front, Left Front, and 2 Sleeves.
- The circular needle is used to accommodate the large number of sts. Work back and forth on circular needle just as if working on straight needles.
- The Back is worked in Stockinette stitch (k on the RS and p on the WS) with a ribbed lower edge.
- Decreases are worked on each side edge of the Back – but not on the Fronts. We found that this created a more flattering shape.
- The Fronts begin with a ribbed edge, then continue in Stockinette stitch with a cabled band along both center front edges.
- These cable bands are made longer than the Fronts. Later, this extra length becomes the back neckband.
- Each Sleeve is made by working a cable band, then picking up stitches for the Sleeve along one side of the band. The cable band is the lower edge of the Sleeve.
- For a balanced design, we used both Left and Right cables. Both cables are super easy to do – just be sure to follow the specific pattern for the cable you should be working!
- Cables can be worked from the written instructions or by following the charts. When working from the charts, read RS rows from right to left and WS rows from left to right.
- This pattern includes some knitter’s lingo. When the pattern says to ‘work even’ this means that you continue in the specified st or pattern and keep the number of sts the same – without increasing or decreasing. When you see ‘– 12 sts’ at the end of a sentence, this is the number of sts you will have after working that row.
- Our pattern includes diagrams to help you visualize how the Cardigan is made and put together. Take the time to review the diagrams before you start knitting. The Cardigan is easy to make, but having the big picture will make it even easier!
STITCH EXPLANATIONS
4/4 LC (4 over 4 left cross) Slip 4 sts to cable needle and hold in front, k4, then k4 from cable needle.
4/4 RC (4 over 4 right cross) Slip 4 sts to cable needle and hold in back, k4, then k4 from cable needle.
M1 (make 1) An increase made by lifting the horizontal strand lying between needles and placing it onto the left needle. Knit this new stitch through the back loop – 1 st increased.
ssk (slip, slip, knit) Slip next 2 sts as if to knit, one at a time, to right needle; insert left needle into fronts of these 2 sts and knit them tog – 1 st decreased.
PATTERN STITCHES
K1, p1 Rib (worked over an odd number of sts)
Row 1 (RS): K1, *p1, k1; rep from * to end of row.
Row 2: K the knit sts and p the purl sts.
Rep Row 2 for K1, p1 Rib.
Right Cable (worked over 11 sts)
Rows 1 and 3 (RS): P2, k8, p1.
Row 2 and all WS Rows: K1, p8, k2.
Row 5: P2, 4/4 RC, p1.
Rows 7, 9 and 11: Rep Row 1.
Row 12: Rep Row 2.
Rep Rows 1-12 for Right Cable pattern.
Left Cable (worked over 11 sts)
Rows 1 and 3 (RS): P1, k8, p2.
Row 2 and all WS Rows: K2, p8, k1.
Row 5: P1, 4/4 LC, p2.
Rows 7, 9 and 11: Rep Row 1.
Row 12: Rep Row 2.
Rep Rows 1-12 for Left Cable pattern.
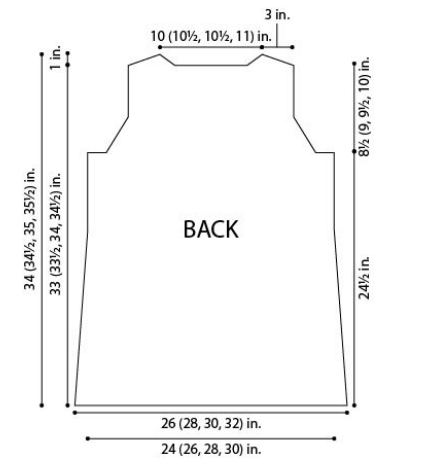
BACK
Cast on 105 (113, 121, 129) sts.
Rows 1-8: Work in K1, p1 Rib for 8 rows.
Row 9 (RS): K51 (55, 59, 63), k2tog, k to end of row – at the end of this row you will have 104 (112, 120, 128) sts. Purl one row, then continue in St st (k on RS, p on WS) until piece measures about 8 in. (20.5 cm) from beg, end with a WS (purl) row as the last row you work.
Shape Sides
- Decrease Row (RS): K1, ssk, k to the last 3 sts, k2tog, k1 – 102 (110, 118, 126) sts.
- Continue in St st until piece measures 11 in. (28 cm) from beg, end with a WS row as the last row you work, then rep the Decrease Row – 100 (108, 116, 124) sts.
- Continue in St st until piece measures 14 in. (35.5 cm) from beg, end with a WS row as the last row you work, then rep the
- Decrease Row – 98 (106, 114, 122) sts.
- Continue in St st until piece measures 17 in. (43 cm) from beg, end with a WS row as the last row you work, then rep the Decrease Row – 96 (104, 112, 120) sts.
- Work even (without any more decreasing) in St st until piece measures about 24 1/2 in. (62 cm) from beg, end with a WS row as the last row you work.
Shape Armholes
- Row 1 (RS): Bind off 7 (8, 10, 11) sts, k to end of row – 89 (96, 102, 109) sts.
- Row 2: Bind off 7 (8, 10, 11) sts, p to end of row – 82 (88, 92, 98) sts.
- Row 3 (Decrease Row): K1, ssk, k to last 3 sts, k2tog, k1 – 80 (86, 90, 96) sts.
- Row 4: Purl.
- Rep last 2 rows 8 (10, 12, 14) more times – 64 (66, 66, 68) sts.
- Work even in St st until armholes measure about 8 1/2 (9, 9 1/2, 10) in. (21.5 (23, 24, 25.5) cm), end with a WS row as the last row you work.
Shape Neck and Shoulders
- In the next row, you’ll be binding off sts for the back neck, then working the left and right shoulders separately with separate balls of yarn. After the back neck bind off, you’ll be working neck and shoulder shaping AT THE SAME TIME – just keep careful track of where you are in the pattern and you’ll find that this is easy to do!
- Place a marker on each side of the center 28 (30, 30, 32) sts on your needle.
- Row 1 (RS): Bind off 4 sts, k to first marker, remove marker, join a 2nd ball of yarn and bind off next 28 (30, 30, 32) sts, removing 2nd marker when you come to it, k to end of row – 14 sts on right shoulder and 18 sts on left shoulder.
- From this point on, you’ll be working both shoulders AT THE SAME TIME using separate balls of yarn.
- Row 2: On first side, bind off 4 sts, p to end of side; on 2nd side, bind off 2 sts, p to end of side – 14 sts on left shoulder and 12 sts on right shoulder.
- Row 3: On first side bind off 4 sts, k to end of side; on 2nd side, bind off 2 sts, k to end of side – 8 sts on right shoulder and 12 sts on left shoulder.
- Row 4: On first side, bind off 4 sts, p to end of side; on 2nd side, bind off 4 sts, p to end of side – 8 sts on left shoulder and 4 sts on right shoulder.
- Row 5: On first side, bind off rem 4 sts; on 2nd side, bind off 4 sts, k to end of side – 4 sts rem on left shoulder only. Bind off rem 4 sts of left shoulder.
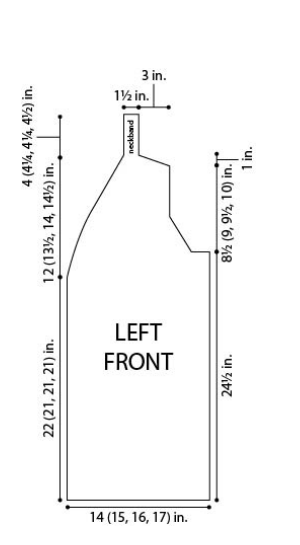
LEFT FRONT
On the first 8 rows of the Left Front, you’ll be working the Left Cable at the front edge and the rem sts in K1, p1 Rib. In the instructions below, the rib is spelled out for you because it’s set up a bit differently than on the Back.
- Cast on 61 (65, 69, 73) sts.
- Row 1 (RS): *P1, k1; rep from * to last 11 sts, place marker (pm), work Row 1 of Left Cable pattern over last 11 sts.
- Row 2: Work Row 2 of Left Cable pattern to marker, slip marker (sm), k the knit sts and p the purl sts across to end of row.
- Row 3: K the knit sts and p the purl sts to marker, sm, work next row of Left Cable pattern to end of row.
- Row 4: Work next row of Left Cable pattern to marker, sm, k the knit sts and p the purl sts across to end of row.
- Rows 5-8: Rep Rows 3 and 4 twice.
- Row 9: Knit to marker, sm, work next row of Left Cable pattern to end of row.
- Row 10 (WS): Work next row of Left Cable pattern to marker, sm, work in St st to end of row.
- Rep Rows 9 and 10, working Left Cable pattern over 11 front edge sts and St st over rem sts, until piece measures about 22 (21, 21, 21) in. (56 (53.5, 53.5, 53.5) cm) from beg, end with a WS row as the last row you work.
Shape V-Neck
- Row 1 (Neck Decrease Row – RS): K to 3 sts before marker, k2tog, k1, sm, work Left Cable pattern to end of row – 60 (64, 68, 72) sts.
- Row 2: Work Left Cable pattern to marker, sm, p to end of row.
- Row 3: K to marker, sm, work Left Cable pattern to end of row.
- Row 4: Rep Row 2.
- Row 5: Rep Row 1 – 59 (63, 67, 71) sts. Rep last 4 rows 2 (3, 3, 3) more times – 57 (60, 64, 68) sts, then rep Row 2 once more.
Shape Armhole and continue V-Neck Shaping
To make this part of the pattern clear, we’ve divided the instructions into separate sections – one for each size. Be sure to follow the specific instructions for the size you are making.
-
Size 1 ONLY
Row 1 (RS): Bind off 7 sts, k to marker, sm, work Left Cable pattern to end of row – 50 sts.
Row 2: Work Left Cable pattern to marker, sm, p to end of row.
Row 3 (Neck and Armhole Decrease Row – RS): K1, ssk, k to 3 sts before marker, k2tog, k1, sm, work Left Cable pattern to end of row – 48 sts.
Row 4: Rep Row 2.
Row 5 (Armhole Decrease Row – RS): K1, ssk, k to marker, sm, work Left Cable pattern to end of row – 47 sts.
Rows 6-17: Rep Rows 2-5 three more times – 38 sts.
Rows 18 and 19: Rep Rows 2 and 3 – 36 sts.
Row 20: Rep Row 2.
Row 21: K to marker, sm, work Left Cable pattern to end of row.
Row 22: Rep Row 2.
Row 23 (Neck Decrease Row): K to 3 sts before marker, k2tog, k1, sm, work Left Cable pattern to end of row – 35 sts.
Rep Rows 22 and 23 twelve more times – 23 sts.
Keeping 11 front sts in Left Cable pattern and rem sts in St st, work until armhole measures about 8 1/2 in. (21.5 cm), end with a WS row as the last row you work.
Now, continue following the pattern, beginning at Shape Shoulder (below). -
Size 2 ONLY
Row 1 (RS): Bind off 8 sts, k to marker, sm, work Left Cable pattern to end of row – 52 sts.
Row 2: Work Left Cable pattern to marker, sm, p to end of row.
Row 3 (Neck and Armhole Decrease Row – RS): K1, ssk, k to 3 sts before marker, k2tog, k1, sm, work Left Cable pattern to end of row – 50 sts.
Row 4: Rep Row 2.
Row 5 (Armhole Decrease Row – RS): K1, ssk, k to marker, sm, work Left Cable pattern to end of row – 49 sts.
Rows 6-21: Rep Rows 2-5 four more times – 37 sts.
Rows 22 and 23: Rep Rows 2 and 3 – 35 sts.
Row 24: Rep Row 2.
Row 25: K to marker, sm, work Left Cable pattern to end of row.
Row 26: Rep Row 2.
Row 27 (Neck Decrease Row): K to 3 sts before marker, k2tog, k1, sm, work Left Cable pattern to end of row – 34 sts.
Rep Rows 26 and 27 eleven more times – 23 sts.
Keeping 11 front sts in Left Cable pattern and rem sts in St st, work until armhole measures about 9 in. (23 cm), end with a WS row as the last row you work.
Now, continue following the pattern, beginning at Shape Shoulder (below). -
Size 3 ONLY
Row 1 (RS): Bind off 10 sts, k to marker, sm, work Left Cable
pattern to end of row – 54 sts.
Row 2: Work Left Cable pattern to marker, sm, p to end of row.
Row 3 (Neck and Armhole Decrease Row – RS): K1, ssk, k to 3 sts before marker, k2tog, k1, sm, work Left Cable pattern to end of row – 52 sts.
Row 4: Rep Row 2.
Row 5 (Armhole Decrease Row – RS): K1, ssk, k to marker, sm, work Left Cable pattern to end of row – 51 sts.
Rows 6-25: Rep Rows 2-5 five more times – 36 sts.
Rows 26 and 27: Rep Rows 2 and 3 – 34 sts.
Row 28: Rep Row 2.
Row 29: K to marker, sm, work Left Cable pattern to end of row.
Row 30: Rep Row 2.
Row 31 (Neck Decrease Row): K to 3 sts before marker, k2tog, k1, sm, work Left Cable pattern to end of row – 33 sts.
Rep Rows 30 and 31 ten more times – 23 sts.
Keeping 11 front sts in Left Cable pattern and rem sts in St st, work until armhole measures about 9 1/2 in. (24 cm), end with a WS row as the last row you work.
Now, continue following the pattern, beginning at Shape Shoulder (below). -
Size 4 ONLY
Row 1 (RS): Bind off 11 sts, k to marker, sm, work Left Cable pattern to end of row – 57 sts.
Row 2: Work Left Cable pattern to marker, sm, p to end of row.
Row 3 (Neck and Armhole Decrease Row – RS): K1, ssk, k to 3 sts before marker, k2tog, k1, sm, work Left Cable pattern to end of row – 55 sts.
Row 4: Rep Row 2.
Row 5 (Armhole Decrease Row – RS): K1, ssk, k to marker, sm, work Left Cable pattern to end of row – 54 sts.
Rows 6-29: Rep Rows 2-5 six more times – 36 sts.
Rows 30 and 31: Rep Rows 2 and 3 – 34 sts.
Row 32: Rep Row 2.
Row 33: K to marker, sm, work Left Cable pattern to end of row.
Row 34: Rep Row 2.
Row 35 (Neck Decrease Row): K to 3 sts before marker, k2tog, k1, sm, work Left Cable pattern to end of row – 33 sts.
Rep Rows 34 and 35 ten more times – 23 sts. Keeping 11 front sts in Left Cable pattern and rem sts in St st, work until armhole measures about 10 in. (25.5 cm), end with a WS row as the last row you work.
Now, continue following the pattern, beginning at Shape Shoulder (below).
Shape Shoulder – ALL Sizes
- Row 1 (RS): Bind off 4 sts, k to marker, sm, work Left Cable pattern to end of row – 19 sts.
- Row 2: Work Left Cable pattern to marker, sm, p to end of row.
- Row 3: Rep Row 1 – 15 sts.
- Row 4: Rep Row 2.
- Row 5: Bind off 4 sts, removing marker as you come to it, work Left Cable pattern to end of row – 11 sts.
- Row 6: Work Left Cable pattern across 11 rem sts, cast on 1 extra st – 12 sts. Place a marker on this row for beginning of neckband.
Neckband
For the neckband, you’ll just be working on these 12 sts to make the neckband, extending away from the front shoulder. Refer to the diagram to see how this piece should look. You’ll be continuing the Left Cable pattern on 11 of the sts and working the 12th st in St st. This 12th st is an edge st, and will be used when you sew the neckband to the back neck of the Cardigan.
- Row 1 (RS): K1, work next row of Left Cable pattern to end of row.
- Row 2: Work next row of Left Cable pattern across 11 sts, p1. Rep Rows 1 and 2 until neckband strip measures about 4 (4 1/4, 4 1/4, 4 1/2) in. (10 (11, 11, 11.5) cm) from marker.
- Remove marker and place sts onto a st holder.
RIGHT FRONT
- Cast on 61 (65, 69, 73) sts.
- Row 1 (RS): Work Row 1 of Right Cable pattern over first 11 sts, pm, *k1, p1; rep from * to end of row.
- Row 2: K the knit sts and p the purl sts to marker, sm, work Row 2 of Right Cable pattern across to end of row.
- Row 3: Work next row of Right Cable pattern to marker, sm, k the knit sts and p the purl sts across to end of row.
- Row 4: K the knit sts and p the purl sts to marker, sm, work next row of Right Cable pattern to end of row.
- Rows 5-8: Rep Rows 3 and 4 twice.
- Row 9: Work next row of Right Cable pattern to marker, sm, knit to end of row.
- Row 10: Work in St st as established to marker, sm, work next row of Right Cable pattern to end of row.
- Rep Rows 9 and 10, working Right Cable pattern over 11 front edge sts and St st over rem sts, until piece measures about 22 (21, 21, 21) in. (56 (53.5, 53.5, 53.5) cm) from beg, end with a WS row as the last row you work.
Shape V-Neck
- Row 1 (Neck Decrease Row – RS): Work Right Cable pattern to marker, sm, k1, ssk, k to end of row – 60 (64, 68, 72) sts.
- Row 2: P to marker, sm, work Right Cable pattern to end of row.
- Row 3: Work Right Cable pattern to marker, sm, k to end of row.
- Row 4: Rep Row 2.
- Row 5: Rep Row 1 – 59 (63, 67, 71) sts.
- Rep last 4 rows 2 (3, 3, 3) more times – 57 (60, 64, 68) sts.
Shape Armhole and continue V-Neck Shaping
To make this part of the pattern clear, we’ve divided the instructions into separate sections – one for each size. Be sure to follow the specific instructions for the size you are making.
-
Size 1 ONLY
Row 1 (WS): Bind off 7 sts, p to marker, sm, work Right Cable pattern to end of row – 50 sts.
Row 2 (Armhole Decrease Row – RS): Work Right Cable pattern to marker, sm, k to last 3 sts, k2tog, k1 – 49 sts.
Row 3: P to marker, sm, work Right Cable pattern to end of row.
Row 4 (Neck and Armhole Decrease Row – RS): Work Right Cable pattern to marker, sm, k1, ssk, k to last 3 sts, k2tog, k1 – 47 sts.
Row 5: Rep Row 3.
Rows 6-17: Rep Rows 2-5 three more times – 38 sts.
Row 18: Rep Row 2 – 37 sts.
Row 19: Rep Row 3.
Row 20 (Neck Decrease Row): Work Right Cable pattern to marker, sm, k1, ssk, k to end of row – 36 sts.
Row 21: Rep Row 3.
Row 22: Work Right Cable pattern to marker, sm, k to end of row.
Row 23: Rep Row 3.
Row 24: Rep Row 20 – 35 sts.
Rep Rows 23 and 24 twelve more times – 23 sts.
Keeping 11 front edge sts in Right Cable pattern and rem sts in St st, work even until armhole measures about 8 1/2 in. (21.5 cm), end with a RS row as the last row you work. Now, continue following the pattern, beginning at Shape Shoulder (below). -
Size 2 ONLY
Row 1 (WS): Bind off 8 sts, p to marker, sm, work Right Cable pattern to end of row – 52 sts.
Row 2 (Armhole Decrease Row – RS): Work Right Cable pattern to marker, sm, k to last 3 sts, k2tog, k1 – 51 sts.
Row 3: P to marker, sm, work Right Cable pattern to end of row.
Row 4 (Neck and Armhole Decrease Row – RS): Work Right Cable pattern to marker, sm, k1, ssk, k to last 3 sts, k2tog, k1 – 49 sts.
Row 5: Rep Row 3.
Rows 6-21: Rep Rows 2-5 four more times – 37 sts.
Row 22: Rep Row 2 – 36 sts.
Row 23: Rep Row 3.
Row 24 (Neck Decrease Row): Work Right Cable pattern to marker, sm, k1, ssk, k to end of row – 35 sts.
Row 25: Rep Row 3.
Row 26: Work Right Cable pattern to marker, sm, k to end of row.
Row 27: Rep Row 3.
Row 28: Rep Row 24 – 34 sts.
Rep Rows 27 and 28 eleven more times – 23 sts.
Keeping 11 front edge sts in Right Cable pattern and rem sts in St st, work even until armhole measures about 9 in. (23 cm), end with a RS row as the last row you work.
Now, continue following the pattern, beginning at Shape Shoulder (below). -
Size 3 ONLY
Row 1 (WS): Bind off 10 sts, p to marker, sm, work Right Cable pattern to end of row – 54 sts.
Row 2 (Armhole Decrease Row – RS): Work Right Cable pattern to marker, sm, k to last 3 sts, k2tog, k1 – 53 sts.
Row 3: P to marker, sm, work Right Cable pattern to end of row.
Row 4 (Neck and Armhole Decrease Row – RS): Work Right Cable pattern to marker, sm, k1, ssk, k to last 3 sts, k2tog, k1 – 51 sts.
Row 5: Rep Row 3.
Rows 6-25: Rep Rows 2-5 five more times – 36 sts.
Row 26: Rep Row 2 – 35 sts.
Row 27: Rep Row 3.
Row 28 (Neck Decrease Row): Work Right Cable pattern to marker, sm, k1, ssk, k to end of row – 34 sts.
Row 29: Rep Row 3.
Row 30: Work Right Cable pattern to marker, sm, k to end of row.
Row 31: Rep Row 3.
Row 32: Rep Row 28 – 33 sts.
Rep Rows 31 and 32 ten more times – 23 sts.
Keeping 11 front edge sts in Right Cable pattern and rem sts in St st, work even until armhole measures about 9 1/2 in. (24 cm), end with a RS row as the last row you work. Now, continue following the pattern, beginning at Shape Shoulder (below). -
Size 4 ONLY
Row 1 (WS): Bind off 11 sts, p to marker, sm, work Right Cable pattern to end of row – 57 sts.
Row 2 (Armhole Decrease Row – RS): Work Right Cable pattern to marker, sm, k to last 3 sts, k2tog, k1 – 56 sts.
Row 3: P to marker, sm, work Right Cable pattern to end of row.
Row 4 (Neck and Armhole Decrease Row – RS): Work Right Cable pattern to marker, sm, k1, ssk, k to last 3 sts, k2tog, k1 – 54 sts.
Row 5: Rep Row 3.
Rows 6-29: Rep Rows 2-5 six more times – 36 sts.
Row 30: Rep Row 2 – 35 sts.
Row 31: Rep Row 3.
Row 32 (Neck Decrease Row): Work Right Cable pattern to marker, sm, k1, ssk, k to end of row – 34 sts.
Row 33: Rep Row 3.
Row 34: Work Right Cable pattern to marker, sm, k to end of row.
Row 35: Rep Row 3.
Row 36: Rep Row 32 – 33 sts.
Rep Rows 35 and 36 ten more times – 23 sts.
Keeping 11 front edge sts in Right Cable pattern and rem sts in St st, work even until armhole measures about 10 in. (25.5 cm), end with a RS row as the last row you work. Now, continue following the pattern, beginning at Shape Shoulder (below).
Shape Shoulder – ALL Sizes
- Row 1 (WS): Bind off 4 sts, p to marker, sm, work Right Cable pattern to end of row – 19 sts.
- Row 2: Work Right Cable pattern to marker, sm, k to end of row.
- Row 3: Rep Row 1 – 15 sts.
- Row 4: Rep Row 2.
- Row 5: Bind off 4 sts, removing marker as you come to it, work Right Cable pattern to end of row – 11 sts.
- Row 6: Work Right Cable pattern to end of row, cast on 1 extra st – 12 sts.
- Place a marker on this row for beginning of neckband.
Neckband
Just as you did on the Left Front, you’ll now be continuing the cable pattern on 11 of the sts and working the 12th st in St st to make the neckband.
- Row 1 (WS): P1, work next row of Right Cable pattern to end of row.
- Row 2: Work next row of Right Cable pattern over first 11 sts, k1.
- Rep Rows 1 and 2 until piece measures same length as Left Front neckband.
- Remove marker and place sts onto a st holder.
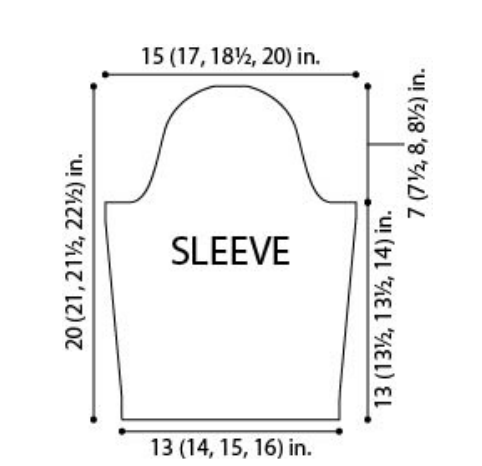
SLEEVES (MAKE 2)
Each Sleeve begins by making a cabled band. The band is simply the Right Cable, with an extra st at the edge. The extra st is worked in St st. Sts for the Sleeve are picked up along this St st edge of the cabled band.
Cabled Band (make 1 for each Sleeve)
- Cast on 12 sts.
- Row 1 (RS): Work Row 1 of Right Cable pattern over first 11 sts, k the last st for the edge st.
- Row 2: P1 (edge st) work Row 2 of Right Cable pattern to end of row.
- Row 3: Work next row of Right Cable pattern to last st, k1.
- Row 4: P1, work Right Cable pattern to end of row.
- Rep Rows 3 and 4 until band measures about 13 (14, 15, 16) in. (33 (35.5, 38, 40.5) cm) from beg.
- Bind off.
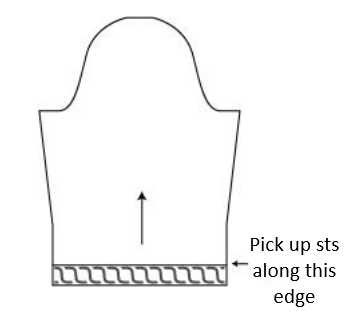
Sleeve
- Row 1 (RS): From RS, pick up and k52 (56, 60, 64) sts evenly spaced across the long side of the cabled band (the long side with the edge st). An easy way to pick up sts evenly spaced is to use pins (or even binder clips, whatever you have handy) to divide the cabled band into quarters. Then just pick up and k13 (14, 15, 16) sts evenly spaced across each quarter section of the band.
- Beg with a WS (purl) row, work St st until piece measures about 1 1/2 in. (4 cm) from cabled band, end with a WS (purl) row as the last row you work.
- Increase Row (RS): K1, M1, k to last st, M1, k1 – 54 (58, 62, 66) sts. Continue in St st for 15 (9, 7, 7) rows.
- Next Row: Rep the Increase Row – 56 (60, 64, 68) sts. Rep the last 16 (10, 8, 8) rows 2 (4, 5, 6) more times – you’ll now have 60 (68, 74, 80) sts.
- Continue even in St st until piece measures about 13 (13 1/2, 13 1/2, 14) in. (33 (34.5, 34.5, 35.5) cm), measuring from lower edge of cabled band, end with a WS row as the last row you work.
Shape Sleeve Cap
The Sleeve cap is the shaped upper portion of the Sleeve. The Sleeve cap shaping is created with decreases. Be sure to follow the instructions below for your specific size!
-
Size 1 ONLY
Row 1 (RS): Bind off 7 sts, k to end of row – 53 sts.
Row 2: Bind off 7 sts, p to end of row – 46 sts.
Row 3 (Decrease Row – RS): K1, ssk, k to last 3 sts, k2tog, k1 – 44 sts.
Row 4: Purl.
Rows 5-10: Rep Rows 3 and 4 three more times – 38 sts.
Row 11: Rep Row 3 – 36 sts.
Rows 12-14: Work even in St st.
Row 15: Rep Row 3 – 34 sts.
Rows 16-23: Rep Rows 12-15 twice – 30 sts.
Row 24: Purl.
Row 25: Rep Row 3 – 28 sts.
Rows 26-35: Rep Rows 24 and 25 five more times – 18 sts.
Row 36: Bind off 2 sts, p to end of row – 16 sts.
Row 37: Bind off 2 sts, k to end of row – 14 sts.
Row 38: Bind off 3 sts, p to end of row – 11 sts.
Row 39: Bind off 3 sts, k to end of row – 8 sts.
Bind off. -
Size 2 ONLY
Row 1 (RS): Bind off 8 sts, k to end of row – 60 sts.
Row 2: Bind off 8 sts, p to end of row – 52 sts.
Row 3 (Decrease Row – RS): K1, ssk, k to last 3 sts, k2tog, k1 – 50 sts.
Row 4: Purl.
Row 5: Rep Row 3 – 48 sts.
Rows 6-13: Rep Rows 4 and 5 four more times – 40 sts.
Rows 14-16: Work even in St st.
Row 17: Rep Row 3 – 38 sts.
Rows 18-21: Rep Rows 14-17 – 36 sts.
Row 22: Purl.
Row 23: Rep Row 3 – 34 sts.
Rows 24-37: Rep Rows 22 and 23 seven more times – 20 sts.
Row 38: Bind off 2 sts, p to end of row – 18 sts.
Row 39: Bind off 2 sts, k to end of row – 16 sts.
Row 40: Bind off 3 sts, p to end of row – 13 sts.
Row 41: Bind off 3 sts, k to end of row – 10 sts.
Bind off. -
Size 3 ONLY
Row 1 (RS): Bind off 10 sts, k to end of row – 64 sts.
Row 2: Bind off 10 sts, p to end of row – 54 sts.
Row 3 (Decrease Row – RS): K1, ssk, k to last 3 sts, k2tog, k1 – 52 sts.
Row 4: Purl.
Row 5: Rep Row 3 – 50 sts.
Rows 6-15: Rep Rows 4 and 5 five more times – 40 sts.
Rows 16-18: Work even in St st.
Row 19: Rep Row 3 – 38 sts.
Rows 20-23: Rep Rows 16-19 – 36 sts.
Row 24: Purl.
Row 25: Rep Row 3 – 34 sts.
Rows 26-39: Rep Rows 24 and 25 seven more times – 20 sts.
Row 40: Bind off 2 sts, p to end of row – 18 sts.
Row 41: Bind off 2 sts, k to end of row – 16 sts.
Row 42: Bind off 3 sts, p to end of row – 13 sts.
Row 43: Bind off 3 sts, k to end of row – 10 sts.
Bind off -
Size 4 ONLY
Row 1 (RS): Bind off 11 sts, k to end of row – 69 sts.
Row 2: Bind off 11 sts, p to end of row – 58 sts.
Row 3 (Decrease Row – RS): K1, ssk, k to last 3 sts, k2tog, k1 – 56 sts.
Row 4: Purl.
Row 5: Rep Row 3 – 54 sts.
Rows 6-17: Rep Rows 4 and 5 six more times – 42 sts.
Rows 18-20: Work even in St st.
Row 21: Rep Row 3 – 40 sts.
Rows 22-25: Rep Rows 18-21 – 38 sts.
Row 26: Purl.
Row 27: Rep Row 3 – 36 sts.
Rows 28-43: Rep Rows 26 and 27 eight more times – 20 sts.
Row 44: Bind off 2 sts, p to end of row – 18 sts.
Row 45: Bind off 2 sts, k to end of row – 16 sts.
Row 46: Bind off 3 sts, p to end of row – 13 sts.
Row 47: Bind off 3 sts, k to end of row – 10 sts.
Bind off.
FINISHING
-
Step 1: Sew shoulder seams.
-
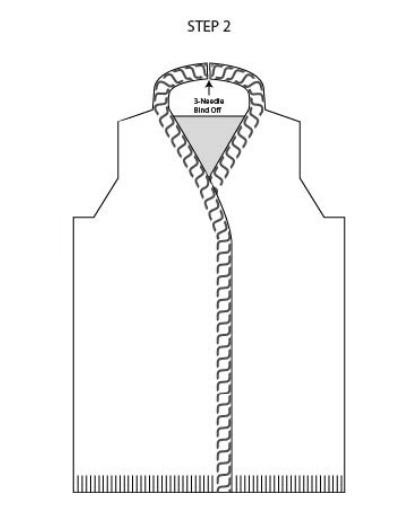
Step 2: Join the ends of the neckbands using the 3-Needle Bind Off, as follows:
- Slip the sts for right neckband from holder onto one end of circular needle and sts for left neckband onto opposite end of needle.
- Hold ends of needle together in one hand, so that WS of each neckband is facing out.
- With spare needle, knit tog the first st from each needle, *knit tog the next st from each needle, pass first st worked over the 2nd to bind off; rep from * across. Cut yarn and pull yarn end through the last st.
For these next steps, you’ll be sewing the pieces of the Cardigan together. You may find it helpful to position the pieces before sewing by pinning them together first.
-
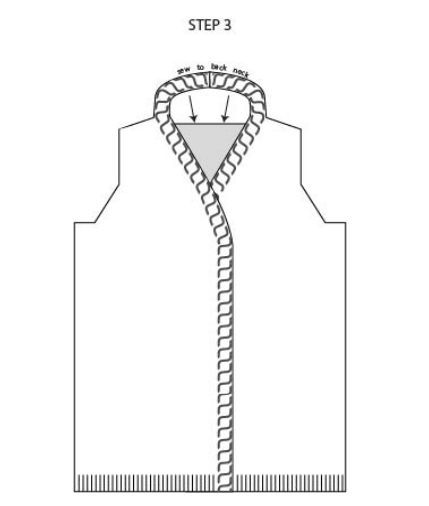
Step 3: Neatly sew the edge of the neckband (this is the long edge with the extra st) to the Back neck edge.
-
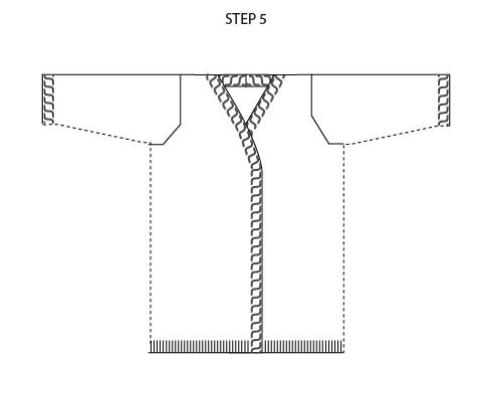
Step 4: Matching the center of the Sleeve cap to the shoulder seam of the Cardigan, sew in Sleeves.
-
Step 5: Matching the underarm seams, sew side and Sleeve seams.
Weave in all yarn ends.

Abbreviations
- beg
- begin(s)(ning)
- k
- knit
- k2tog
- knit 2 stitches together
- p
- purl
- rem
- remain(ing)(s)
- rep
- repeat(s)(ing)
- RS
- right side
- WS
- wrong side
- St st
- Stockinette stitch
- tog
- together
Read NextSimple Men's Knit Sweater Pattern
Your Recently Viewed Projects

Thanks for your comment. Don't forget to share!
Sigo
Aug 30, 2018
I totally like this cardigan! I love the color, the length is really my style and I like the cabled stitched edge. I am saving this one in the hopes I will find time to knit it some day. Thanks for sharing!
Report Inappropriate Comment
Are you sure you would like to report this comment? It will be flagged for our moderators to take action.
Thank you for taking the time to improve the content on our site.