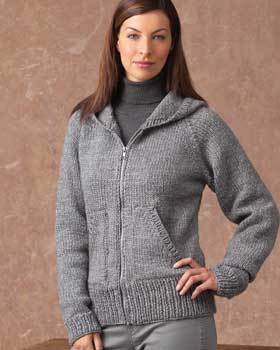
Short Sleeve Hooded Sweater
A short-sleeve sweater is a great transition piece as the months warm or cool. This short-sleeve hooded sweater knitting pattern is fun, stylish and flattering. Knit in super-bulky yarn, this sweater works up very quickly.

Materials:
- Yarn: RED HEART® “Zoomy™”: 7 (8, 9, 10, 11) Balls 8379 Malted.
- Knitting Needles: 6.5mm [US 10.5], 8mm [US 11].
- Circular Knitting Needles: 6.5mm [US10.5] – 32”.
- Stitch holders
- yarn needle
- 1 button
Gauge: 11 sts = 4”; 16 rows = 4” in Moss st on larger needles.
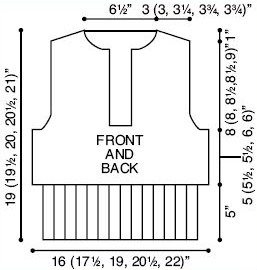
Size: XS (S, M, L, 1X)
To Fit Bust: 30 (33, 36, 39 42)”.
Finished Bust Measurement: 32 (35, 38, 41, 44)”.
Stitch Patterns:
RIB PATTERN (Worked over a multiple of 4 + 2 sts):
Row 1 (Wrong Side): P2, * K2, P2; repeat from * to end.
Row 2: K2, * P2, K2; repeat from * to end.
Rep Rows 1 and 2 for Rib Pattern.
MOSS ST (Worked over an even number of sts):
Row 1 (Right Side): * K1, P1; repeat from * to end.
Row 2: Repeat Row 1.
Rows 3 and 4: * P1, K1; repeat from * to end.
Repeat Rows 1-4 for Moss st.
Instructions:
BACK: ** With smaller needles, cast on 42 (46, 50, 54, 58) sts. Work Rib Pattern for 5”, end right side row. Work 1 more row, inc 2 sts evenly spaced—44 (48, 52, 56, 60) sts. Change to larger needles and Moss st until 10 (10½, 10½, 11, 11)” from beginning, end wrong side row.
Shape Armholes: Keeping continuity of Moss st, bind off 3 (4, 5, 6, 7) sts at beginning of next 2 rows. Dec 1 st at beginning of next 4 rows—34 (36, 38, 40, 42) sts. **
Work even in pattern until armhole measures 8 (8, 8½, 8½, 9)”, end wrong side row.
Shape Shoulder: Bind off 4 (4, 4, 5, 5) sts at beginning of next 2 rows, then 4 (4, 5, 5, 5,) sts at beginning of next 2 rows. Bind off 18 (20, 20, 20, 22) sts.
FRONT: Work same as for back from ** to **.
Divide for Placket: Work 14 (15, 16, 17, 18) sts in pattern; slip remaining 20 (21, 22, 23, 24) sts onto holder. Working on left front sts only, work even until armhole measures 5 (5, 5½, 5 ½, 6)”, end right side row.
Shape Neck: Bind off 3 (4, 4, 4, 5) sts at neck edge. Dec 1 st at neck edge on next 3 rows—8 (8, 9, 10, 10) sts. Work even until front measures same as back to shoulder, end wrong side row.
Shape Shoulder: Bind off 4 (4, 4, 5, 5) sts at beginning of next row. Work 1 row. Bind off 4 (4, 5, 5, 5) sts.
With right side facing, bind off center 6 sts of last long row, work in pattern to end—14 (15, 16, 17, 18) sts. Complete to correspond to left front, reversing shaping for neck and shoulder.
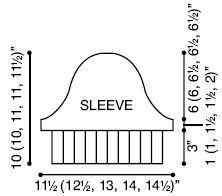
SLEEVES: With smaller needles, cast on 30 (34, 34, 38, 38) sts. Work in Rib Pattern for 3”, end right side row. Work 1 more row, inc 2 (0, 2, 0, 2) sts evenly spaced—32 (34, 36, 38, 40) sts. Change to larger needles and Moss st for 1 (1, 1½, 1½, 2)”, end wrong side row.
Shape Cap: Bind off 3 (4, 5, 6, 7) sts at beginning of next 2 rows—26 sts. Dec 1 st at each end of next 3 rows—20 sts. Dec 1 st each end of every 4th row 3 times—14 sts. Bind off 3 (3, 2, 2, 2) sts at beg of next 2 (2, 4, 4, 4) rows. Bind off 8 (8, 6, 6, 6) remaining sts.
HOOD: Sew shoulder seams. With right side facing and larger needle, starting at right neck edge, pick up and K14 (15, 15, 15, 16) sts up right neck edge, 18 (20, 20, 20, 22) sts across back neck, and 14 (15, 15, 15, 16) sts down left front neck edge—46 (50, 50, 50, 54) sts. Work even in Moss st for 8”, placing marker at center back of hood.
Shape Top: Work to 2 sts before marker, work 2 sts together, slip marker, work 2 sts together, work to end of row.
Repeat last row every other row until hood measures 11” from beginning. Bind off all sts.
FINISHING: Fold hood at top and sew top seam. With right side facing and circular needle, starting at bottom of right front placket edge, pick up and K15 sts up right front edge, 38 sts to top of hood, 38 sts down hood to left front edge, and 15 sts to bottom of left front placket edge—106 sts. Work 3 rows in Rib Pattern, begin Row 2.
Next Row-Buttonhole Row (Right Side): Work 8 sts in pattern, bind off 2 sts, work in pattern to end.
Next Row: Work in pattern, casting on 2 sts above boundoff sts.
Work even in rib for 3 rows. Bind off in rib.
Sew bottom edges of button band border to bound-off sts at front center, with right band over left band as shown.
Sew in sleeves to body. Sew sleeve and side seams. Sew on button.
For more ideas and inspiration, visit Red Heart Yarn.
Read NextTwo Piece Knit Poncho Pattern
Your Recently Viewed Projects

Thanks for your comment. Don't forget to share!
arlene o
Feb 13, 2013
very pretty - but when a pattern has a convertible feature, such as a hood, it would be MUCH better to display a second picture showing how that looks. There are too many different hood shapes to take the trouble to work up such a pattern, only to see that the effect is TOTALLY different from the one desired. Yes, I do know that a picture won't show me exactly how a hood will fit my head size/ shape, but at least I can get an idea, without having to create a muslin pattern.
Report Inappropriate Comment
Are you sure you would like to report this comment? It will be flagged for our moderators to take action.
Thank you for taking the time to improve the content on our site.