Crochet Ripple Afghan Troubleshooting Guide
These tips and tricks will make you a master of the neat ripple pattern.

The neat ripple pattern that I used in my summer crochet ripple cushion is adapted from the neat ripple pattern originally published by Lucy of Attic24. You can see her detailed tutorial here.
When I started rippling, to make my seascape ripple blanket, as yet unfinished, I admit I had a lot of trouble getting to grips with this pattern. I love the effect but I was always losing my place, getting things wrong and generally making a complete mess of it. Having to keep ripping out and redoing your crochet is not much fun after a while so I decided to study the ripple and work out where I was going wrong and why.
I thought this might help some of you too!
Getting the edges straight
This pattern produces lovely straight edges – but only if you do it right.
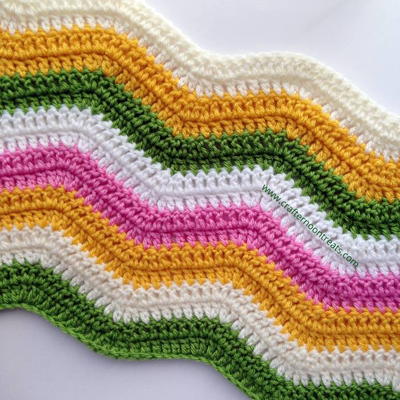
One thing I realised is that you need an equal number of peaks and troughs in your ripple. The pattern consists of a starting section, a middle (with repeats of the basic pattern) and then an end section.
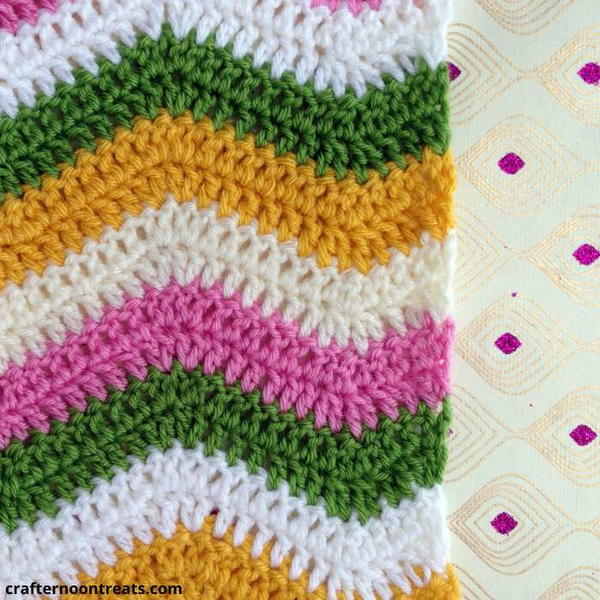
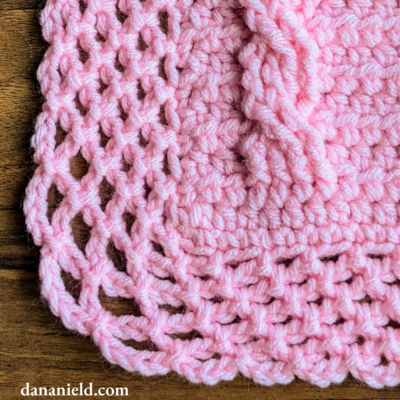
You can see how its made up in this photo of my summer ripple cushion – click to enlarge to see the detail and the notes. You can see there are four troughs. There are then three peaks in the main part of the ripple and half a peak at each end – which equals four.

Getting the edges straight continued
This means that the decreases in the troughs and the increases in the peaks, including the two half peaks at either end, balance out to give you a magically straight edge on both sides:
If you are not getting a straight edge, check your pattern and see if you have an odd number of peaks and troughs.
If you have, the pattern will never go right, there is no choice but to start again… Or make your proto blanket into a scarf (which is what I did the first time). :)
Knowing which side is which
The front and back of a neat ripple pattern look very similar. When you are working on the ripple, they look identical and I find it impossible to tell by looking which is the front and the back.
BUT, if you start your stripes inconsistently from one end for a few rows and then from the other for a few rows, the final result will not look as good, particularly if its on something like a cushion that is stretched over the cushion pad when finished. That type of thing can be very annoying because you just know its not perfect. Even if no-one else notices – or even cares!
The solution to this is to leave sewing in all your ends until last.
What????? Leave the ends dangling. Weeeeellllll, yes this isn’t usually the advice I give. I am very much with Lucy of Attic24 who is also very keen on weaving in your ends as you go. I think there is nothing worse that having a mass of ends to sew in before you can complete a project. Very depressing.
But with a small ripple I find it easier to leave the ends because it helps you know which side to start a new colour stripe if you have put your ripple away for a while. Always start with your ends behind you on the right.
It stops you weaving in the ends too close to the edge. You need to add a border to the side of the ripple and this works out much neater and more even if you don’t have woven in ends there. Always take your ends inwards and weave in through the thicker part of the stitches in the middle of each stripe (more on this below).
Keeping the pattern lined up
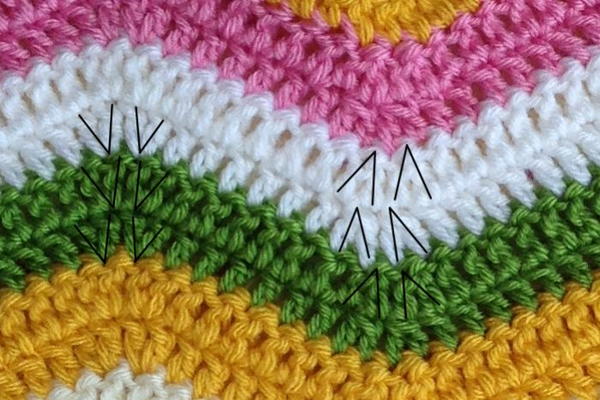
When I first started doing ripples I would lose concentration, miscount and my peaks and troughs would be all over the place. Each trough and each peak in a ripple should line up so when you hold your crochet fabric up to the light, you can see faint hints of straight lines running through each peak and each trough. These are usually more obvious at the troughs.
In the photo below I’ve picked out the increases and decreases in a few rows to show you how the increases and decreases line up.
Keeping the pattern lined up continued
Imagine you are crocheting along the top white row pictured above.
Coming down from the right, you are completing your six trebles. Then its time to decrease.
Your first stitch of the decrease goes into the ordinary treble of the row below that lies just before the decrease stitch in that previous row. You complete the decrease into the top of the decrease of the row below.
The first stitch of your second decrease goes into the top of the second decrease stitch of the row below. You complete the decrease using the next, ordinary treble stitch, of the previous row.
Now imagine you are carrying on and make the next six ordinary trebles leading up to the peak. Your first increase is made in the second treble of the increase of the previous round. The second increase is made into the first treble of the second increase of the previous round.
I’m sorry, but there is no simpler way to express this in words, or I can’t think of any. All I can suggest is that you study the photo, make a small ripple sample and think it through… It will help, honest.
Once you understand exactly where the stitches go, its easier to see where you have gone wrong if the number of stitches you count doesn’t seem right. And its better to keep checking because if you go wrong, the only way to get it right is to pull everything back to that first tiny mistake.
Getting a neat edge
We’ve already covered getting a straight edge, but what about a very neat edge at the border?
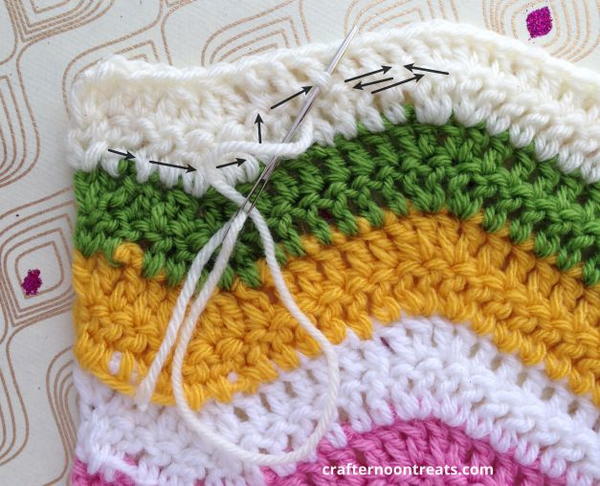
When I first did a ripple I sewed my ends in at the end of the row – which sort of distorts the stitches so when you come to do a border down the sides it can get tricky to make the stitches look even.
I now always sew my ends in slightly in from the edge like this. I do a bit of backwards and forwards at the end, not pulling tightly, but changing direction so that the tail ends stay put.
Then, the border for the edge can go into the end stitch of each row, which are all even and not affected by the weaving in.
I chose to do a round of double crochet stitches first, putting two into the side of each stitch on the end of each row. Then a second round of dc stitches before starting the proper border. Or in the case of the summer ripple cushion, the button strip. Using a contrasting colour gives a very neat finish because it draws the eye to the straight junction between the first border row and the second round of dc stitches.
If you have any other problems with a crochet ripple please leave a comment and I’ll do my best to try to find a solution xxx
Useful links for the summer ripple cushion
Photo tutorial for the summer ripple cushion
Printable pattern for the ripple cushion (UK terms)
Printable pattern for the ripple cushion (US terms)
Photo tutorial on making daisy appliques
Video tutorial on making daisy appliques
Photo tutorial on adding daisy appliques to the ripple cushion
My Craftsy tutorial showing how to make crochet buttons
What do you find most challenging about ripple crochet?

![Yarn Washing Symbols [PDF]](http://irepo.primecp.com/2019/08/421747/Yarn-Washing-Symbols-2_Large400_ID-3350169.png?v=3350169)