This project was submitted by one of our readers, just like you.
Cotton Facemask

Cotton Facemask
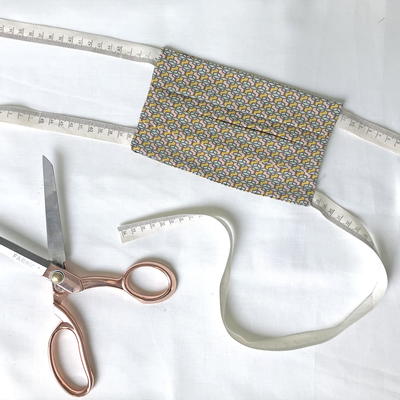
"During these strange times, in some situations, it is compulsory to wear a facemask. These masks are of course available to buy. But with this DIY project, you can make your own fun cotton mask. You could also insert a filter into it should you wish. Choose a nice print from our fabric collection and get started with ribbon, a needle and thread and make your own washable facemask. Got the hang of it? Create an entire collection to complement your wardrobe."
Primary TechniqueOther

Materials List
- CoCo-ton cotton fabric 45x50cm retro light pink vintage motif
- Ribbon 2m 15mm tape measure
- We R Memory Keepers • Happy Scissors x 2
Instructions
-
Wash all fabric and ribbon at 60 degrees. On a piece of paper, draw two rectangles: one measuring 18x19cm and the other 18x17.5cm. Cut them both out. Place the rectangles onto the fabric and trace around in pencil.
-
Use fabric scissors to cut the pieces out of the fabric. Place the pieces together, print side on print, and fasten with pins. The 18cm sides should meet up. One piece is longer than the other.
-
Sew the pieces together on one edge. This can be done on a sewing machine, but in the example this is done by hand; use a backstitch for this. Also stitch the sides to prevent the fabric from fraying.
-
Open it all out and iron smooth. Create a seam along both ends. To do this, fold the fabric over, iron over it to create a sharp edge then fold over again. Iron again and pin the seam. Sew down the seam using backstitch.
-
Now make the pleats. Start 2cm from the centre where the pieces are Sewed together. Fold the right-hand side to the right and the left-hand side to the left. For each pleat, fold at +/- 1.8cm and +/- 1cm back. Iron the pleats.
-
Cut 4 pieces of ribbon to 45-50cm. Position the 4 ribbons as indicated on the photo on the corners of the smallest piece of fabric. Fold back the fabric so that the good sides of the fabric are touching.
-
Now fold the piece that’s too long over one more time, as shown on the photo. This will be useful later on if you decide to insert an additional filter. Pin to secure everything.
-
Sew the 2 short sides using backstitch as in step 3, and add a few extra stitches where the ribbon is. Also stitch the sides to prevent the fabric from fraying.
-
Once you have sewn everything, turn the facemask inside out along the open edge. Iron one last time and your facemask is finished!