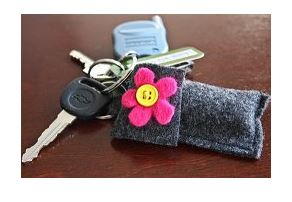
Chapstick Holder Keyfob
If you constantly need lip balm throughout the day but can never find it in your bag, you need this Chapstick Holder Keyfob! This cute DIY accessory is easy to make and can be customized to any sized lip balm or lip gloss. All you need for this easy sewing pattern is some felt, a key ring, some Velcro, and access to a sewing machine. This project can also be an adorable little change purse for an adult, teen, or child. Just throw some cash in there and you're ready to run out of the house on a quick errand without having to carry a bulky purse.


For more sewing projects, take a look at this unique list of 31 Free Sewing Patterns.
Materials:
- Felt (can also be flannel or any other nonfraying material)
- Key ring
- Chapstick
- Scissors
- Velcro
- Sewing machine (You can do with or without a sewing machine for this one).
Instructions:
- Cut a square piece that measures 3 1/2 inches by 5 inches.
- At 2 1/2 inches from the top, cut to a halfway point.
- Then trim lengthwise to make an L shape.
- You'll be folding over the bottom part and sewing it shut. But first sew on the velcro pieces.
- Using use a small, longer rectangular piece of felt, sew on the keychain. You can also sew it on the side before you sew, or even the bottom.
- Now you can add the flower, or any other decoration you like.For the flower, cut out a flower shape from felt, then add a button for the middle and sew it on with embroidery thread.
- Add the keyring and finish.

If you can't stand being unorganized when you're out and about, maybe it's time to get a new purse. Check out our free eBook "How to Make a Purse: 20 Patterns for Sewing Totes, Bags and More" for ideas on how to get started making your own purse.
Read NextDiy Hanging Storage Baskets
Your Recently Viewed Projects
Thanks for your comment. Don't forget to share!
mulberrygalprinces s
May 24, 2018
This is a great project. It's very easy and I don't understand all the confusion. They are easy to make just by looking at the picture. I want to give them out to my lady friends to carry their pepper spray. Hook it on to their key ring and they are all set.
BettyVedder
Jun 25, 2017
This might make a great teacher gift! It could even work for a thumb drive, lip stick, or a roll of lifesavers!
rgawa 0343127
Nov 09, 2013
I cut it out of paper to make a pattern, but the directions are confusing. Please redo directions.
Neveranytime 90153 86
Sep 07, 2013
Cut a rectangle 3 1/2 x 5. Then cut 1/4 of it away, so you have cut off a 1 3/4 x 2 1/2 inch piece.You now have an L shaped piece. Fold the 21/2" side over to the 5" side. Stitch the bottom and 2 1/2" up the side. You can decorate the front with a felt flower or buttons. Apply Velcro to the top flap and the front of the "pouch" you made. Then cut a piece about 1" x 2". Sew 1" x1" to the top back so that 1"extra is sticking up behind the flap. Fold this over a key ring and stitch it down. That's what I figured out, anyway. Hope it helps, KimCJ
marilynlehman88 00 76840
Dec 21, 2012
I have made several of these for gifts, and they are well liked. Instead of sewing the edges with a sewing machine, I used wool felt for the body and needle felted fiber along the edges to hold it together. I also embellished the top using felt flowers.
racquel favre
Nov 24, 2012
This is a cute idea, but there are no drawings/patterns, and the written directions are very hard for me to understand. Without a drawing of how to cut out the fabric I'm sure I'd cut off a piece I needed or leave on a piece that should have been cut off. I'd love to see a drawing for this craft, as I'd like to make several for Christmas gifts.
dsfullersr 3439323
Sep 29, 2012
This is just too cute! I can't wait to share this with my granddaughters. I can see us making a bunch for their friends this Christmas. Thanks for all the great crafts you share with us, your fans!
ArmySweetPea
Feb 05, 2012
Instructions 2-5 are confusing. Could you make a tutorial with pictures or a video tutorial? That would be so greatly appreciated if you could :)
jwerensly 0810557
Jan 20, 2012
I made a bunch of these for a holiday craft bazaar and they were a best seller for me!!
mcasady1 7127434
Jan 06, 2012
Confusing, pictures would be nice...the 2 1/2" from n then cut???chere
kccallmeathome7 15 69893
Dec 27, 2011
i love this one for myself,i will make this one for me so i can carry my kisslipstick in it.
Report Inappropriate Comment
Are you sure you would like to report this comment? It will be flagged for our moderators to take action.
Thank you for taking the time to improve the content on our site.