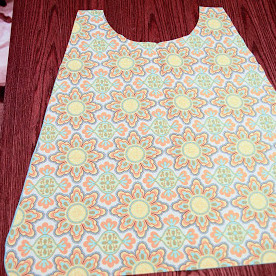
Budget Friendly Superhero Cape
If you're going sew-crazy, here is a fun sewing project idea that both you and the kids will love. This Budget Friendly Superhero Cape makes a great inexpensive gift for all the super kids in your life. This easy sewing idea will keep you just as entertained as the little ones. Best of all, you can have your children customize their cape however they want. If your child wants their initials, favorite colors, or a special insignia, you can create a Budget Friendly Superhero Cape for all their world-saving needs.

Materials:
- 2 yards solid of fabric (You can do 2 yards of the same fabric)
- Marking chalk
- Side plate
- Velcro
- Sewing supplies
- Iron
- Felt
- Stitch witchery (iron on seam tape)
Instructions:
Cape
- Measure how long you want the cape to be. Add 1" to allow for 1/2" seam at top and bottom. This number is Measurement A.
- Take your two yards of fabric and place them one on top of the other.
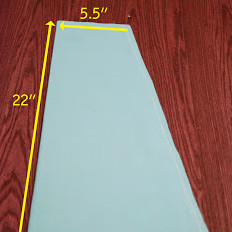
- Fold the fabric in half. Along the fold, make a mark at Measurement A. At one end, make a mark at 5.5" in from the fold. At the other end, make a mark at 11" in from the fold. Use a tape measure to connect the 5.5" and 11" marks and draw a diagonal line to connect them.
- Cut along the 11" line and 1/2" away from the diagonal line (for the seam allowance).
- From the inside fold corner, make a mark 4" along the top and 4" down. NOTE: For bigger children, you may want to make this larger (4" along the top, 5.5" down). Take your side plate and join the two marks. Chalk around the outline of the side plate.
- Cut out the circle mark and you are left with two pieces of fabric.
- Now you can add some embellishments if you want. You need to add the embellishments before you sew the front and back of the cape together. If you just want a simple cape, skip to the end
Ruffle
- Cut a piece of fabric 3"wide and double the length of your garment. If your fabric isn't long enough, use two pieces of fabric and seam them on the short end.
- Make a fold 1/4" along the length of the fabric and iron this down. Fold over 1/4" again and iron this down
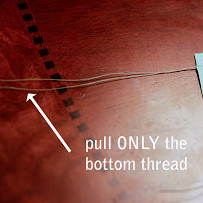
- Sew along the top of this fold. This creates the bottom finished seam of the ruffle. Sew a stitch 1/2" down from the top of the fabric - be sure to leave long leading and ending threads. Pull only the bottom thread and slowly gather the fabric to make ruffles
- Once you have the right length (22" in my case) and have the ruffles looking nice, fold 1/4" at each end and sew the seams.
- Attach the ruffle to the garment with a simple straight stitch along the top edge.
Monogram
- Take a piece of felt and piece of fabric and use your side plate to cut out two circles.
- Draw the letter on the felt by free hand. Cut out the letter.
- Add any other decorative elements you want - stars, lightening bolts, wings etc.
- Place the felt on top of the fabric and sew them together to your solid cape fabric, and use Stitch Witchery to attach the other pieces
Finishing the cape
- Put the cape pieces together, right side facing in
- Make sure any embellishments won't be caught when we sew the seam.
- Sew a 1/2" seam around the entire cape edge, leaving a 2" gap at the bottom so you can turn the fabric inside out.
- Turn out the fabric. Hand sew the gap closed. Iron the garment.
- Sew a small square of velcro on opposite sides of the flap so they overlap when closed.
Read NextGirls' Bolero Free Sewing Pattern