The Evolution of Shadow Stamping: Ghosting and Grunge Shadow Techniques

Ink your stamp, press and lift. That is the rhythm of stamping. Grab a dozen stamps and be over-the-top creative! That is the joy of stamping.
And then there is the ritual of cleaning off all the wet ink that remains on our stamps. We tap it off on scrap paper, wipe on a damp towel or baby wipe, or remove with ink cleaner. Removing that excess ink often takes more time than the actual stamping process!
But what if you could just leave that stamp inky on purpose and turn the ink that remains into a technique?
SHADOW STAMPING
Stamping without reinking has traditionally been used to create the illusion of movement. Referred to as “shadow stamping,” moving the stamp’s position and stamping off the excess ink on the actual project so the image becomes fainter and fainter can create some fun looks. Unfortunately, that is usually as far as it goes.
If there is one thing I love, it is pushing a technique as far as it will go! Join me as we dive deeper into a whole new realm of shadow stamping to create an expanded library of techniques!
GHOSTING
Based on the same premise of utilizing wet ink that remains on a stamp after the first impression, “ghosting” and “grunge shadow” techniques are variations of shadow stamping. Instead of just creating movement, however, they can also create the illusion of depth and shadows. Because second and third image impressions will have progressively less ink and appear more transparent, these impressions will be more muted and tonally lighter than the original image that was stamped. For example, when stamped on white paper, red ink will turn to pink, black ink to grey and brown into tan. Conversely, when using light color pigment ink on a black background, the images will pick up the background color and turn the impression into a muted tone that increasingly fades into the background color the more times the image is stamped.
Giraffe and Dream Bike Adventure Cards


Both cards exhibit a variation of the shadow stamping technique to show movement. Instead of stamping the images in progressively lighter steps, however, the motion effect is achieved a slightly different way by using the ghosting technique. In both examples, the image is initially created with a wet stamp. Without reinking, the stamp is quickly slid across the image, dragging ink with it to create the illusion of movement and depositing additional ink across the paper. The dragging movement may also slightly blur the original image to add to the illusion of movement and shadow. In these examples, the giraffe looks as if it is bending down to nibble on leaves while the bicycle appears to be quickly moving through the card and ready to roll off the edge! Attach paper layers and a few embellishments using Zip Dry® Paper Glue and Gem-tac® Permanent Glue (Beacon Adhesives) to complete a card in 30 minutes or less.
Stamps used with permission: Impression Obsession (G7697 Giraffe, E7690 Brush Tree 1), Clearsnap (Bicycle)
Deer in the Woods Card

The ghosting technique creates dimension using tonal values. With or without added color, the elegant simplicity of this technique successfully mimics natural surroundings as trees recede into a misty background.
Materials:
• Impression Obsession Rubber Stamps: E7724 Brush Tree Line, C7691 Brush Tree 2, F7838 Deer in Forest, F7787 Pine Trees
• Clearsnap, Inc: Art Daubers, Color Blenders
• Colorbox® Archival Dye Inkpad (Wicked Black)
• Beacon Adhesives: Zip Dry® Paper Glue
• Cardstock: White gloss (31/2” x 51/2”), dark gray (53/4” x 37/8”)
• Medium grey cardstock cut and folded to form a 41/4” x 61/4” notecard
Instructions:
1. Using Wicked Black, stamp the Deer in Forest in center of white gloss cardstock. Add Brush Tree Line along the lower edge, stamping off the bottom edge as needed. Without reinking, stamp again to the left and right of the deer.
2. Stamp brush Tree 2 as desired, first inking and then repeat stamping without reinking as shown.
3. Attach layers to card with Zip Dry.
Optional: This project can also be created using colored ink to stamp the trees and sponge in the sky.
Forest Windowscape

Take the ghosting technique one step further by creating 4 different but related scenes and incorporate stenciling with the ghosting technique. The subtly stenciled sky along with the stark black, white and gray palette gives the illusion of winter twilight in a snow-filled forest.
Materials:
• Impression Obsession Rubber Stamps: F7787 Pine Trees, C7691 Brush Tree 2, D7822 Hold Me Close
• Clearsnap, Inc: Art Daubers, Color Blenders
• Colorbox® Archival Dye Inkpad (Wicked Black)
• Beacon Adhesives: Zip Dry® Paper Glue
• Cardstock: Two pieces of white gloss (31/2” x 51/2” pieces), white matte (13/4” x 35/8”), black matte (53/4” x 73/8”, 2” x 33/4” and 1/8” x 73/8”), medium gray matte (21/4’ 41/4”)
• 1” to 11/4” circle cut from a Post it
• Scrap white card stock, scissors
Instructions:
1. Using Wicked Black, stamp the Pine Trees, on both pieces of white gloss cardstock. Without reinking, re-position and stamp again to the right and left. Stamp Brush Tree 2 as desired, first inking and then repeat stamping without reinking as shown. Repeat until both scenes are complete, stamping off the bottom and/or side edges as desired.
2. Place circle as shown along top edge of one stamped scene. Cut scalloped edge along scrap cardstock to create a cloud stencil. Place cloud stencil across scene and dab gently with ink. Move stencil down and over, changing angles as desired as you dab ink to create clouds. Remove circle when completed. Repeat for second scene, eliminating the circular masking step.
3. Position both scenes on the large black cardstock piece, as shown, allowing a 1/4” gap in between both pieces; secure with Zip Dry. Attach the black strip vertically down the center to create the illusion of a window pane.
4. Stamp the phrase on the white matte cardstock. Layer remaining pieces and attach to center with Zip Dry, as shown.
5. Mount on board and frame, as desired.
GRUNGE SHADOW TECHNIQUE
The grunge shadow technique is a very simple technique that involves a rotating hand movement. This technique expands on using the excess ink remaining on a stamp to create the illusion of a dimensional shadow. With this technique, a grunge effect is created that can be colored over with marker, or sponged with ink. A dramatic look can also be achieved when the project is stamped on colored cardstock and colored in with color pencil.
The steps for this technique are variations of shadow stamping and ghosting. Generously ink your stamp, press onto cardstock for the initial image and remove stamp.The next step depends on several factors, including (1) how distinct you want the shadow, (2) how wet the inkpad was, ink type and how much ink was originally applied to the stamp, and (3) absorbency of your card stock. Wait 5 to 15 seconds. Without reinking, press the stamp again over the image and do not lift up Depending on the image and the effect you want to achieve either (1) twist, (2) swipe side-to-side (3) slide up-and-down or (4) rotate the stamp in a circular motion. Remove and apply other techniques as desired.
Grungy Crow Card

Materials:
• Impression Obsession Rubber Stamps: C7842 Single Crow
• Unity Stamps: Distressed Dots
• Clearsnap, Inc: Colorbox® Stylus and Tips
• Colorbox® Archival Dye Inkpad (Wicked Black)
• Beacon Adhesives: Zip Dry® Paper Glue, Gem-tac® Permanent Glue
• Cardstock: Gold matte (23/4” x 23/4”), red matte (31/2” x 31/2”)
• Black matte notecard (41/4” x 41/4”)
• Small wiggle eye
Instructions:
1. Stamp crow in center of gold cardstock. Without lifting or reinking stamp, swipe to the right of the stamped image; slide down and lift. Using direct-to-paper, add ink to edges.
2. Stamp dots as shown on gold and red cardstock. Attach layers to card with Zip Dry® Paper Glue. Glue eye onto crow with Gem-tac® Permanent Glue.
Birds in the Tree Card

Materials:
• Impression Obsession Rubber Stamps: F7837 Crows on Tree
• Clearsnap, Inc:
• Colorbox® Stylus and Tips
• Colorbox® Archival Dye Inkpad (Wicked Black, Mudslide, Tree Frog, Mist)
• Beacon Adhesives: Zip Dry® Paper Glue
• Kreinik: Iron-On 1/8” Ribbon 3M #6256 (Chocolate); craft iron, adhesive press cloth
• Cardstock: Medium brown matte (41/2” x 6”), off-white matte (41/2” x 6”)
• Dark brown notecard (5” x 63/4”)
• Markers of your choice
Instructions:
1. Stamp image in center of off-white cardstock. Without lifting or reinking stamp, swipe to the right of the stamped image; remove stamp.
2. Hand tear around the image. Using the Stylus, dab ink around edges, as shown. Color in leaves with markers.
3. Attach layers to card with Zip Dry® Paper Glue
4. Cut lengths of Iron-On ribbon and iron onto card as shown, per manufacturer’s instructions.
While both the ghosting and grunge shadow techniques work easily with solid or heavily outlined stamp images, they can also be used with line, detailed images that are masked. Create a mask using paper with light tack, removable adhesive backing or adhesive dot. After stamping your initial image, lift stamp and place the mask over the first image. Follow the rest of the steps outlined for the ghosting or grunge shadow techniques and remove the mask when completed. If needed, dab or sponge additional ink for spots that were missed or color the ghosted images with marker.
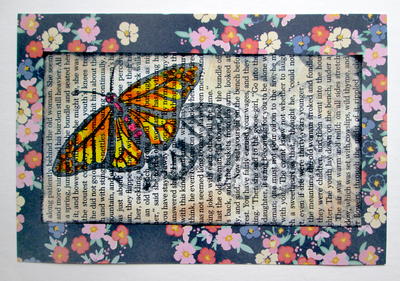
Butterfly Fly Away Card

Materials:
• Impression Obsession Rubber Stamps: E7766 Butterfly 1
• Clearsnap, Inc: Colorbox® Stylus and Tips
• Colorbox® Archival Dye Inkpad (Wicked Black, Apricot, Putty)
• Beacon Adhesives: Zip Dry® Paper Glue
• Printed text page from an old book trimmed to 31/4” x 6”
• Printed floral paper of your choice trimmed and folded to for a notecard (7” x 43/4”)
• Markers of your choice
Instructions:
1. Cut mask. Stamp butterfly in black on printed text page. Remove stamp; quickly place mask over stamped image. Without reinking, quickly stamp image again to the right of the butterfly. Stamp again to the right. Note: If needed, re-ink the stamp, stamp off lightly on scrap paper and use the ink remaining on the stamp for the project.
2. Apply Wicked Black direct-to-paper along edges. Apply Apricot and Putty with Stylus. Color butterfly and shadow with markers.
3. Attach layer to card with Zip Dry® Paper Glue
It is often helpful to experiment with scraps of different cardstock, paper and ink types to get the preferred effect. Archival Dye ink on absorbent surfaces such as plain white bond paper, matte cardstock and printed text were the easiest for me to work with while gloss cardstock and textured surfaces were less predictable. I have also had amazing results using white pigment ink on black matte cardstock. However, each stamper has a different approach and individual ink and surface combinations may become favorites! The fun is in exploring the techniques…and seeing how far you can go!
Read NextEasy Marbled Background