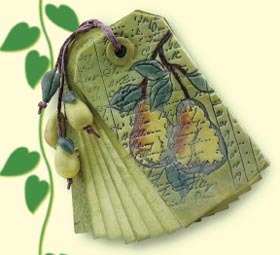
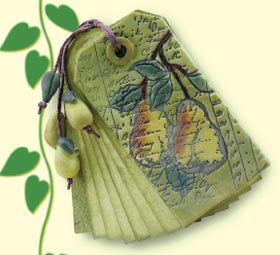
Pear Tag Art Book
This pretty art book is made with porcelain clay, waxed linen and a stack of playing cards.
By Cathy Johnston for AMACO
Materials:
- AMACO® Craft Porcelain
- Brown Waxed Linen
- Card Stock
- Mullberry Paper
- White Glue
- ColorBox Fluid Chalk Inks by Clearsnap — Yellow Cadmium, Burnt Sienna, Deep Green, Olive Pastel, Dark Moss, Dark Brown, and CharcoalAMACO® PolyRoller™
- AMACO® PolyBlade
- Deck of Playing Cards
- Tag (31/4" x 15/8")
- Rubber Stamps from The Stamp Barn ‚ Ledger Sheets and 2 Pears
- Round Kemper Cutters — 5/16" and 3/16"
- Double-Ended Knitting Needle or Piece of 20 Gauge Wire
- Scissors
- Style Stone Inking Brush by Clearsnap
- Micro Brush
- Straight Pin or Quilting Pin
- 1/8" Hole Punch
Steps:
- Book Cover: Count out two stacks of six playing cards and lay these on the table.
- Lay some Craft Porcelain between the two stacks of cards and roll out with the PolyRoller™ so it is the same thickness as the stacks of cards. Roll out enough Craft Porcelain for the front and back cover of the tag book.
- Ink up the ledger sheets stamp with the charcoal ink. Press the ledger stamp into the Craft Porcelain using a small amount of pressure. Remove stamp. Repeat with the pear stamp.
- Lay the tag pattern on the stamped image on the Craft Porcelain and trim with the PolyBlade. Trim out a second cover on unstamped Craft Porcelain for the back of the book.
- Take a tiny amount of Craft Porcelain and roll it very thin. Using the 5/16" kemper cutter, cut out two circles. Place one on the cover of the tag to represent the washer. With the smaller cutter, cut through both layers of the Craft Porcelain. Repeat for the back cover (use the front cover as a guide for the placement of the washer on the back cover). Set the covers aside to dry.
- Making the Pear Beads and Leaf: Roll out three 3/8" balls of Craft Porcelain. Shape each ball into a teardrop shape, then into a pear shape. Pierce the end of each pear using a drilling motion. Drill from the stem to the bottom of each pear with the double-ended knitting needle. With the quilting pin, make a few indents on the bottom of each pear.
- For the leaf, roll out one 1/4" ball, shape into a teardrop, flatten the teardrop, and place on the double-ended knitting needle. Indent the leaf with a line down the center. Set these aside to dry.
- Color the pear beads with the yellow ink. Highlight with the burnt sienna ink. Use the dark green ink on the leaves. Apply the dark brown ink on the stems of the pears with the micro brush.
- Finishing the Book: When the cover is slightly dry, use the style stone brush to color the pear with the yellow ink and highlight the pear with burnt sienna ink. Color in the leaves with the dark green ink. Use a micro brush to apply the dark brown ink on the stems of the pears and allow to dry. TIP: If the Craft Porcelain warps after it dries, use a heat gun (make sure you keep the heat gun moving) to warm it up. Flatten with your hand and place a weight on it until it cools.
- The Craft Porcelain will shrink quite a bit so you will need to make a pattern for the inside pages by tracing one of the covers onto card stock. Trace and cut 4-6 pages for the inside of the book.
- Using the deep moss ink pad, add ink to the edges of each page and the rest of the page.
- Mark each page where you want the hole for the waxed linen. Use the 1/8" punch to punch out each hole.
- Apply white glue to the back side of each cover. Place each cover on the mulberry paper and trim the mulberry paper on each cover with scissors.
- Cut two pieces of waxed linen 9" long. Place a knot on one end of each piece of waxed linen. Thread one pear bead onto each piece of waxed linen. Thread the linen through the book, tie a knot, and thread the remaining beads on the linen and knot each. Trim any remaining waxed linen. TIP: Add a little glue to the knot on each bead.
Read NextPrintable 3d Fruit Ornaments