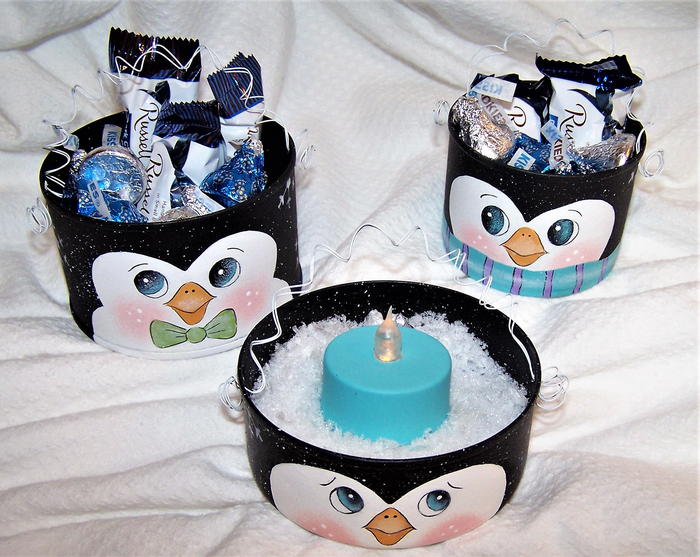
Uncanny Penguin Tin Can Treat Holders
Learn how to paint penguins on tin cans this winter.

From the Designer: "Turn those empty cans in your recycler into adorable treat holders. Fill with candy or small gifts and use as party favors that your guests will love…or fill with birdseed and hang on a tree branch for your feathered friends! "
Time to CompleteIn an evening
Primary TechniquePainting

SeasonWinter
Project TypeMake a Project
Materials List
- Small recycled cans with smooth sides (tuna, olive, pet food, etc.)
- DecoArt Americana Acrylic Paint: • Aqua Sky • Butterscotch • Cotton Candy • Foliage Green • Lamp Black • Purple Cow • Snow (Titanium) White
- DecoArt Americana Acrylic Sealer/Finisher Matte (DAS13)
- Rust-Oleum Universal Bonding Primer (white) or similar spray primer for metal
- Royal Brushes: • Royal Gold Shader Series R150 #4, 12 • Pointed Round Series R250-#2, 20/0
- Royal Stylus Tool (#RD5)
- Royal Dabber Set (#RD110)
- Foam paint brush
- Old toothbrush or other stuff brush for spattering/flyspecking
- Snowflake stencil
- 26 gage white craft wire
- Tracing paper
- Transfer paper (graphite paper)
- Pencil
- White eraser
- Masking tape
- Scissors
- Electric drill
Instructions:
-
Remove labels and glue from cans and wash thoroughly. Run the empty can through the can opener several times to smooth any rough metal edges. Drill two holes in each can near the upper edge for the wires.
-
Spray cans with primer in a well-ventilated area, preferably outside.
-
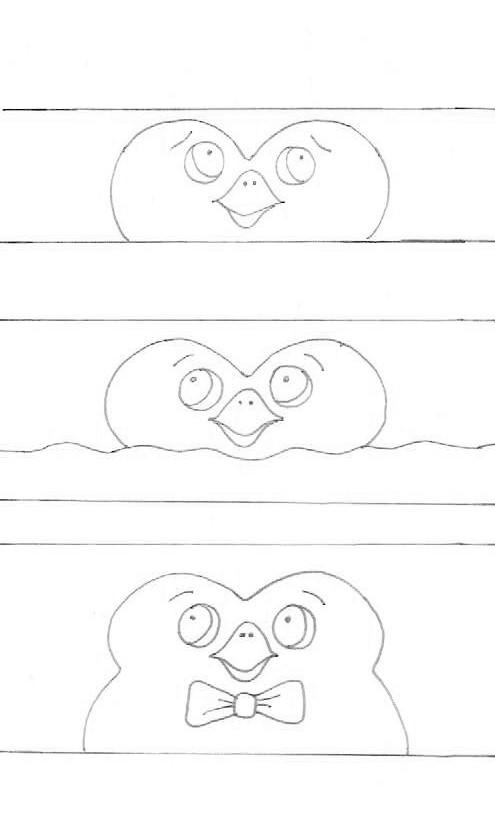
Use a copier to reduce or enlarge the patterns as needed to fit your cans. Make a tracing of the patterns.
Note: Click pattern for larger version. -
Use the foam brush and Snow (Titanium) White to paint a section on the front of the cans slightly larger than the face pattern. Use a stippling or pouncing motion to apply the paint for best coverage. While the paint is wet, use the clean side of the brush to pat down the high areas or bubbles that may have formed. It’s important to have a smooth surface to paint the details of this design. Let dry. Repeat until opaque. For the penguin design with the scarf, use the #12 shader and Aqua Sky to basecoat the scarf and the bottom of that can.
-
Use the #2 round brush and Lamp Black to outline around the faces. Use the #12 shader to base coat the rest of the head area including the insides and bottoms.
-
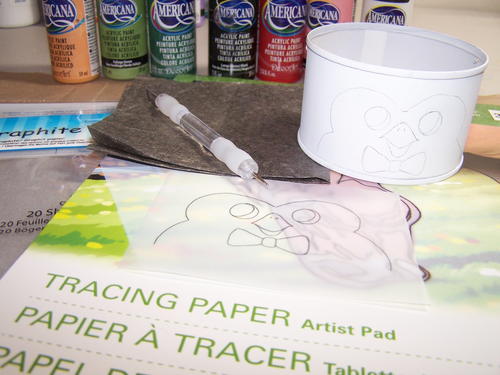
Tape the pattern in place on one edge. Insert the transfer paper under the pattern with the graphite side against the can. Use the stylus and light pressure to trace over the pattern lines. Remove pattern and transfer paper. Erase any stray graphite marks. For the penguin with the scarf, use the pencil to draw the top edge of the scarf around the entire can.
Note: click photo for larger version. -
Load the largest dabber with Cotton Candy. Off-load excess paint onto a paper towel then lightly stipple or pounce cheeks using the photos as a guide for placement. Clean and dry dabbers immediately.
-
Use the #2 round and/or the #4 shader brushes to base coat the facial features. Use Lamp Black to base the eyes. Use Butterscotch to base the beak. Use Foliage Green + Snow (Titanium) White (50:50) to base the bow tie. Use pure Foliage Green to add a final coat to the bowtie. Use Aqua Sky to base scarf. Use Purple Cow to freehand the stripes on the scarf.
-
Use the 20/0 Round brush and Lamp Black thinned with water to paint the eyebrows and to outline the eyes, beak, bowtie, and stripes. Use the stylus to dot the nostrils. Use Snow (Titanium) White and the stylus to dot the cheeks and eyes.
-
Use the #4 shader to drybrush highlights. Load the brush with a small amount of paint then offload most paint onto a paper towel. Lightly skim over the area to be highlighted. Use Snow (Titanium) White to highlight the beak, bow tie and scarf. Use Aqua Sky to highlight the eyes.
-
Use the small dabber and a small amount of Snow (Titanium) White stencil the snowflakes. Offload excess paint onto a paper towel. Hold or tape the snowflake in place then stipple or pounce over the stencil. Clean dabber and stencil immediately.
-
Thin Snow (Titanium) White with water to the consistency of heavy cream. Load the toothbrush or a stuff brush with the mixture. Use your thumb to pull back on the bristles. Release the bristles to allow paint to spatter onto scrap paper at first. Repeat over the black areas of the cans.
-
Erase any graphite lines not covered by paint. Spray cans lightly with Sealer/Finisher in a well-ventilated area.
-
Cut two lengths of wire per can approximately 20-24”. Wrap wires around a paintbrush handle leaving 2” at either end to fit through the holes in the cans. Insert ends into holes from the inside of the cans then carefully curl ends.
-
Fill with treats and enjoy!
Why You'll Love This Recycled Craft
Are you looking for a fun and creative way to upcycle your empty cans? Look no further than our Uncanny Penguin Tin Can Treat Holders craft project! Here are the top 3 reasons why you should give this craft a try:
1. Eco-Friendly Upcycling: By turning your empty cans into adorable treat holders, you'll not only be reducing waste but also giving them a new purpose. It's a great way to show off your creativity while also being environmentally conscious.
2. Versatile Party Favors: These penguin treat holders are perfect for filling with candy or small gifts as party favors. Your guests will be delighted to receive such a unique and adorable gift. Plus, you can customize the penguins to match any party theme or color scheme.
3. Bird-Friendly Decor: If you're an animal lover, you can fill these tin can penguins with birdseed and hang them on a tree branch in your yard. Your feathered friends will be thrilled to have a cute and functional feeder to visit. It's a great way to attract birds to your garden while also adding some whimsical decor.
Overall, the Uncanny Penguin Tin Can Treat Holders craft project is a fun and versatile way to get creative with your recyclables. Whether you're looking for party favors or bird feeders, this craft is sure to bring a smile to your face and those around you. Happy crafting!