Sparkling New Years Card
When you want a handmade New Year card that is equal parts scintillating and celebratory, then you need this metallic star design!

Want to start off the New Year by putting some good vibes into the world? Then why not begin January 1st by spreading good karma with this galactically gorgeous DIY New Year card from Scrapbook Adhesives by 3L? This handmade New Year card uses metallic paper and the precise cut of a die-cutting machine to perfectly cut out stars as shiny as the ones in the sky. With the easily read good wish on the front, this card will bring a smile to whoever receives it! In less than 45 minutes, you'll be able to put together a greeting card that will set the ball rolling for a positive, playful, and pleasant year.
Time to CompleteUnder an hour
Primary TechniquePaper Crafts
Project or Page SizeCard
Type of Paper UsedCardstock

HolidayNew Year
Project TypeMake a Project
Materials List
- Scrapbook Adhesives by 3L® E-Z Runner® Grand Permanent Strips Refillable Dispenser
- Scrapbook Adhesives by 3L® 3D Foam Holiday Embellishment Kit
- Cardstock: Shimmery Navy, Silver Mirror White Vellum
- Paints: White Paint
- Water Mister
- Paint Brush
- Computer Font or Stamp
Instructions
-
Fold a piece of 8 1⁄2 x 5 1⁄2-inch shimmery navy cardstock in half to make a vertical 4 1⁄4 x 5 1⁄2-inch card base. Set aside.
-
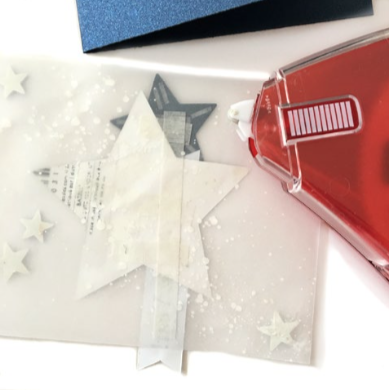
Cut one 4 x 51⁄4-inch with white vellum.
-
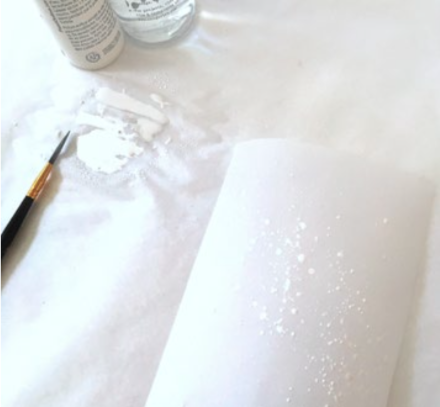
On a scrap piece of wax paper, squeeze a drop of white acrylic paint and add water with a water mister for a watery consistency. Dip a medium fine tip paint brush into the mixture and tap the brush with your other hand to make paint splatters on your vellum card panel in a diagonal line from corner to corner. Set aside to dry.
-
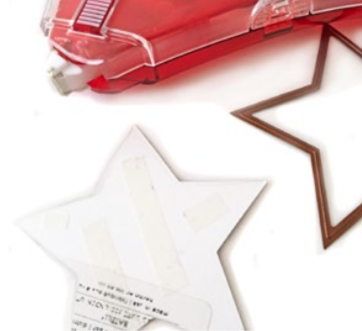
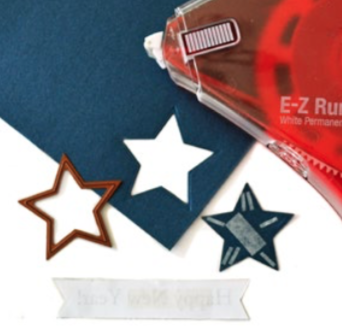
Die-cut a 3 1⁄4-inch wide star from silver mirror cardstock. On its back, apply strips of E-Z Runner® Grand Permanent Strips Refillable adhesive and place on the vellum card panel.
-
Place the silver star die cut on the vellum card panel.
-
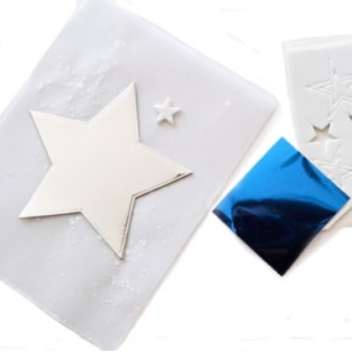
From the 3D Foam Holiday Embellishment Kit, use 3D Foam Stars and silver and blue craft foils. Randomly place the small 3D Foam Star shapes onto the vellum card panel, keep the top liner on for easy handling.
-
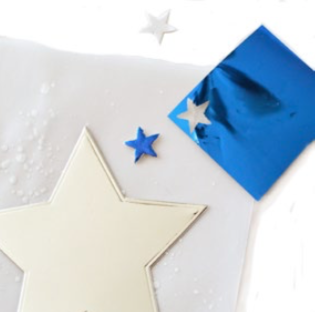
Remove the top liner on one of the 3D Foam Stars, place the blue craft foil (colored side UP) onto the exposed adhesive, and gently rub with finger to transfer the foil color to the star.
-
Slowly remove the foil for a beautiful sparkly star!
-
Repeat the process for the other stars using your choice of blue or silver craft foils.
-
Print or stamp “Happy New Year” sentiment onto with white cardstock. Cut into a 3 3⁄8 x 5⁄8-inch banner strip.
-
Die-cut a 1 1⁄2-inch wide star with shimmery navy cardstock. Apply E-Z Runner® Grand Permanent Strips Refillable adhesive behind each piece and place on card panel.
Note: See how I applied the adhesive strips individually as needed, on the navy star die cut. -
Apply E-Z Runner® Grand Permanent Strips adhesive behind each element on the vellum card panel and center onto the card base to finish.

What's your New Years crafting resolution? Let us know below in the comments!


