This project was submitted by one of our readers, just like you.
Gift For Mom
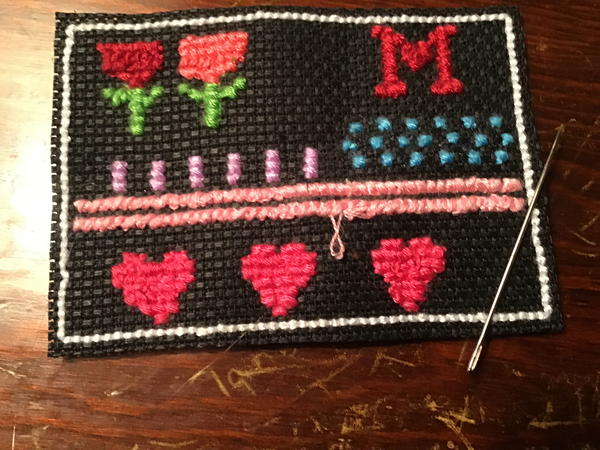
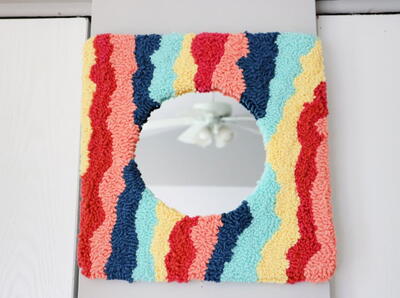
"This took a week of evenings, I am doing it for my mom and it will be her Valentines Day Gift. The materials were, embroidery hoop, needle, thread (color of choice, since the color doesn’t matter and could vary between who you are giving it too or what your doing it for), and Black Aida cloth. A tip for someone making this is, make it unique, whether you change the color of something or the size it doesn’t matter, just make it your own."
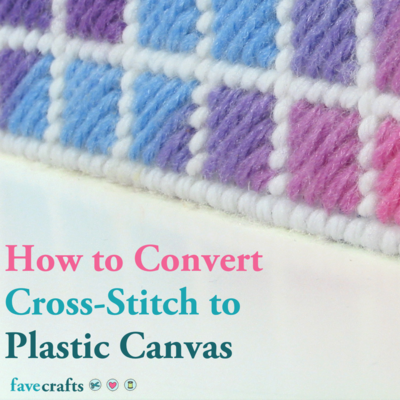
Primary TechniqueNeedlework

Materials List
- Embroidery Hoop
- Fabric Scissors
- Needle
- Colored Thread
- Black Aida Cloth
- Time that you can spend
Instructions
-
Center the pattern on your fabric. Make the hole bigger there, so you can use it later on.
-
Put your fabric in the hoop
-
Thread your needle
-
Knot the end of your thread. Insert your needle in the fabric from front to back, about 1 inch away from where you want to start. The knot should be on top of the fabric.
-
Bring your needle up through the hole in the center of your fabric.
-
Insert your needle in the hole above and to the right of what you just did.
-
Make the second half of the stitch, insert the needle up into the hole in the lower right corner of the square and pull it through. To finish the first stitch, insert your needle down into the top left corner, and pull the thread through.
-
Repeat steps 5-7
-
Continue this until you have completed the second row of the blue thing in the completed picture
-
When you have completed the second row, start working from right to left on the next row up.
-
When you complete that row, work left to right on the bottom row. Finish Stitching all of your blue cross-stitches and then finish ooff your thread.
-
If you run out of thread or finish stitching, you will need to anchor your thread so that it doesn’t come loose. Do his by sliding your needle under some of the stitches on the back of your work. Pull the thread through and snip the rest off with your scissors.
-
Start your next color the same way, instead of creating a wast knot.
-
Count down 4 squares from the far right stitch that you mad earlier, and start it in the top right corner of your first square.
-
Do more cross stitches like the 2 pink rows in the picture.
-
After the pink rows count up three squares from the top left pink cross stitch this is where you will make your first column.
-
Bring needle up through the Aida cloth in the bottom left corner of the starting square and back down at the tp right corner.
-
Continue till you have a column of 3 cross stitches.
-
Make as many columns as the purple ones in the picture.
-
When you finish the purple columns count down 3 stitches from the bottom left PINK cross-stitch, and then over one to the right. This where the first heart starts.
-
Make to cross stitches In a row then skip one square and make two more cross stitches.
-
Move your needle down one square and to the left one square, then make a row of 7 stitches.
-
Make another row of 7 when finished, then a row of 5, then 3, then 1, all in an upside down pyramid shape, when finished it should look like a heart.
-
Go over 2 squares and make another heart.
-
Afterwards, go over 2 squares again and make one last heart.
-
Count 3 squares up and 2 squares to the right of the top left purple column. This is going to be the stem of the first flower.
-
Make 5 cross stitches going up.
-
To add leaves make a stitch next to the second from the top stitch, then across from that one an up make another one. Repeat on the other side of that stem.
-
Repeat all of the stem one square to the right to make a second stem.
-
On the left stem count 5 squares up from the left leaf, make 3 rows of stitches. Make a row of 3 stitches and then one stitch that should attach to the stem.
-
Repeat on the stem on the right side.
-
2 squares over from the top stitch on the right flower, make a 2 stitches.
-
Below the second stitch make a column of 10, then next to the last stitch make 1 stitch on the left side and 2 on the right side.
-
To the right of the second stitch in the column make a stitch then down and to the right of that make a column of 3 stitches.
-
After that to the right and down of the last stitch of that column make a row of two and then another row of two underneath.
-
Then Make a column of three to the right and up of the first columns right stitch.
-
On the top stitch of that make another stitch to the right and up
-
Then do the identical column as the other side to the right.
NotesFollow the picture while your read the instructions.