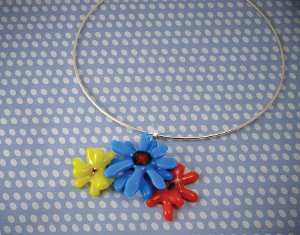
Flower Pendant
Kids and adults alike will love this Flower Pendant from Diamond Tech. Made using Fusework glass supplies, this necklace pendant is a charming addition to any outfit! Kids and teens should make these with adults, since hot glass is involved.
Materials:
- 1- 2” x 3” Fuseworks blue opalescent sheet glass
- 1- 2” x 3” Fuseworks yellow opalescent sheet glass
- 1- 2” x 3” Fuseworks orange opalescent sheet glass
- 4- 3mm-5mm assorted Fuseworks millefiori
- Fuseworks Microwave Kiln
- 800-1200 Watt microwave
- Fuseworks Kiln paper
- Scissors
- Ruler
- Sharpie™ marker
- Studio Pro Glass cutter
- Studio Pro Grozier/Breaker tool
- Jennifers Mosaics Wheeled Glass Nippers
- Fuseworks Bail
- E6000™ Adhesive
Instructions:
- Read and follow kiln safety rules and warnings before you begin.
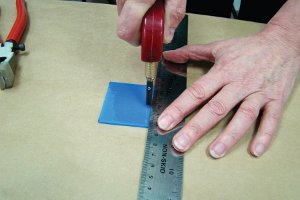
- Starting with the blue glass, make 5/16” wide marks with the Sharpie™ on the glass to indicate the 6 strips you will need. Using your ruler and hand cutter, score along the marks.
- Holding the glass in one hand, place the flat side of the grozier/breaker jaws face up and parallel to the score line. Pull up on the groizer tool and the sheet glass in the opposite hand to break away the strip of glass.
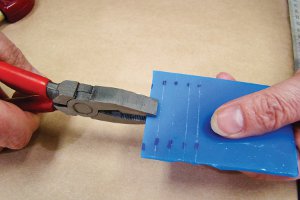
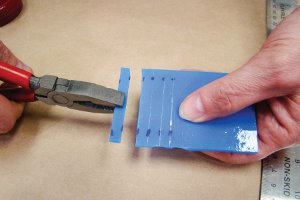
- Repeat step 2 to break away 6 -2” strips of glass.
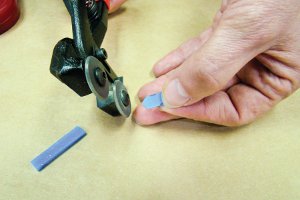
- Blue Flower (makes 2): Nip the 6 strips into 5/8” to 3/8” lengths with the wheeled nippers. These will form the petals.
- Shape the end of each strip with the wheeled nippers to round the edges. Do make sure to remove all Sharpie marks from the glass before fusing.
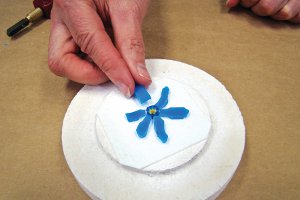
- Cut kiln paper to fit base. Place a single millefiori in the center of the paper and arrange 6 randomly sized strips of the cut blue glass around it. Make sure all 6 petals touch the millefiori or nip them thinner to fit.
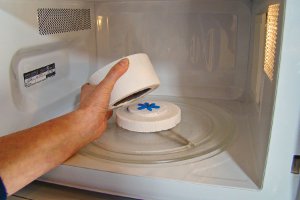
- Carefully set the kiln base inside the microwave and cover with kiln top.
- If using a 1200 watt microwave, Heat 2 mins. at 80% power. When time is complete, open the microwave and lift the kiln lid just enough to visually check your glass. These visual checks will help you determine the amount of time and power you’ll need to finish fusing your glass.
- Then add another 45 seconds at 90%. Check the visual appearance of the glass between time intervals.
- If needed, add time in 15 second intervals to achieve the exact results you want. Glass edges should be nicely rounded. PLEASE NOTE: If using a microwave with a lower wattage, increase the power percentage but keep times consistent.
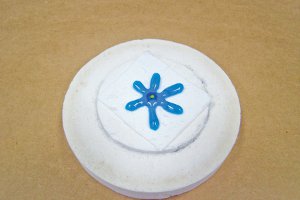
- Remove kiln from microwave using Hot Mitts and place on a heat resistant surface. Cool the kiln for at least 30 minutes WITH THE LID ON. Caution: Removing the lid or peeking under the lid during the cooling stage will result in your piece cracking. Glass remains hot for a long time, handled with great caution.
- To make your second Blue Flower, repeat the Blue Flower Assembly steps and Fusing schedule above. Remove any paper residue and set both aside for final assembly.
- Yellow and Orange Flowers: For the Yellow Flower, cut 3-2” strips of glass 3/8” wide. Use a Sharpie™ to mark 3/8” intervals on the glass.
- Following steps above, score and break your glass.
- Using your wheeled nipper, cut strips into 9 pieces varying in sizes of 3/8” to ½” long.
- Shape the end of each strip with the nippers to round the end.
- For the Orange Flower, cut 3- 2” strips of glass ¼” wide. Use a Sharpie™ to mark ¼” wide intervals on the glass.
- Following steps above, score and break your glass.
- Using your wheeled nipper, cut strips into 9 pieces varying in sizes of 3/8” to ½” long.
- Shape the end of each strip with the nippers to round the end.
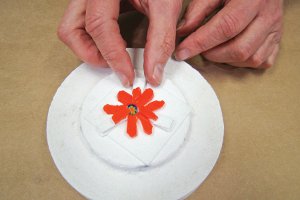
- Place a piece of kiln paper on the kiln base. Put a single millefiori in the center of the paper and place 6 petals around the mille.
- Cut small rectangles of kiln paper and trim one end into triangles. Stack them into 3 piles 4 pieces high. Place kiln paper stacks between the glass pedals. Alternate each stack between 2 of the petals. Place the remaining 3 pieces of glass on each of the stacked paper. This will create a dimensional look when fused. Be sure all pieces of glass touch the sides of the millefiori.
- Follow the original Fusing steps above and fuse Yellow flower. Once cooled, remove any paper residue from the back of the flower.
- Assemble the Orange Flower and fuse as above.
- Place Blue Flowers on top of each other and position top flower so all 12 petals appear. Glue into place with E6000 and allow to dry following the manufacturer’s instructions.
- Find the widest of the blue petals on the underlying flower and mark that one for attaching the bail. You will need to be sure this petal is pointing up, centered in a vertical position before attaching the remaining flowers.
- Place the Yellow and Orange flowers on either side of the Blue flower and glue into place. Again, allow to dry.
- Glue the bail to the back of the designated Blue petal and allow to completely dry.

- Attach to your favorite chain or chocker.
Read NextVictorian Garden Necklace