Two Hour Potholders
It seems that we have a fabric eating monster in our home. Socks, dishcloths, hand towels, and potholders seem to disappear with alarming regularity. Or maybe it’s just my 2 and 4 year old throwing things away when I’m not looking! It finally got so bad, I could hardly find a potholder to get things out of the oven. Well, with plenty of cotton yarn in my stash, I thought that, surely, I could knit up a much needed potholder without running to the store. The key was to get it thick enough. I’ve found that using two strands of cotton yarn and the double stitch works very well. These are so much nicer and thicker than the potholders you can buy in the store, and now you can make them to match your kitchen décor. Plus, they are easy to knit and work up quickly. So, save yourself a trip to the store and knit a few today, from Authentic Knitting Board.

Finished size is approx. 7 ¼” x 7 ½”
Materials:
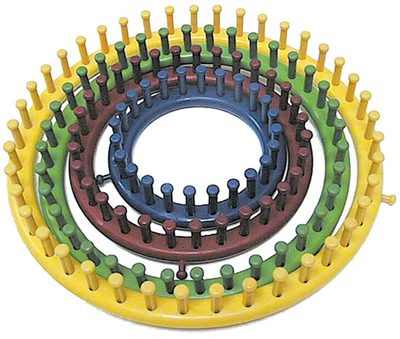
- Knitting Loom: Regular gauge (pegs ½” from center to center) double sided
- knitting board with at least 16 pegs. The 28” Regular Gauge Authentic Knitting
- Board (standard (1/2”) spacer setting) was used in the sample.
- Yarn: 75 yards each of two different colors of 100% cotton worsted weight yarn.
- Peaches & Crème yarn and the twisted stockinette stitch was used in the
- sample.
Notions: Tapestry Needle, Knitting tool, Size H crochet hook
Gauge: Not important
Abbreviations: Cast on—CO, Bind off—BO
Instructions:
- CO 16 pegs with the stockinette cast on. When casting on, wrap the board once, lay the anchor yarn, and then wrap the board two more times. If you are using the twisted stockinette stitch, begin wrapping in that pattern on the third pass. There will now be 3 sets of loops on each peg. This will be the only time that the board is wrapped three times. Hook the bottom set of loops over the top two sets of loops. After hooking over, there should be two sets of loops on each peg.
- Knit 36 rows or until the piece measures 7 ½””, always hooking one set of loops over two sets of loops, except on row 36. On row 36, lift the bottom two sets of loops over the top set. There will only be one set of loops on all the pegs.
- BO both ends. You will have more loops than usual because of using the double stitch. Treat each pair of loops as one loop and BO as usual. Weave in loose ends.
Pattern Notes:
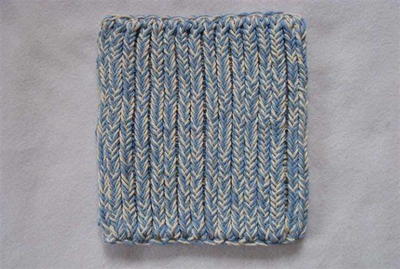
- Two strands of yarn, held together, are used throughout the pattern The double stitch (1 over 2) is used throughout the pattern. This potholder can be knit in either plain stockinette stitch or, what I call, twisted stockinette. To wrap in twisted stockinette, wrap the board as usual for the stockinette stitch, but go to the far side of each needle and wrap around the needle. This is like the figure 8 wrap. Wrap the end needles, on the opposite end from where you start, in the normal manner, do not wrap around them as you did the others. The picture shows how the board will look when properly wrapped for the twisted stockinette stitch. Experiment with other stitch patterns to make one-of-a-kind potholders. Just make sure to use stitches that create a dense fabric.
- Make sure to only use yarns that are made of natural fibers. Acrylic and other synthetic yarns can melt if they come into contact with high temperatures.
Up Next:
Read NextKelly Colored Scarf
Your Recently Viewed Projects
Thanks for your comment. Don't forget to share!
Ohhhdear
Nov 05, 2013
To gr8chefmb; a potholder made with plastic bags would likely be a melting hazard under a hot pot or holding a steamy lid. Plastic bag crafts gave their place, but melted plastic is extremely hot and dangerous. Ask any IED burn victim. To jelun; no, the other comments aren't ridiculous. Yes, there's many, many other potholder patterns available. But not many purport to be finished in "two hours". That's what caught everyone's eye and why we spent a few minutes reading the pattern, only to be disappointed. Frankly, the title should have been "Two Hour Loom Potholder" and saved us a lot of hassle.
jelun
Sep 02, 2011
I think these comments are hilarious. This is a FREE pattern for using a loom. If you don't use a loom this pattern is not for you. There must be at least 10 million patterns using either crochet or knitting needles on the internet. For heaven's sake, look one up!
HJM
Jan 16, 2011
Some of these comments are from April, 2010. We still didn't get an answer of how to know or crochet this great potholder without using plastic bags, etc..
marlinilamborgini
Dec 30, 2010
If I understand you correctly you are doubling the thickness of the shaped piece I believe the same thing can be achieved for knitters and crocheters without a loom to knit or crochet in a circle then close the ends.
HJM
Dec 02, 2010
Most of the comments on the 2 hour pot holders were asking if you could convert this to knitting or crocheting. One person responded with using a plastic bag. Another was converting it to knitting but still using a loom. Do you have a conversion for knitting or crocheting?
HJM
Nov 05, 2010
You responded to my question (HJM) using a stockinette stitch. You still mention the pegs and board in your answer in the pattern notes. If I'm substituting the stockinette stitch, please give the exact beginning directions for the stockinette stitch (no plastic bags)
HJM
Oct 30, 2010
I am very anxious to make these 2-hour potholders. I knit and crochet. I don't know what a loom is, pegs, board, knitting tool. Can you convert this. I would be very thankful.
eclecticindiv
Oct 14, 2010
For those who don't want to use a loom, a basic stockinette or single crochet stitch would be just as effective. If you really wanted to get craft, cut plastic bags into rings by cutting the handles off and folding the bag in half lengthwise, and repeat 2-4 times until folded bag measures 1-inch across. Cut crosswise into strips about 3/4-1 inches wide. Loop them together to form 'plarn' and roll into a ball. Use as you would regular yarn, adjusting your needles/hooks to accomodate the thickness of the 'plarn.'
Eneri
May 07, 2010
Hello Reta Powers. I do a lot of loom knitting it's great. May I suggest you start with the loops on one side then go the the other side to finish. In other words start on either the right side or the left, when you get to the middle of the loom start on the other side till they are all loomed that way the edge will be even. I hope you understood me and that I was of some help.Irene
Crafter 6109925
Apr 27, 2010
Hello, I finished one of these potholders last night, the only problem I have with it is...the cast on edge , the loops are big so what is done with those so they don't hang so large? Thank you Reta Powers
Penguin 911
Apr 24, 2010
Does anyone have a pattern similar to this using needles? Please post. Thank you!
StephanieT98
Apr 24, 2010
I totally agree this looks like something really nice, but do you have instructions for people that do not use a loom yest?
Crafter 7167130
Apr 13, 2010
This sounds liken a great project. However, I only knit with needles. Is there some way it can be converted?
Quilting Cat 4
Apr 12, 2010
This would also be very helpful to those of us who don't use looms (at least for now) to give us a pattern for this with traditional kitting needles.
Report Inappropriate Comment
Are you sure you would like to report this comment? It will be flagged for our moderators to take action.
Thank you for taking the time to improve the content on our site.