Contour Line Drawings Convert to Warhol Like Prints
Target Grade: 9-12
Goal (Terminal Objective): The student will successfully print a patterned composition appropriated from a blind contour line drawing with this lesson from Sargent Art. Two portions of drawing will be transferred to and etched into a printing plate made from insulation sheathing.
Objective: The student will use compositional concepts to appropriate two areas of a contour drawing to etch lines into a printing plate. The student will learn printmaking skills and terminology. Student will demonstrate knowledge of line quality, value, color, balance, emphasis, contrast, and pattern. Student will demonstrate knowledge of relief printing.
National Standards:
Visual Arts Grades 9-12 Content Standard 1: Understanding and applying media, techniques, and processes
Visual Arts Grades 9-12 Content Standard 4: Understanding the visual arts in relation to history and cultures
Visual Arts Grades 9-12 Content Standard 6: Making connections between visual arts and other disciplines Math Cross Curriculum Connection
Purpose: Students will discover pattern as a major concept in art history and become aware of pattern in works of Andy Warhol, Henri Matisse, and Gustave Klimt. Students will become aware of emphasis, contrast, and balance in selecting two pattern designs. Student will understand printmaking as a way of producing multiple images. Students will become familiar with relief printmaking process first with simple crayon rubbings followed by use of tempera and a relief plate made from inexpensive insulation sheathing. The student will learn to paint the sheathing with a brayer to create a patterned print that reveals good craftsmanship. Students will apply color concepts to enhance print design. Advanced students may use complements or four colors including metallics.
New Vocabulary: tempera, brayer, emphasis, repetition, balance, proof, relief, color scheme, analogous, monochromatic, warm, cool, contrast, contour, line contrast or quality, negative shape, parallel, rubbing, insulation sheathing
Materials:
- Sargent Art Metallic Tempera
- Sargent Art Tempera Paint
- Sargent Art 4 Crayons
- 12” by 18” and 9” by 12” construction paper
- Sargent Washable Paints
- Sargent Metallic Tempera Paints
- Sargent 4 Crayons (optional)
- 48” by 96” insulation sheathing cut in 3 ¾” by 2 ¾” blocks (one for each student)
- brayers
- glass plate or other smooth surface
- 3 ¾” by 2 ¾” cardboard patterns to make viewfinders (one for every four students)
- scissors
- ballpoint pens
- pencils
- masking tape
- notebook paper
- sketchbooks
Time: This lesson may be modified to last from 2 to 5 hours, depending upon size and complexity of expectations.
Introduction and Motivation (Set): Define pattern as elements of art (lines, shapes, colors, textures, and forms) that repeat in a regular manner. Ask students to look around room for patterns or observe patterns in their clothing. Show book Tar Beach by Faith Ringgold and a handmade quilt. Tell how African Americans brought the idea of patterned quilts with them from Africa and made quilts for warm coverings by cutting up their worn out clothing. American pioneers also did the same thing; now quilts are considered an important art form even exhibited in museums.
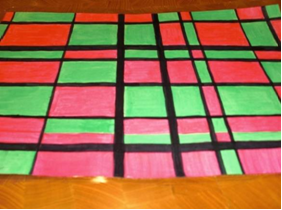
Discuss how example uses elements of art: line, color, and value and principles of design: pattern, unity, and contrast taken from a contour line drawing.
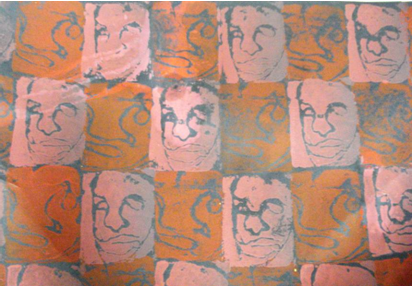
Show on pattern composition example how two different designs are used. Teacher compares example to work of Andy Warhol. Show how artists use pattern in other ways like Matisse who used patterns in his backgrounds and Gustave Klimt who covered his figures with patterned clothing.
Introduce students to relief process of printing as a way of making multiple images from a raised surface such as coins. Distribute 4 pack of Sargent crayons. Students place coin under page of their sketchbook or other paper and rub crayon on top surface of paper to reveal shape and imagery on coin. Students note that raised surface or relief is what transferred. Students are shown how coin can be used to create a pattern in sketchbook by repeated measured placement and rubbing.
Instruction:
Teacher makes a viewfinder to isolate a line design for sheathing by tracing 2 ¾” by 3¾” cardboard pattern the size of the sheathing in center of notebook paper. Teacher cuts rectangle shape from center of paper to make viewfinder.
Teacher moves viewfinder over contour line drawing to select area that shows emphasis and balance.
Teacher draws a dot in each corner of image. Then teacher aligns original cardboard pattern with dots and traces rectangle shape for pattern of lines that will be transferred to sheathing.
Pattern is cut out and taped to top of sheathing. Teacher demonstrates drawing over lines to incise surface. Pattern is removed; lines are incised deeper.
Teacher marks centers of 9” and 12” and 12” by 18” colored construction papers with small mark.
Teacher demonstrates rolling out Sargent Art Washable Paint on clean glass surface with brayer to a thin even coating. Teacher applies paint to incised sheathing with brayer. A proof is made first on 9” by 12” paper placed on a clean smooth surface.
Painted sheathing is placed in center of paper if vertical or in corner if horizontal. Sheathing is pushed firmly against paper; when paint attaches sheathing and paper, the paper and sheathing are rubbed against clean surface to insure transfer of paint. Paper and sheathing are carefully turned over and wooden spoon or barren is pressed over back of paper to insure print is transferred. Carefully lift a corner to check transfer before pulling print. If print does not transfer, continue rubbing back of paper. Under coating sheathing which results in too little color or over coating where paint goes into incised lines and oozes is discussed.
Once proof is completed with a checker board pattern, teacher begins 12” by 18” sheet by placing plate on top of paper to right of center using same color. When both papers are printed with checker board pattern; teacher rolls out second color that is a tint or shade of first color or analogous to first color, applies paint to opposite side of sheathing; prints in negative shapes.
Teacher emphasizes careful spacing holding sheathing parallel to top and sides of paper leaving about 1/8” of space between shapes.
Activities:
(1) Guided Practice:
1. Students make paper viewfinders as demonstrated by teacher.
Pattern
2. Using viewfinder students find two parts of contour drawing to transfer to sheathing marking dots in corners of image.
3. Students align original cardboard pattern with dots and trace rectangle shape that will be transferred to sheathing.
Pattern
4. Students use cardboard pattern to trace shape of design into sheathing. Using metal straight edge and Xacto knife, students cut out individual pieces of sheathing. Note: sheathing has thin plastic protective covering. Remove plastic before tracing and cutting sheathing.
5. Students cut out the two images from paper, tape, and transfer images to opposite sides of sheathing tracing over contour lines pressing into sheathing through paper. Avoid pressing too hard or paper pattern will tear.
Tape
6. Students incise line into sheathing directly holding ballpoint pen at an angle to create a smooth and deeper line. Students check for accuracy in incising lines before removing pattern.
Pattern is lifted to incise sheathing directly.
7. Students roll out Sargent Art Tempera Paint with brayer to an even consistency on smooth surface and apply evenly to side of sheathing that prints first.
8. Students print small proof sheet first; continues to larger sheet using same color following teacher directions and demonstration. When both sheets are printed with first color, a second color is mixed. Student washes and dries first side of sheathing; applies second color to remaining side and prints design in negative spaces to complete composition.
(2) Independent Practice and Check for Understanding:
Teacher circulates among working students observing students demonstrating understanding of objectives and providing reinforcement as necessary to assist students, especially in printing process.
(3) Closure:
Students copy assignment rubric in sketchbook checking the following as they reflect on their work:
Technical -- each print demonstrates consistency and craftsmanship in use of media;
placement of shapes are parallel to top and sides of paper, evenly spaced. Sheathing accurately cut. Final composition is neat.
Elements -- lines carefully incised, monochromatic or warm or cool colors dominant
Principles -- pattern appears in repetition of line, shape and color. Contrast appears in mixing of color and incising of line from thick to thin. Composition is balanced with accurate placement of sheathing in printing process.
Evaluation:
Level One -- Pattern composition demonstrates complete understanding and high level of success in completion of all parts of assignment rubric. Colors, pattern, balance and contrast attract viewers.
Level Two -- Pattern composition demonstrates understanding and success in completion with need for more dominance in assigned elements and principles and/or fewer errors in craftsmanship or printing.
Level Three -- Pattern composition is complete but demonstrates limited understanding of elements and principles assigned and/or need for more practice in incising or painting sheathing and printing to achieve contrast, balance, and pattern.
Level Four -- Pattern composition is complete with lack of understanding of elements and principles assigned. Skill in incising lines, painting, and printing is poor.
Extensions: Before sheathing is incised, blocks of color (plate blocks) can be printed in a checkerboard pattern and dried. Incised sheathing will overprint increasing number of colors in composition from three to five including background color.
Students can roll paint colors together to achieve rainbow or graded effects. Sargent Art Metallic Tempera Paint can be mixed into Sargent Art Tempera Paint or used individually.
Completed work can be used a wallpaper background for oil pastel portrait, still life, or landscape composition as shown.
Your Recently Viewed Projects

Thanks for your comment. Don't forget to share!
Report Inappropriate Comment
Are you sure you would like to report this comment? It will be flagged for our moderators to take action.
Thank you for taking the time to improve the content on our site.