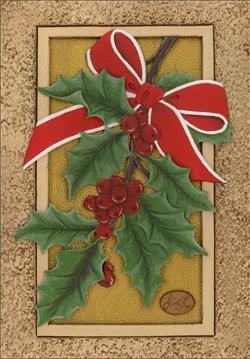
Leather Carved Christmas Card
Create a lovely three-dimensional Christmas card with lightweight carved leather. Card recipients will love the carved and mounted Christmas ribbon and holly. These would also make wonderful gift toppers or tags.

Materials:
- Leather: #9003 Royal Meadow
- Craftool Stamps: B202L, B202R, B701, E294-00, E294-01, E294-03, E294-04, F891 & S931
- Pattern and Instructions [pdf]
Instructions:
This beautiful Christmas card, designed and carved by Jim Linnell, can be carved two different ways. It can either be carved as one piece of leather with usual carving technique or it can be carved using the filigree technique. The featured piece was done with the filigree technique using two different pieces of leather. The filigree technique provides extra depth to the finished card. The ribbon and holly was carved on a lighter weight of leather and then glued onto the main card. The leather used was the #9003 Royal Meadow. Keep in mind, when cutting your leather for this project, you will want to include the backside of the card as well. The fold for this card will be on the topside of
this pattern.
The filigree technique ~ Use a medium weight leather (5 to 6 oz.) for the main body of the card and use a lighter weight ( 3 to 4 oz.) for the ribbon and holly.
The main card ~ Transfer the “Season Greetings” onto the leather with tracing film. Also transfer the rectangular frame on the left side. Do not transfer the ribbon and holly. Carve the letters with a swivel knife and then use a beveler around the letters. A figure carving beveler (F891) was used on this sample. A delicate touch must be used when beveling and matting around the tight spots on the letters. Use the swivel knife to carve the rectangle frame. Use a beveler on the outside of the frame. Use the E294 matting tools to add a textured background all around the card. Now use a razor knife to carefully cut out the interior of the frame. A thin liner was painted gold and glued to the main card to fill the interior of the rectangle frame. (Be sure to cut the liner a little larger to provide an area to be glued to the card.)
The ribbon and holly ~ Transfer the design onto lightweight leather. The B701 beveler was used to bevel most of the design. The B202L & B202R bevelers were used on the spines of the leaves. The S931 seeder was used to accent the berries. Once your tooling is complete, use a razor knife and/or chisels to cut (filigree) the ribbon and holly apart from the leather. Lightly moisten the leather and mold the leaves and ribbon to give extra depth. Use Cova Colors to add your desired colors. After all tooling and coloring has been completed, you are now ready to adhere the ribbon and holly to the main card. Lightly apply #2655-01.
Leather Weld to the backside of the ribbon & holly and position onto the rectangle frame of the card. The inside can be done several ways. You can choose to line the inside of the card with a heavy paper with glue. After it dries, you can write your Christmas greeting on the paper. Another choice is to use an existing card that is similar in size. Simple glue the existing card to the inside of the leather card and you’re done. Or you can use your creativity to finish the inside in a unique way.
Find all materials at Tandy Leather Factory.
Read NextLeather Sunflower Notebook Cover