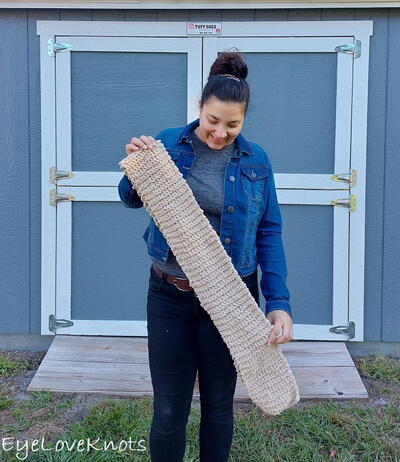
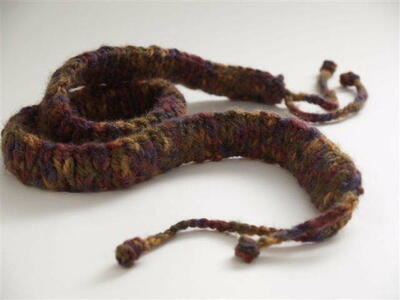
Fun Knitted Belt
This knitted belt, made quickly on a knitting board, is a great way to perk up an outfit, from Authentic Knitting Board.

Made with Stockinette Stitch
Measures 1-1/2” wide X 40” long to be worn at hipline. Knitted in four sections. Belt may be adjusted to any length by adjusting the amount of needles used.
Each section knit at full width on mini board = 10” of length. 30” belt will require only 3 sections at full width of mini board. For smaller belts, reduce the amount of cast-on stitches for each section.
Materials:
- 10” mini board
- knit hook
- crochet hook
- Lion Brand Jiffy Yarn El Paso #325, 115 yds or (1) skein of yarn.
Instructions:
- For Belt 40” between the Ties, Cast On 22 stitches. Lay anchor yarn.
- Knit in Stockinette for (5) rows.
- Bind Off of board. Bind Off the cast on stitches at anchor yarn.
- Make (4) of this piece.
FINISHING:
There are variations to completing the belt. Sew with large eyed needle with your matching yarn. You can join the pieces by simply whipping the side edges together with matching yarn and the seams will be invisible as we have done. You can also join them with an ‘X’ by sewing the corners of each side seam with large diagonal stitches. This will result in a longer belt due to the added spacing between the sections. They could also be sewn with a piece of leather joining them together. To complete the belt, crochet a chain for each end with your yarn. Make (2) of these chains to be 22” in length each. Slip the crochet hook thru end of belt and pull the chain thru all the end stitches so that the (2) ends of chain are even. Tie the chain firmly. Tie knots in the ends of the chain to create balls. These chains can also be created by using purchased leather rope for the chains. Again, the finishing can create many delightful effects to your knitted belts. This will make great gifts for any season.
How to Bind Off:
Taking your knitting off the knitting board is Binding Off. You can use your knit hook, however, a crochet hook is easier. Start at end of board opposite the yarn
attached. Cut yarn to 2-3” tail. Slip the hook into the first 3 loops, first stitch front and back, next stitch, front. With 3 loops on hook, pull loop closest to hook thru the other 2 loops. Next pick up the next 2 loops, back loop and next front loop. Pull loop closest to hook thru the other 2 loops. Continue this across the board until the knitting is free of the board. If you end with just one loop, that is fine. With your last loop on the hook, pull yarn tail thru the loop for a finished knot. You can pull the tail into the knitting with crochet hook. The same process applies to the cast-on stitches on the anchor yarn. Pick up 3 loops, pull one thru the other 2. Pick up next 2 loops (do not be concerned if it’s the back or front loop). Pull the loop closest to hook thru the other 2. Continue this across the anchor yarn, knot with yarn tail, and remove the anchor yarn.
Read NextWoodland Hat
Your Recently Viewed Projects
Thanks for your comment. Don't forget to share!
JessiCAN
Apr 04, 2011
@Ecohagan: A knitting board is another name for a knitting loom. This review explains a bit about them: http://www.knittersreview.com/article_tool.asp?article=/review/product/041118_a.asp Hope this helps! -- Editors of FaveCrafts
Report Inappropriate Comment
Are you sure you would like to report this comment? It will be flagged for our moderators to take action.
Thank you for taking the time to improve the content on our site.