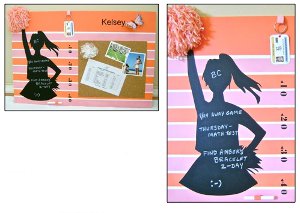
Back to School Organizer Board
Make sure your little girl is all ready for the new school year with this Back to School Organizer Board. With room to store her ID and a chalkboard stencil so she can write down all her important tasks, this organizer board makes a great gift for girls of all ages.
Materials:
- Aztek airbrush
- White paint
- International Orange paint
- Piping Pink paint
- Blue Angel paint
- Craft Knife
- Elmer’s white 20” x 30” Foam board
- Darice Sticky Back Chalkboard Roll
- Artist’s Loft natural Cork Liner
- Offray .50” white grosgrain ribbon
- Elmer’s Glue
- Dritz Quilting Basket .50” Sequin Pins
- White plastic shopping bag
- Large Metal ring
- Scotch Spray Mount Repositionable Spray
- 3M 1” wide Painter’s Tape
- Template 1 (A)
- Template 2 (B)
- Template 3 (yard marking)
Instructions:
To achieve the colors in this project mix: Orange = International Orange, a bit of white and Piping Pink; Pink = Piping Pink and a small amount of Blue Angel
-
With a marker, make a rectangle on the right side of the board that measures 12” x 11”. Position the rectangle 6” from the top of the board and 2” from the right side. This area will not need to be painted, as the cork liner will cover it.
-
Apply paint on the board from the bottom up, marking bands for color placement with painters tape, painting, then moving on to the next color. Use tape to mask areas you won’t be painting and to create straight lines. The tape can be placed over dried airbrushed paint and removed again without lifting the paint if done carefully.

-
Each painted band is 1.50” wide. Each unpainted white line is .25”. Start by painting a pink band at the bottom followed by a .25” space then an orange band. Repeat working toward the top.
-
The ninth line will be pink, followed by ¼” white space and a 4” wide band of orange.

-
Download and print out the yard line markers on card stock. Cut out the black areas. Turn them over and coat with the repositionable spray. Place the markers on the board between the cheerleader and the cork.
-
Spray the yard line markers with black paint.

-
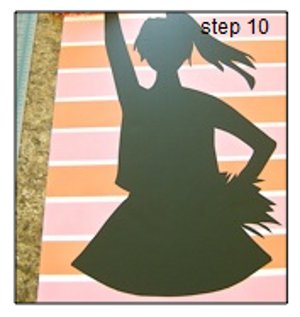
Download and print out the cheerleader templates A & B. Tape the two pieces together matching where the printing ends on one to where it begins on the other. The image is deliberately printed in reverse.

-
Spray the back of the joined templates with repositionable spray. Attach the template to the paper backing on the reverse side of the chalkboard.
-
With a craft knife, cut out the template and chalkboard together.

-
Peel off a couple of inches of the chalkboard backing at the bottom of the image. Position the chalkboard cheerleader on the painted board. Work it the way you would contact paper, removing more backing and smoothing the image into place a little at a time. The hem of the cheerleader’s skirt should be about 1” from the bottom of the board. The widest part of the skirt should be approximately 1.25” from the left edge of the board. The cheerleader’s arm does not reach the top of the board. It will be covered later by the pom-pom.
-
Remove the backing from the cork and press it in place over the unpainted area.
-
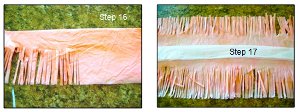
The pom-pom is made from a white plastic shopping bag which has been painted and has the bottom cut out.
-
Cut off the bag handles and the printed section of the bag. Save the handles.
-
Fold the plastic in half twice along the length. Cut the side with the raw edge along with the folded one, creating a straight edge on both.
-
Spray paint one side of the plastic pink and the other side orange.
-
Use a rotary cutter or scissors to cut thin strips along the length of the plastic. Only cut to about .50 inch from the fold.
-
After cutting all the slits, open up the plastic and lay it flat. Place a small plastic strip from the handle along the uncut center.
-
Gather up the center portion of the plastic with the handle and tie it in a tight knot. Cut off the tails of the tie and fluff up the plastic to shape it.
-
Create a ring holder by painting a six-inch piece of ribbon pink. The holder is a convenient place for hanging student ID tags, keys, or any other small item used daily. Put the painted ribbon through the metal ring and glue the ends to the back of the board.

-
Create a chalk holder by painting a piece of ribbon orange. The ribbon should be large enough to wrap around a piece of chalk. Add a half-inch to this measurement and cut the ribbon. Overlap the ends .25” and glue them together.
-
Glue the holder to the bottom of the board.

-
Personalize the board with a name. Print out the name in black at least one inch high on card stock. Cut out the black areas to create a stencil. Spray the back of the page with repositionable spray. Press the name stencil to the board in the wide orange band above the cork area and spray it with black paint. As an option, you can also use peel and stick lettering available at craft stores to create the name.
-
Glue the pom-pom at the top of the cheerleader’s arm.
-
Attach photos and schedules to the bulletin board area with the tiny pins.

- Attach the board to the wall using adhesive-back Velcro strips or the method of your choice.
Read NextDoll Bed Makeover

Thanks for your comment. Don't forget to share!
flowergirl
Sep 17, 2017
I'm not going back to school anytime soon but I would love a personalised organizer for myself. I love a good step by step tutorial and this will be wonderful cause I could stop and pick up from where I left off.
Report Inappropriate Comment
Are you sure you would like to report this comment? It will be flagged for our moderators to take action.
Thank you for taking the time to improve the content on our site.