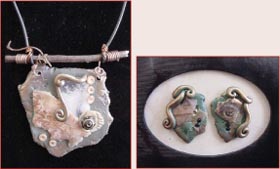
Polymer Clay Pendant and Earring Set
Due to the nature of this project and individual taste, each pendant and earring will be unique in itself. Feel free to experiment and let your creativity flow! This is a fool-proof project from AMACO!!!
Materials:
- Fimo® Soft Polymer Clay: Sahara, Caramel, Tropical Green, Black
- Fimo® Classic Polymer Clay: Translucent
- FUN WIRE™: Copper; 22 gauge and 26 gauge
- Miscellaneous beads and findings of interest
- PearlEx Powder: Copper and Gold
- Small Twig; approximately 3"
- Black cording for pendant
- Earring backs for earrings
- Quick grab glue adhesive
- Acrylic Clay Roller or Pasta
- Machine
- AMACO® PolyBlade Worksurface
- Rubber Stamp(s) of choice
- Pigment Ink in color(s) of choice
- Pliers
Condition all clay with roller or pasta machine until it is soft and pliable.
Steps:
- To create the olive green base of the pendant, mix together all colors except translucent, in small varying amounts until desired marble or solid color is achieved. It is not necessary to mix the colors completely if you have achieved a pattern or texture you like.
Hints:
If color is too gray — add sahara and small amount of brown
If color is too brown — add small amount of green
- Flatten green marbled mixture to 1/8" with roller and tear out an asymmetrical square approximately 21/2 to 3 inches.
- Begin tearing off pieces of the square until you get the shape you like. Determine the top and poke one hole on each side with needle tool.
- Texture base with a crunched piece of discarded Fimo® wrapper.
- Flatten translucent clay to approximately 1/8" thick. Stamp image. Allow to dry for a few seconds before touching. You may lay an extremely thin sheet of translucent over the top of the image to prevent distortion of the image.
- Tear out the image and place it on the base where desired. Add other asymmetrical shapes of color or translucent clay to the base and texture if desired.
- Roll logs and curl into filigree shapes or add flattened balls of clay to add additional interest to piece. Embellish with beads and found objects if desired. Highlight desired areas with PearlEx powders.
- When the final look is achieved, bake at 265 degrees for 20-30 minutes.
- For earrings, use the same technique only creating smaller versions to coordinate with pendant.
Pendant Assembly:
- Trim twig to size. Cut a 12" piece of 22 gauge copper wire and wrap several times around each end of twig. Poke remaining end of wire through hole of pendant and twist to secure.
- Cut jewelry cord to size, approximately 36 inches long. Wrap jewelry cord around twig and secure ends by wrapping with 26 gauge copper colored wire.
- Glue earring backs to earrings with Quick Grab glue adhesive.