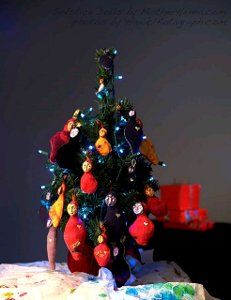
Fabric Solstice Dolls
Learn how to make cloth dolls with a craft tutorial from Kara Jones. These fabric solstice dolls are perfect for your Christmas or solstice celebration.

Materials:
- sculpey or any brand of poly-clay
- clay moulds or willingness to sculpt your own faces out of the clay
- pearl ex pigments and soft paint brush
- wood or metal pointed skewer
- parchment paper
- oven for baking pressed clay pieces
- needle
- thread
- scissors
- scrap fabrics
- ribbon
- plain white tissue paper
- old cardboard box
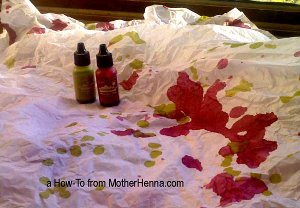
- alcohol inks (various colors you like)
- india ink waterproof pen
- 1 inch round punch
- cardstock
- acrylic paint or gesso
- shimmery silver or gold pen
Instructions:
- For the faces, I started by doing mould pressings with poly-clay. You can use sculpey as I did, but there are other brands of clay, too. And the moulds I'm using are the two shown above in the photo. I've seen them both at Michael's or online at Mister Art or Dick Blick or Create For Less, etc.
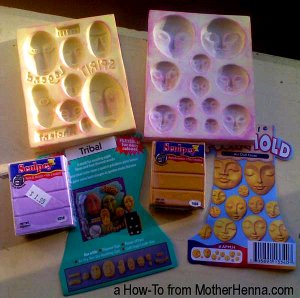
- After I press the clay, I mess around with the faces. I poke holes in the top of each so that I'll have a place to stitch them onto the fabric --poke holes using pointy end of a skewer. I carve henna style designs into some of them using that pointy end of the skewer, too. I might mess around with the shape of the eyes or tilt of mouth. I might press one color clay for immediate front of face, but then I'll press a second color of clay on top, so when I pull it out of the mould, then it looks layered.
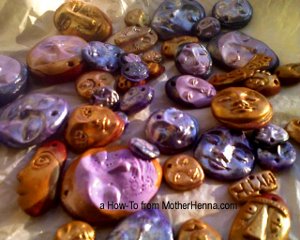
- And I also pull out the Pearl Ex shimmery pigments and use very soft, dry paint brush to add coat of various rose gold or silvers on top of them. This really brings out the accents of the lines of each face. And then I put all the faces on parchment paper on a cookie sheet and bake at 275F for 15 minutes. It's stinky!! So be sure you turn on your oven fan and open a window!
- Then I start thinking about the dolls themselves. I keep a bag set aside in my studio for scrap fabrics. There are bits and pieces from sleeves I've cut off t-shirts or other clothing items I've altered or were so worn, I cannot decently wear them anymore. There are pieces from other projects where I just didn't use all the fabric for it. There are pieces people have sent me in art supply swaps. You get the idea. So I go through this bag and pull out the larger pieces that I could use to make hand-sized-or-smaller patterns for the dolls. I wanted to keep them a little smaller this time so that they could be used as ornaments on trees if people wanted to do that with them. At the very bottom of the bag is just a mound of literally, diced-up pieces of fabric. These were the ends of pieces or edges cut away from other patterns and such. This diced up pile is what I use to stuff the dolls! This is truly a recycling project!
- With the larger, in-tact pieces I begin pairing them up to be the two sides of the doll. I turn them inside out and draw the pattern on the back side. These are very rough patterns. I just wanted the impression of head, round body, some sort of tapering at the bottom. I was sort of thinking Venus of Willendorf kind of tribute. But so the patterns are just loosely sketched circles and triangle-ish shapes. And then I cut each out.
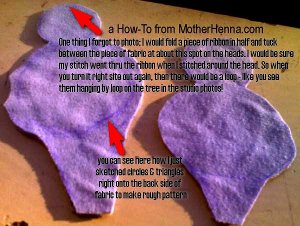
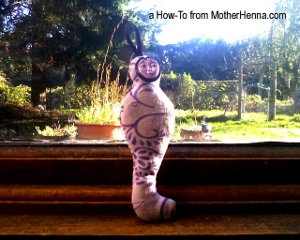
- I do a back-stitch around 3/4 of the body -- you'll find a *great* back-stitch how-to video on YouTube by clicking here -- and then I pull it right side out again thru the open 1/4 space. I stuff it full of the diced fabric piece, making sure the head and body really fill out. And then I stitch the last 1/4 closed by doing a whipstitch and I use the same kind of stitch to attach the polyclay face onto the head area. I might take a fine point, india ink pen to the face at this point, too. I draw thin lines over the eyes, mouth, maybe add more henna style accents -- like flower petals around the hole where the stitch is holding it onto the doll body.
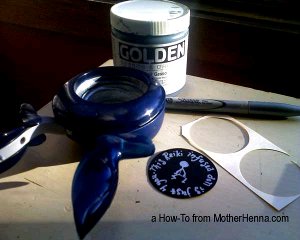
- Then I start thinking about how to package the piece. I wanted a tag to go with each doll, so I used my circle punch to get circle shaped tags out of manilla tag paper or cardstock. I painted the front of the tag with black gesso - you could use any acrylic paint. And then using a silver sharpie pen I drew my little doll logo with circle of words around it that say: "This Reiki infused doll is just for you." On the back of the tag, I write: "handmade with heart by ..." And then I sign and date it... and add my motherhenna.com address, too.
- Again thinking about packaging, I wanted to have lovely tissue paper to wrap each doll. I stole this idea entirely from Sooze who sent me something for our Day of the Dead swap in this type of tissue paper. So you just take any old white, plain - previously used even so you are recycling again! - tissue paper. Crumple it up and I put it in a cardboard box. Then I sprinkled liberally with the cranberry and lettuce color alcohol inks from Adirondack. Uncrumple and see what you get! They all turn out so lovely. Let them dry entirely before wrapping anything in it!
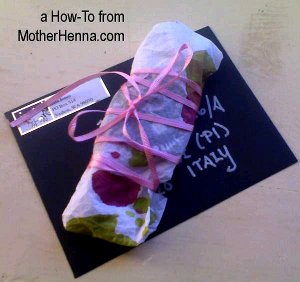
- So my dolls each got this kind of wrapping along with a piece of ribbon to keep the paper closed. And for the most part, they were all small enough that I could slip them into the note card sized envelopes I had on hand. I used gold or silver pens to do the addressing. Made for pretty little holiday packets.
- And in the end, I had a whole little tree of ornaments!
Read NextEaster Basket
Your Recently Viewed Projects


Thanks for your comment. Don't forget to share!
Mazzie
Feb 14, 2011
How creative and beautiful! I was drawn to your solstice dolls as our grandsons (aged 4 and 7) live in Anchorage and attend a Waldorf School where they learned (and have taught me) all about celebrating solstice :) You pay such attention to every detail. And so generous of you to share your directions. I have minimal talent and just had to compliment your work and generosity. Mema
Report Inappropriate Comment
Are you sure you would like to report this comment? It will be flagged for our moderators to take action.
Thank you for taking the time to improve the content on our site.