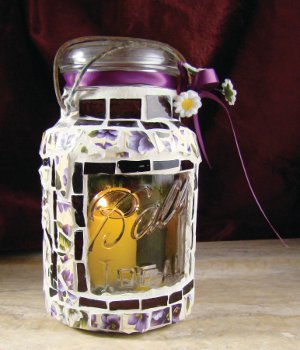
Pansy Ball Jar
Take an old Ball jar and turn it into something beautiful! This Pansy Ball Jar from Diamond Tech is great for displaying a candle, storing spices, or just sitting pretty on your shelf. You can make this Mason jar craft with whatever color tiles you'd like.
Materials:
- 1 pkg. Jennifer’s Mosaics™ Purple Cathedral Glass Chips
- 1 pkg. Jennifer’s Mosaics™ Green Cathedral Glass Chips
- 1 pkg. Jennifer’s Mosaics™ Vintage Pansies tile
- 2 lb. Jennifer’s Mosaics™ White Sanded Grout
- Jennifer’s Mosaics™ Wheeled Glass Nippers
- 1 Quart Ball Jar
- Mosaic Adhesive or Silicone
- Latex Glove
- Safety Glasses
- Mixing Spoon
- Paper
- Scrubby or Soft Cloth
- Disposable or Plastic Bowl
- Plum Colored Ribbon – 1 yard
- Small Artificial Daisies
- Yellow Votive Candle
- Sand
- Optional – Long Tweezers or Pliers
- Pattern
- Grid
Instructions:
- Start with a quart Ball jar. This project uses a jar with a wire bail lid. Any style jar can be used for this project. Wash the jar inside and out and dry.
- Because jars vary in size, start by enlarging pattern (Fig. 1) to fit the size of your jar. Lay the pattern flat on your work area.
- The jar used in this project has the word “Ball” embossed on the front. Nip several of the purple cathedral chips into thirds and create a window around the words to allow them to be a part of the design. If there are no words, leave a 3” X 3” window on the front of the jar (or a window size relative to your jar).
- Using a wheeled nipper nip Vintage Mosaic™ Pansies into small pieces. You can also place the tile in an old towel and strike them with a hammer to break.
- Use the photo and the pattern for reference. Lay out cut stained glass chips and Vintage Mosaic™ tiles on your pattern. Leave 1/8” space between the chips and tiles for grout.
- Once you are happy with your layout, applying the pieces to the jar. Use a clear drying mosaic glue or silicone. Apply glue approximately 1/8” thick on the back of each piece and place on the glass surface.
- Let dry according to the manufacturer’s instruction.
- Glue whole green & purple chips to the inside back of the jar opposite the window. Create a checkerboard pattern (Fig. 2) by alternating chips. Place these chips up against each other as thee will not be grouted. When finished, the pattern can be seen through the clear opening on the front of the jar. Use liberal dollop of mosaic glue to hold the glass chips to the concaved surface of the inside of the jar. NOTE: A pair of long tweezers or pliers is useful for placement, should the opening be too narrow for your hand.
- Place the jar vertically on a flat surface to allow the glued chips to dry without moving for 24 hours.
- Tape off window with masking or painters tape. This allows the window to remain grout free.
- Exterior grouting - mix one cup of white grout, following the manufacturer’s instructions. Wearing a latex glove, spread grout on to the surface of the jar making sure that grout is pressed into all the spaces between the glass pieces. Wait about 15 minutes for grout to set.
- Gently wipe away excess grout using a scrubby, taking care not to pull away grout from between pieces. It is very important to remove any grout on tile surfaces before grout is completely dry.
- Use a soft cloth to buff glass to a clean shine. Allow 24 hours for mosaic piece to dry thoroughly.
- Fill the jar with sand until it reaches bottom edge of the window opening. Insert the votive into the sand. Cut several daisy blossoms from their stems and arrange them around the candle.
- Tie a bow around the neck of the jar, leaving several inches of length on the ends. Glue several stems of flowers at the bow.
Read NextSpotify Glass Art
Your Recently Viewed Projects

Thanks for your comment. Don't forget to share!
Marilyn B
Jun 08, 2017
I love pansies and violets so this really caught my eye. This would make a great gift or as part of as pretty luncheon centerpiece filled with real pansies! I am wondering if you could embed real dried pansies or Violets into plain tiles or even onto the glass itself with a decopage technique if you wanted a bit of a different look. Fun project and super idea!
Report Inappropriate Comment
Are you sure you would like to report this comment? It will be flagged for our moderators to take action.
Thank you for taking the time to improve the content on our site.