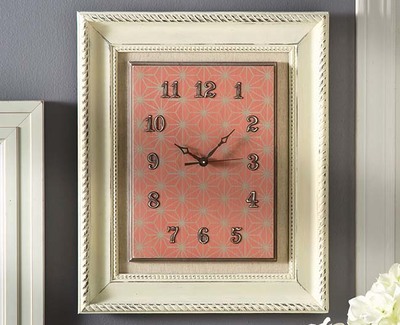
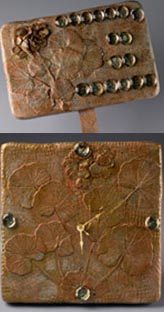
Tick Tock Goes the Clock
Keep track of time with this Faux Terra Cotta clock and Garden sign. It would fit perfectly in your backyard gazebo.
Materials:
-
STYROFOAM™ Brand Foam:
- Blocks, 18" x 12" x 1"
- Acrylic paints: cream; terra cotta; dark green; metallic gold; metallic green patina
- Matte-finish acrylic sealer
- Fresh geranium leaf
- Terra cotta air-dry clay
- Clay tools: mini four-petal flower cutter; rolling pin; woven placemat or textured fabric
- Clock movement and hands
- Alphabet/number stickers of choice
- Flat-backed glass marbles, 21
- Wooden garden stake
- Serrated knife
- Candle stub or paraffin
- Fine-line black permanent marker
- Pencil
- Ruler
- Medium flat paintbrush
- Small natural sponge
- Old toothbrush
- Disposable palette
- Water basin
- Paper towels
- Solt, lint-free closth
- Sissors: regular; serrated scallop decorative-edge
- Sawtooth picture hanger with nails
- Glue for STYROFOAM
- Optional: Large cardboard box
Instructions:
-
Wax serrated knife with candle stub or paraffin. Measure and cut one 9" square (clock) and one 6-1/2" x 9-1/2" rectangle (sign) from foam block. Frimly press foam sides against hard work surface to smooth cut edges and round corners. Push pencil tip through center of clock to create hole for clock movement.
-
Roll clay to 1/8" thickness. Cover entire surface of each foam piece with clay, piecing seams as needed. Gently press out air bubbles while working. Use rolling pin or work surface to smooth any visible fingerprints, then press placemat or fabric into clay to create unique texture.
-
For sign, insert top of garden stake into center bottom edge and remove. Apply glue to end of stake before inserting into hole; let dry.
-
Roll clay to 1/8" thickness. Press geranium leaf, vein side down, several times into clay; designer used seven leaves on sign and ten on clock. Use regular scissors to cut clay shapes apart, leaving border around each leaf. Use scallop scissors to cut each leaf from clay, creating signature ruffled edge and trimming to desired size.
-
For leaf stems, roll thin ropes of clay. To attach stems and leaves to surface, use fingertip to lightly coat back of clay shape with water before gently pressing to surface. Refer to photo for placement. Add each leaf and its stem individually.
-
Roll clay to 1/8" thickness. Use flower cutter to cut several shapes from clay. Use scissors to snip clay between petals, amost to center. Pinch center to gather petals, moisten back with water and press to surface. Repeat as desired, overlapping blossoms. Refer to photo for placement.
-
Let dry overnight, turning shapes periodically to be sure each side dries. Color will lighten as clay dries. If any clay pieces come loose, gently remove and re-glue to clock or sign.
-
Paint garden stake with two coats terra cotta; let dry. Thin cream paint with water and brush over all surfaces of clock and sign, including stake; remove excess with soft cloth, leaving paint in crevices. Let dry.
-
Follow manufacturer's instructions to sponge paint raised clay areas and garden stake with gold, then green patina, paint; let dry between colors. Repeat as desired. Let dry.
-
Place clock and sign inside large cardboard box. Spatter paint surface of both pieces with dark green; to spatter paint, barely dip toothbrush bristles into paint before dragging thumbnail acress bristles. Let dry.
-
Apply two coats of matte sealer to each piece; let dry.
-
Following manufacturer's instructions, insert clock movement. Adhere number stickers at 12, 3, 6 and 9 o'clock or as desired. Glue marbles on top of stickers; let dry. Apply glue to tips of picture hanger nails before inserting into hanger at top center of back of clock.
- Adhere letter stickers to sign, spelling "Welcome to my garden" or desired message; allow extra room between letters to accommodate marbles. Glue marbles on top of stickers; let dry.
®™ Trademark of The Dow Chemical Company ("Dow") or an affiliated company of Dow. For more project ideas, please see styrofoamstyle.com.