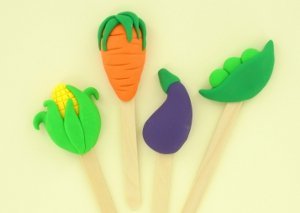
DIY Clay Garden Stakes
Keep your garden organized with these Adorable Garden Stakes. This DIY garden decor will not only look cute, but will help keep track of where you planted all your vegetables. With miniature versions of your crops on top of the stakes, you'll never lose track of where you planted your produce. This is an easy DIY garden project that will only take you minutes to create. Follow this tutorial and prepare to take your garden to the next level with these fantastic stakes.

Materials:
- Sculpey® III Emerald clay - 2 oz, 1 block
- Sculpey® III Granny Smith clay - 2 oz, 1 block
- Sculpey® III Yellow clay - 2 oz, 1 block
- Sculpey® III Purple clay - 2 oz, 1 block
- Sculpey® III Just Orange clay - 2 oz, 1 block
- Craft sticks
Instructions:
-
Do not use unbaked clay on unprotected furniture or finished surfaces. Start with clean hands and work surface area. Good work surfaces include wax paper, metal baking sheet, or disposable foil. Knead clay until soft and smooth. For best results, clean your hands in between colors. Shape clay, pressing pieces together firmly. Bake on oven-proof glass or metal surface at 275°F (130°C) for 15 minutes per ¼" (6 mm) thickness. For best baking results, use an oven thermometer. DO NOT USE MICROWAVE OVEN. DO NOT EXCEED THE ABOVE TEMPERATURE OR RECOMMENDED BAKING TIME. Wash hands after use. Baking should be completed by an adult. Begin by preheating oven to 275°F (130 °C). Test temperature with oven thermometer for perfectly cured clay. Condition clay by kneading and squeezing small pieces until it is smooth and a consistency that is easy to work with.
-
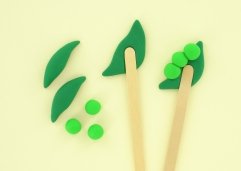
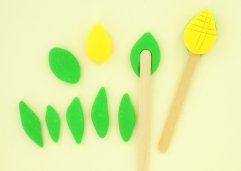
To make the pear pod, make two large Emerald pea shapes that are thick in the middle and tapered at both ends. Make three pea shapes from Granny Smith.
-
Flatten one of the pea shapes. Press a craft stick into it.
-
Position the peas on the edge of the pea pod. Flatten the other pea shape and drape it over the top of the peas. Smooth the top pea shape to the bottom one along the edges. Set aside.
-
To make the corn, make an oval shape from Granny Smith and several flat husk shapes. Make a Yellow corn cob shape.
-
Flatten the Granny Smith oval and press a craft stick into it. Flatten the corn cob shape over the craft stick and press it into place. Use the craft knife to score corn kernels into the cob.
-
Place the husk shapes over the corn and curl some of them. Set aside.
-
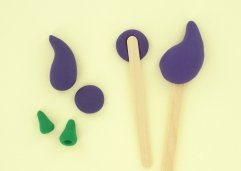
To make the eggplant, make a thick circle and a thick eggplant shape from Purple. Make an Emerald cone shape.
-
Press the craft stick into the circle. Press the eggplant shape over the craft stick and push it into place.
-
Using a pencil, create a hole into the thick end of the green cone. Put the tip of the eggplant shape into the hole in the stem. Smooth the sides of the stem around the eggplant neck. Set aside.
-
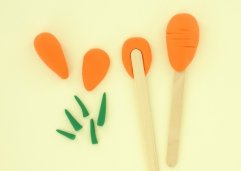
To make the carrot, make a little carrot shape and a large carrot shape using Just Orange. Make five little green tops for the carrot. Press the craft stick into the smaller carrot shape.
-
Flatten the big carrot shape over the craft stick. Make little lines in the carrot with the craft knife. Add the carrot tops. Set aside.
- Bake all of the plant stakes as directed above. Baking will not harm the craft sticks. Cool and happy harvest!
Read NextKnee Pad For Gardening