Rustic Stenciled Dresser Makeover

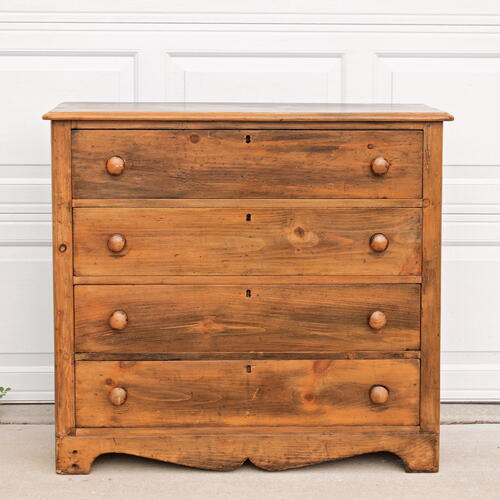
If furniture could talk, I’m sure this piece would tell some incredible stories from its lifetime. Even though the finish was a bit dated, the late-1800s Knapp joints, primitive nails, and keyholes have such rustic charm. And the drawers all slid smoothly, which is a rare find in such an aged piece!
I wanted to update this dresser in a way that would enhance its charm and add a touch of whimsy. This makeover will demonstrate how to refresh a very old antique while keeping its original character.
Materials List
- Wood filler (I used Elmer’s ProBond® wood filler)
- Small scraper
- 220-grit sandpaper
- Gray paint (I used Annie Sloan Chalk Paint® in Paris Grey)
- Paintbrushes
- 320-grit sandpaper
- Lint-free cloths
- Painter’s tape
- Stencil (I used Miss Mustard Seed’s Nancy stencil)
- White paint (I used Annie Sloan Chalk Paint in Pure White)
- Thick paper plate
- Plastic spoon
- Foam pouncers (larger one for stenciling and smaller one for making dots—mine are by Martha Stewart Crafts®)
- Paper towels, folded
- White furniture wax (I used Annie Sloan’s white wax)
- Wax brush
Instructions
-
Clean and make repairs to your dresser as needed. Refer to page 182 for helpful tips on making repairs and prepping your piece for a makeover. This piece was in great shape for its age and didn’t need any major repairs.
-
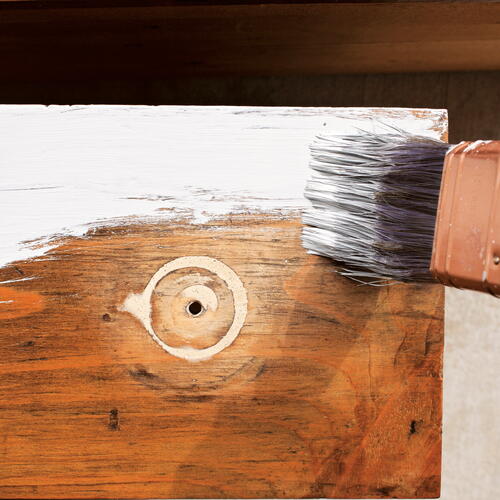
Remove the drawers. It seemed like the drawer pulls had been changed at some point, because there were deep grooves where the former pulls used to be. I filled those circles with wood filler and a scraper but otherwise left all the little nicks and dents alone as part of its character. Once dry, sand over the filled areas with 220-grit sandpaper.
-
Next, give your piece 2 to 3 coats of gray paint. I skipped painting the insides of the drawers because the wood was in good condition.
-
Always paint the inside of the frame where the drawers go. Once they’re pushed in, you want the paint to peek through from underneath and on the sides, not the original wood. I do this for all of my makeovers to give them a more finished look.
-
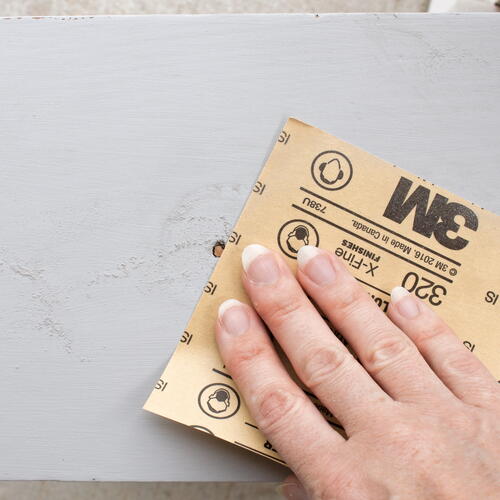
Lightly sand all over for smoothness with 320-grit sandpaper.
-
Tape your chosen stencil to the center of a drawer. Since this stencil is pretty simple, I started it off-center and then flipped it around later so there would be three flourishes centered on each drawer.
-
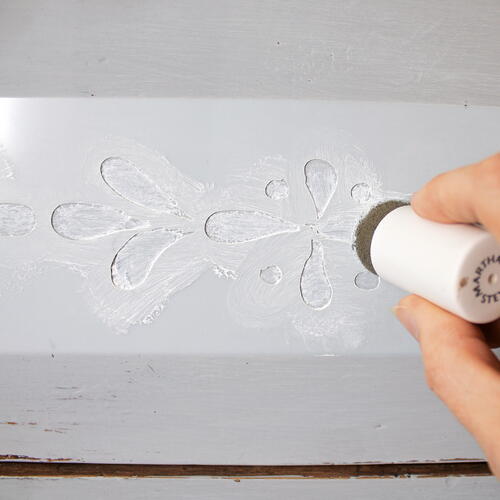
Get your white paint, strong paper plate, plastic spoon, large foam pouncer, and folded paper towels ready for stenciling. Scoop some paint onto the plate so it’s easier to work with.
-
With the foam pouncer, dab it into the paint and then blot the excess off onto the folded paper towel. You don’t want too much paint on the pouncer or you might end up with globs and drips under the stencil. Gently dab it onto the stencil, let it sit for 1 to 2 minutes to dry, and then go over it a second time.
-
When that section was done, I flipped the stencil to overlap the center flourish and then repeated the previous steps, stenciling just the left area. Miss Mustard Seed’s stencils are based on hand-painted designs, so they are not perfectly symmetrical. By flipping it over, the left and right flourishes end up being a mirror image of each other. If you’re using a regular stencil, you shouldn’t need to flip it.
-
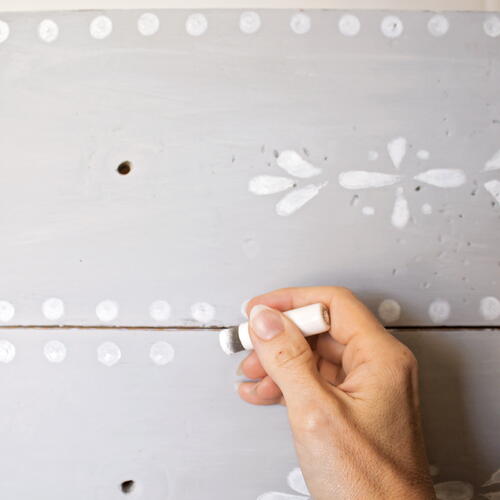
After all the drawers are stenciled, add some whimsical dots along the edges with a small foam pouncer. Blot it on the paper towel first and then you can make several dots before dabbing it into the paint again. Don’t worry about it being perfect.
-
For fun, add a stencil and dots to the sides of the dresser too!
-
Let the paint dry for about 10 minutes. Very lightly sand over the white painted areas with 320-grit sandpaper to give it a timeworn, faded look. Also sand near the edges of the drawers and dresser body to let the original wood show through some.
-
The wood pulls were still usable, so they were also painted gray.
-
Apply a topcoat to protect your beautiful work. I chose white wax to soften the gray tone a little more. Remember that wax takes about 30 days to fully cure, so be cautious setting things on top of the dresser for the first several weeks.
-
Be proud of your newest artistic creation!

Read NextGiant Clothespin Memo Holder