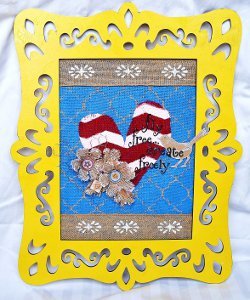
Fly Free, Create Freely DIY Home Decor Frame
 Visit Keri at The Creative Life.
Looking to add a bit of color and fun into your home decor? Check out the Fly Free, Create Freely DIY Home Decor Frame. Full of texture, color, and little rustic details, this is the perfect way to spice up your simple decor. Using a variety of crafting materials, this tutorial will show you how to collage them together to create a beautiful new piece of DIY home decor. Follow the step-by-step instructions to create your own unique piece of art. When you're done, place it on a shelf or hang it on your wall.
You can find this project, as well as many other fabulous blogger projects, in our new eBook, The Best Blogger Craft Ideas 2014: Decoupage, Sewing, Jewelry Making, and More free eBook. Download your own free copy today!

Materials:
- Embossing Folder (Basket Weave)
- Frogtape-Chevron
- Duct Tape Clean Release Painter's tape
- Multi-Media Scissors
- Aleene's Max Tacky Adhesive
- Short Cuts Hobby/Craft Paint in Sun Yellow
- Mod Podge (Glossy)
- Mod Podge Facet Cut Acrylic Shapes
- Mod Podge Papers
- Mod Podge Stencil
- Mod Podge Folk Art Paint
- Mod Podge Apple Barrel Paint
- Sizzix Big Shot
- Tim Holtz for Sizzix: Bird and Tattered Flowers
- Natural and red burlap and burlap ribbon
- Letter font: Quick Kutz
- Frame
- DecoArt Crackle Finish
- Chicken Wire
- Chipboard
Instructions:
- In a safe area, like a garage or outside, spray your Micheal's wooden frame with Krylon Short Cut Hobby/Craft Paint in Sun Yellow.
- While that dries, it's time to stencil your background! Cut your natural burlap to about 1/4in larger than your frame opening and lightly tape it down to your protected work surface using painter's tape, like Duct Tape Clean Release Painter's Tape. Mix equal parts of Folk Art Multi-Surface Acrylic Paint in Look at Me Blue and Mod Podge in a small bowl. (The Mod Podge will not only seal your paint, it will also fill in some of the holes on your burlap to give you a smoother finish.) Using a small stiff brush and Plaid's Folk Art Painter's Stencil in Moroccan Tile, begin stenciling in the upper left corner. When you are ready to move to another section, allow one row of your stencil to overlap your already painted design to ensure the pattern continues correctly. Set aside to dry.
- Using your red burlap, free-hand a heart or whatever shape you desire. Place shape on a protected surface and lay your Frogtape Chevron Tape to make your desired chevron pattern. Paint your burlap using a mixture of half Mod Podge/half Folk Art White Acrylic Paint. Because of the intensity of the red burlap, this will take 2-3 coats. Once dry, peel up your tape for perfect chevron lines.
- While all that dries, grab your Sizzix Big Shot, Sizzix Bigz Die-Birds, and Darice Embossing Folder in Basket Weave. Die cut a bird from your chipboard piece and then emboss it using your folder (note: make sure you have the bird facing the correct way for your embossing or you'll embossing will be upside down...trust me! LOL) I added a little white paint with my finger just to bring out the pattern.
- Next, to make your flowers, cut 5-7 flowers out of burlap using your Tim Holtz Tattered Florals Die. To get the 3-D shape, I lightly brushed each of them with Mod Podge and then nestled them into an empty egg carton to dry. For the centers, I used Mod Podge Facet Cut Acrylic Shapes and Mod Podge Podgeable Papers. I simply found a design I liked, used my shape as a template to draw around, cut it out using my Fiskars scissors and Mod Podged the design to the bottom of my shape. I lightly brushed the edges of my flowers with white acrylic paint to break up all the burlap.
- For an added bit of texture, I cut a heart from a piece of chicken wire using my Fiskars Multi-Media Scissors.
- To put it all together, I added strips of burlap ribbon to the top and bottom of my blue painted burlap and then attached the entire piece to the back of my frame using Max Tacky Adhesive by Aleene's. Next, I layered on my chevron heart, then my chicken wire heart and bird and lastly my grouping of flowers and flower centers.
- To finish up my project, I cut my title using my Sizzix Big Shot and Quickutz Alpha die "Dragonfly." I chose the title "Fly Free...Create Freely." I also lightly stenciled on my burlap ribbon using Folk Art White Acrylic Paint and a self-adhesive stencil from Plaid.
- This step is optional, but once I was done, I realized (for me) my frame was too matte, so I did a thin, all-over layer of DecoArt Crackle paint and then went back and hit a few spots with a thicker layer (thicker layer=thicker crackles.)
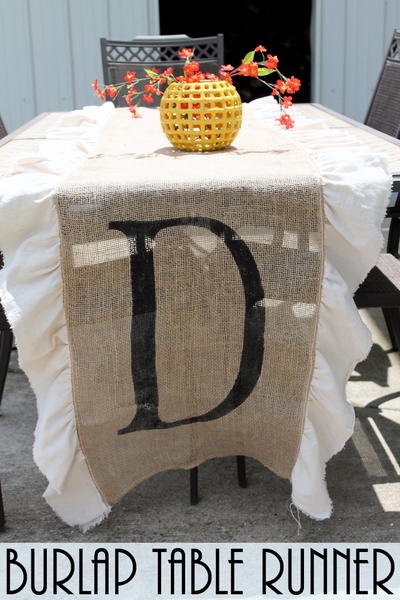
Read NextDIY Burlap Table Runner