Family Tree Canvas
If you're looking for some creative wall art, you're going to love this amazing Family Tree Canvas. This beautiful DIY canvas art piece makes a great gift for grandparents and parents, and it's so fun and easy to make. This is a quick and easy way to add a meaningful decoration to your living room or bedroom, and everyone who comes over to admire it is sure to love it as much as you do!

Materials:
- That’s Amore Squeeze Punch (Medium)
- SureCut™ Deluxe Craft Paper Trimmer (12")
- Micro-Tip® Scissors (No. 5)
- Seal of Approval Squeeze Punch (Large)
- Photographs
- Canvas
- Acrylic white paint
- Yellow mist paint
- Cream cardstock
- Brown ink
- Glue dots
- Various paper scraps and embellishments
Instructions:
-
Every family has a history. A story to tell. One day, while thinking on this topic, I realized that my little daughter didn’t really know much about our ancestors. Learning our family history gives each of us a place in the family structure and explains where we came from, how we fit in and how the family has grown and changed over time. So out came the old ring albums with my parents’ photos. You probably have one album just like that too. But with age, the album has disintegrated and all the photos have become fragile and have started to lose their color. That was when this project was born.
-
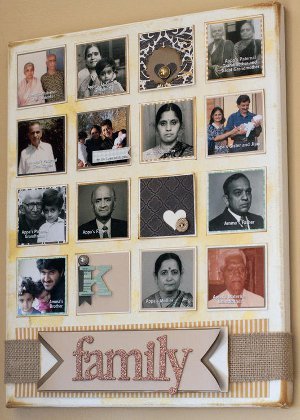
To document our family history, I chose to make a family wall art canvas. This project can easily be modified into a scrapbook layout that would go into an album. I wanted the photographs displayed up on the wall, so that my daughter could see them often and we could talk about the people in the photographs.
-
To begin, I chose a 16 by 20 inch canvas and primed it with white acrylic paint.

-
While the paint was still wet, I spritzed the canvas with some yellow mist and patted into the canvas. I let it dry for a couple of hours. This will make the canvas looked a bit aged.

-
Once the canvas dried, I chose few patterned papers and punched out 2.25-inch squares from them using the new 3X lever punches. I then arranged them onto the canvas. I matted them with cream cardstock and inked all the edges with some brown ink. I also ran the inkpad along the edges of the canvas to distress it a bit.

-
I scanned our entire ancestor’ photographs, and using a photo editing software, added a title to each photo. I then printed my photos and trimmed them to size. You could instead include your handwriting and write who is in the photograph using an archival safe pen.

-
I added a couple of blocks without photos, as decorative blocks to add some interest to the canvas. For these I used squeeze punches and buttons. I then adhered all my photo squares onto the canvas using glue dots.

- I finally added the title “family” and added some cardstock beneath it and ran a strip of burlap to finish the canvas. I cut the V shape from cardstock using the Microtip scissor and then used a regular pencil to give a slight curl to it.
Read NextRound Crochet Flower Floor Rug
Your Recently Viewed Projects

Thanks for your comment. Don't forget to share!
Report Inappropriate Comment
Are you sure you would like to report this comment? It will be flagged for our moderators to take action.
Thank you for taking the time to improve the content on our site.