This project was submitted by one of our readers, just like you.
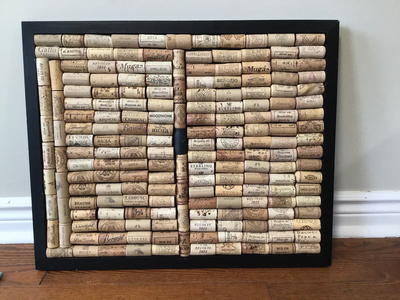
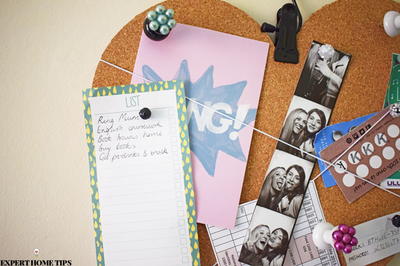
Cork Bulletin Board

Cork Bulletin Board
"An unused picture frame was used for this project with wine bottle corks collected. The back was reinforced with an extra piece of 1/4” plywood cut to fit. Some frame backing do not need this reinforcement. I laid out the corks in a pattern to determine fit. Once the pattern was in place, I checked for gaps between the corks. Once I was satisfied with the pattern, I hot glued all the corks down, removing a few at a time to keep the pattern in place. Time to create: 2 hours. "
Primary TechniqueMixed Media

Materials List
- Corks - 196 were used in the featured photo.
- Picture Frame with solid backing. The size of the frame used was 17” x 21”
- Hot melt glue gun.
Instructions
-
Find a picture frame with backing on it. If the backing is not solid - if it doesn’t bend easily- you will have to reinforce it with a thin piece of plywood or similar type of hard material. Use carpenters or hot melt glue to ensure that the backing is adhered firmly.
-
Dump out all the corks onto your table top and sort according to length and thickness. You will want to use the majority of the ones that are similar in length and breadth. If you do not have enough of the same ones, you can still create your pattern within the front of the frame and perhaps use the larger ones along the outside of the frame.
-
Place the corks in a pattern that appeals to you. It doesn’t matter which way you place the corks, as long as they all fit comfortably within the frame front.
-
Once you have your pattern set, plug in your glue gun to heat up.
-
Now you can start hot gluing your corks in place. You will have to work fairly quickly as the hot glue cools fairly quickly.
-
Starting in the top left corner, lift out a few corks at a time, perhaps about 5 or 6. If you remove more, the surrounding corks may roll into the space left by the ones you removed. Squeeze the hot melt glue in the first space left by the first cork. Place the cork down and move on to the next one. It dries quickly, so ensure the cork pattern is snug together. Don’t worry if the cork is off kilter. You can always pull the cork off, apply more hot glue and reposition it. You could use a thin ruler to assist in keeping the rows straight.
-
The board comes quickly together once you get started.
-
Voila! You now have a beautiful bulletin board.