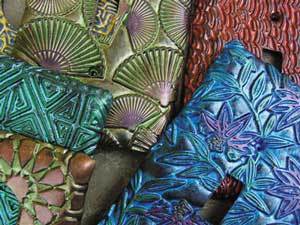
Cool Light Switch Covers
Beautify all parts of your home, even your light switch covers with these Cool Light Switch Covers. This free last minute craft idea is perfect to do with kids as well.

Materials:
- Blank switch covers (I prefer the brass ones, but most plastic will work also.
- Pearl Ex Pigments (as many colors as you like)
- Premo! Sculpey black clay (one 2 ounce package per each switch cover)
- Clay dedicated pasta machine or rolling pin to flatten the clay
- Scratch Art Texture Sheets
- Small squirt bottle of water
- Small paint brush
Instructions:
- Note: Test your plastic switch cover in the oven at full temperature for baking the clay for about 5 minutes before proceeding with the decorating instructions.
- Lightly spray selected texture sheet with water, to act as a "mold release."
- Place flattened piece of conditioned clay on texture sheet and roll clay to emboss texture. If using pasta machine, roll clay through on widest setting, then roll through with texture sheet on same setting.
- Peel off clay and place textured side down.
- Place the original cover face down on clay and trim with 1/4" selvage.
- Wrap edges up around sides of cover and trim to back edge.
- Trim out area for switch and screws.
- Flip over and apply colors of Pearl Ex to the high points of the texture.
- Bake as directed on clay package and allow to cool...and install!