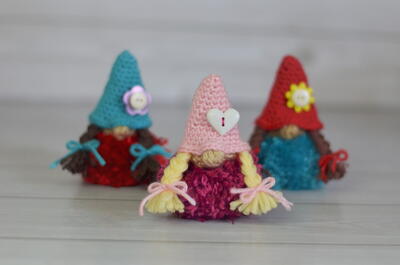
Puffball Gnomette

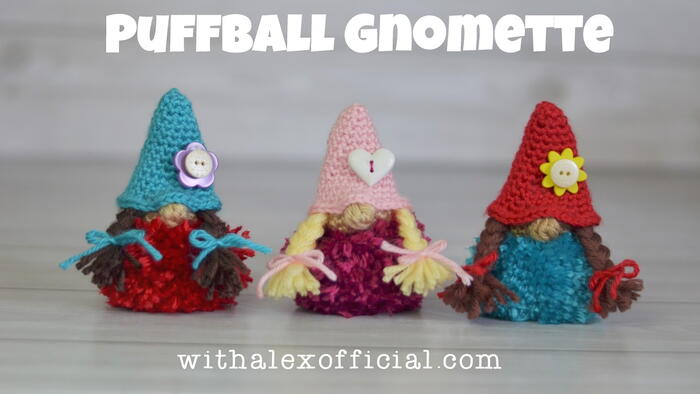
Make an adorable puffball gnomette to pair with the puffball gnome! These adorable tiny amigurumis make sweet mantel decorations or toys for kiddos! Make an entire village of cute gnomes that the kids can play with. The button detail on the gnomette hats is just too cute!
From the Designer: "Puffball Gnome has a new friend! Meet Puffball Gnomette! Puffball Gnome and Gnomette are perfect gifts for Valentine's! Or year round! They are both so adorable and sweet! What colors will you make yours? Scroll down for the free crochet pattern."
NotesEach pom pom should be between 2.5 and 3 inches wide and tall after trimming.
The hat and the head are worked in a spiral. Use a stitch marker to mark the beginning of each round.

Crochet HookG/6 or 4 mm hook
Yarn Weight(4) Medium Weight/Worsted Weight and Aran (16-20 stitches to 4 inches)
Finished SizeThe pom pom is between 2.5 and 3 inches wide and tall. The gnomettes measure approximately 5 inches tall.
Materials List
- Size G (4.00 mm) crochet hook
- Medium 4 weight yarn (Caron Simply Soft)
- Pom Pom maker (mine is 2.5 inches)
- Scissors
- Darning needle
- Stitch marker
- Polyester fiberfill
- Button, flower or etc to decorate the hat
- Optional: Hot glue and glue gun
Pattern
Please read the notes before beginning this pattern.
Video Tutorial
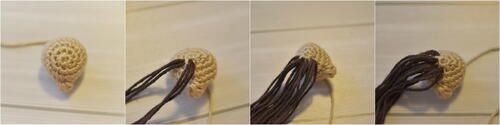
How To Attach The Hair
-
Cut 18 strands of yarn the desired length. Use a crochet hook or a darning needle to thread 3 strands of yarn through a stitch at the top of the head, on one side. Repeat 2 more times. Do this to the other side of the head with the remaining strands of yarn. Braid the hair and tie a bow with leftover yarn.
Click image for larger version:
The Body/Dress
Make a yarn pom pom (puffball) that is between 2.5 and 3 inches tall and wide after trimming.
The Hat
-
R1: Make a loose slip knot or a magic circle, ch 1 and put 4 sc into the loose slip knot. =4
-
Pull on the tail end to close the hole.
-
R2: 2sc in each stitch around. =8
-
R3: sc in each stitch around. =8
-
R4: *2sc in the next stitch, sc in the next stitch.* Repeat from the star around. =12
-
R5-R7: sc in each stitch around. =12
-
R8: *2sc in the next stitch, sc in the next 2 stitches.* Repeat from the star around. =16
-
R9-R10: sc in each stitch around. =16
-
R11: *2sc in the next stitch, sc in the next 3 stitches.* Repeat from the star around. =20
-
R12-R13: sc in each stitch around. =20
-
R14: *2sc in the next stitch, sc in the next 4 stitches.* Repeat from the star around. =24
-
R15: *2sc in the next stitch, sc in the next stitch.* Repeat from the star around. Sl st to the first sc of the round. =36
-
Cut the yarn, leaving the tail long enough to sew to the head. Weave in the other end, stuff the hat with a small amount of polyester fiberfill (or yarn scraps) and shape it. Add a button, flower or etc to decorate the hat.
The Head
-
R1: Make a loose slip knot or a magic circle, ch 1 and put 8 sc into the loose slip knot. =8
-
Pull on the tail end to close the hole.
-
R2: 2sc in each stitch around. =16
-
This is a good place to weave in the end and flip right side out.
-
R3: *2sc in the next stitch, sc in the next stitch. Repeat from the star around. 24
-
R4: sc in each stitch around. =24
-
R5: sc in each stitch around until the last stitch. YO, insert the hook into the last stitch, YO and pull up a loop, YO and pull through the 1st 2 loops on the hook. *YO, insert the hook into the same stitch, YO and pull up a loop, YO and pull through the 1st 2 loops on the hook. Repeat from the star 3 more times. YO and pull through all 6 loops on the hook. =24
-
R6: sc into the next stitch (make sure to pop the nose out) and sc into each stitch around. =24
-
R7: *inv sc dec, sc in the next stitch around. Repeat from the star around. =16
-
Start stuffing with polyester fiberfill.
-
R8: *inv sc dec. Repeat from the star around. =8
-
Finish stuffing the head. Cut the yarn, leaving the tail end long enough to sew to the pom pom, and pull the tail end through the last stitch. Thread through a darning needle and whip stitch in each stitch around and pull on the tail end to close the hole. Knot it, but do not weave in the end. Add hair.
Assembly
-
Sew the hat to the head. Make sure to shape the hat over the nose. Knot the yarn and weave it in.
-
Sew the head to the pom pom. Knot the yarn and weave it in.
-
Optional: Add a flower or a button to the hat.
Abbreviations
- ch
- chain
- sl st
- slip stitch
- sc
- single crochet
- 2sc
- single crochet increase
- inv sc dec
- invisible single crochet decrease
- YO
- yarn over
Discover More Featured Projects:
Read NextSummer Lovin' Crochet Sun Hat