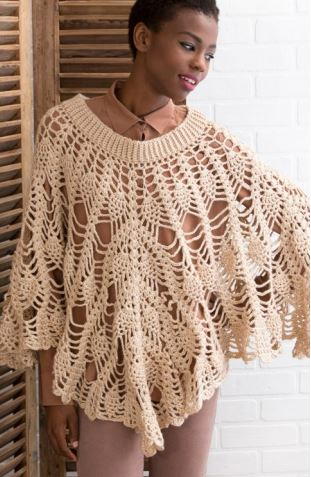
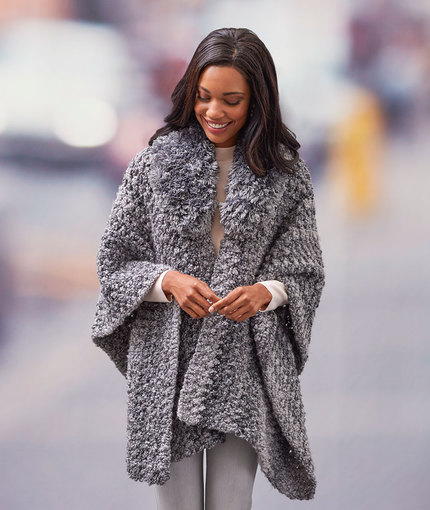
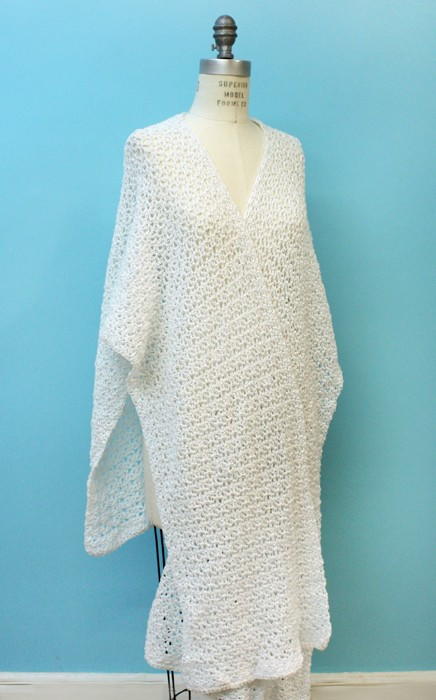
Glamorous Spring Crochet Ruana Pattern

Ruanas aren't just for winter! Accessorize during the warmer months with this Glamorous Spring Crochet Ruana Pattern. Using elegant yarn that sparkles like diamonds, you can use this crochet ruana for a night on the town or for dressing up an everyday outfit. Ruana wrap patterns are so much fun to make because you can style them in a variety of ways. Ruanas also make fabulous gifts as gauge is not critically important for many ruana projects. Make a lovely new accessory for your wardrobe or for a friend using this free crochet pattern.

Crochet HookK/10.5 or 6.5 mm hook
Yarn Weight(4) Medium Weight/Worsted Weight and Aran (16-20 stitches to 4 inches)
Crochet Gauge12 sts + 8 rows = 4 in. (10 cm) in V-st Lace pattern. BE SURE TO CHECK YOUR GAUGE. When you match the gauge in a pattern, your project will be the size specified in the pattern and the materials specified in the pattern will be sufficient. If it takes you fewer stitches and rows to make a 4 in. [10 cm] square, try using a smaller size hook or needles; if more stitches and rows, try a larger size hook or needles.
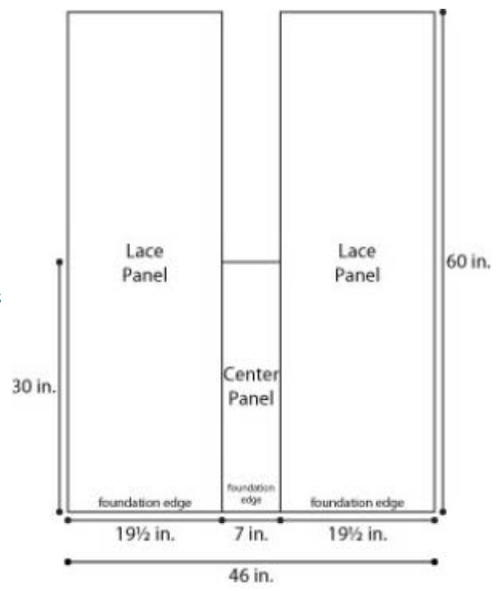
Finished SizeAbout 46 x 60 in. (117 x 152.5 cm)
Materials List
- Lion Brand Vanna's Glamour: Diamond - 7 Balls
- Lion Brand Crochet Hook - Size K-10.5 (6.5 mm)
- Lion Brand Large-Eye Blunt Needles (Set of 6)
Instructions
LACE PANEL (make 2)
Ch 60 loosely.
-
Border
Foundation Row (WS): Sc in 2nd ch from hook and in each ch across – 59 sc at the end of this row. -
Beg with Row 1, work in Border pattern for 4 rows.
Beg V-st Lace Pattern
-
Row 1 (RS): Ch 1, turn, sc in first dc, dc in next sc, sc in next dc, dc in next sc, *ch 1, sk next st, sc in next st, ch 1, sk next st, dc in next st; rep from * to last 3 sts, sc in next dc, dc in next sc, sc in last dc.
Note: All rows beg with a ch-1 turning ch. This creates a firm edge. Do not count the turning ch as a st. Always work the first st of a row into the very first st. -
Row 2: Ch 1, turn, dc in first sc, sc in next dc, dc in next sc, sc in next dc, *V-st in next sc, sc in next dc; rep from * to last 3 sts, dc in next sc, sc in next dc, dc in last sc.
-
Row 3: Ch 1, turn, sc in first dc, dc in next sc, sc in next dc, dc in next sc, *ch1, sc in center ch of next V-st, ch 1, dc in next sc; rep from * to last 3 sts, sc in next dc, dc in next sc, sc in last dc. Rep Rows 2 and 3 until piece measures 58 in. (147.5 cm) from beg, end with a Row 3.
Note: End with a Row 3 means that the last row you work should be a Row 3, and the next row that you are ready to work will be a Row 2.
Border
-
Row 1 (WS): Ch 1, turn, dc in first sc, sc in next dc, dc in next sc, sc in next dc, *dc in next ch-1 sp, sc in next sc, dc in next ch-1 sp, sc in next dc; rep from * to last 3 sts, dc in next sc, sc in next dc, dc in last sc.
-
Beg with Row 1, work in Border pattern for 3 rows.
-
Row 5: Ch 1, turn, sc in each st across.
-
Fasten off.
CENTER PANEL
Ch 20, loosely.
-
Foundation Row (WS): Sc in 2nd ch from hook and in each ch across – 19 sc.
-
Beg with Row 1, work in Border pattern for 61 rows.
-
Fasten off.
FINISHING
-
With RS facing and first row of each Panel at the top, arrange Panels in the following order: Lace Panel, Center Panel, Lace Panel, matching row ends.
-
Sew long edges of Center Panel to long edge of each Lace Panel, beg at foundation edge and sew to last row of Center Panel.
-
Weave in ends.
NOTES
-
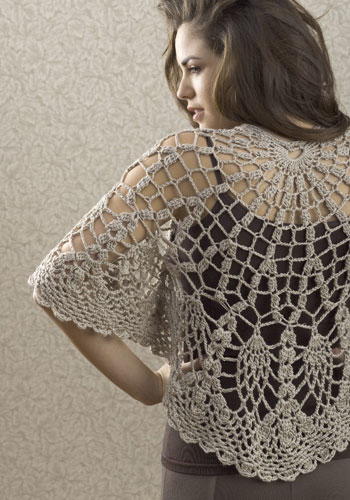
Ruanna is worked in 3 pieces; 2 long Lace Panels and 1 short Center Panel.
-
Lace Panels beg and end with rows of Border pattern. Rows between the beg and end borders are
worked in V-st Lace pattern with first and last 3 sts of each row in Border pattern. The Center Panel is
worked entirely in Border pattern. -
The Panels are sewn together at side edges, with the Center Panel between the 2 Lace Panels.
-
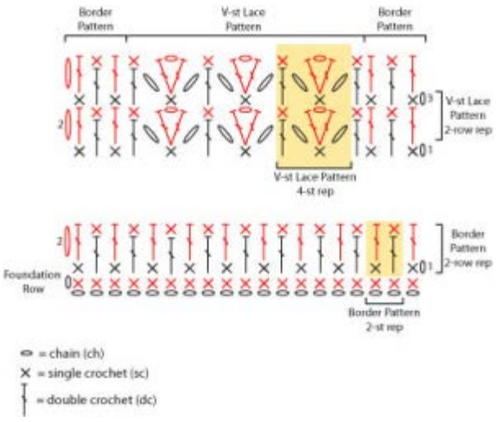
V-st Lace pattern and Border pattern can be worked from written instructions or by following the
Stitch Diagrams. -
The wonderful thing about this Ruanna is that after the first Panel is completed, it can be worn on its
own until you finish the other 2 Panels and sew them all together!
Abbreviations
- V-st (V-stitch)
- Work (dc, ch 1, dc) in indicated st or sp.
- Border Pattern (worked over an odd number of sts)
- Row 1 (RS): Ch 1, turn, sc in first st, *dc in next st, sc in next st; rep from * across. Row 2: Ch 1, turn, dc in first sc, *sc in next dc, dc in next sc; rep from * across. Rep Rows 1 and 2 for Border pattern.
Read NextLightweight Zen Jacket
Your Recently Viewed Projects
Thanks for your comment. Don't forget to share!
Cheryl Y
Mar 05, 2018
This is a beautiful Ruana, and I think it would be great for anytime. The written pattern is well done and I appreciate the chart for the stitch pattern and how to place the panels together. Using the V stitch in this one will make it warm but airy, and look great as well. I'm looking forward to making this one. Thank you so much for sharing this free Glamorous Spring Crochet Ruana Pattern.
Report Inappropriate Comment
Are you sure you would like to report this comment? It will be flagged for our moderators to take action.
Thank you for taking the time to improve the content on our site.