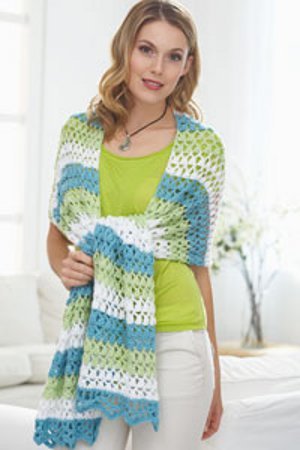
Beautiful Crochet Top
Use this free crochet pattern from DMC Threads to crochet yourself a beautiful top. This design is brilliant and everyone will ask where you bought it from. This crochet cotton is soft and very delicate looking. You'll love wearing it.

Materials:
- DMC Traditions Crochet Cotton(Art.145) 5712 Cream or choose from any of the other Traditions colors, in the following amounts:
Extra Small — 6 balls or 1800 yards (1645 m)
Small — 6 balls or 2000 yards (1825 m)
Medium — 7 balls or 2600 yards (2375 m)
Large — 9 balls or 3000 yards (2740 m)
- Steel crochet hook size 7 (1.5 mm)
- 3.5 yards (3.25 m) 1/8" leather or suede cord
- 2 bone or wood beads with center hole large enough to thread leather or suede cord
- Yarn needle
- Sewing needle and sewing thread to match crochet cotton
Approximate Size of Top upon completion: To fit bust: 30" (34, 40, 44)
STITCH GAUGE:
7 Rows = 2”, 3 completed fan sts = 4.5”
ABBREVIATIONS:
beg = Beginning
ch = Chain
cont = Continue
dec = Decrease
inc = Increase
sc = Single Crochet
sl st = Slip Stitch
sp = Space
st(s) = Stitch(es)
tr = Triple Crochet
pat st = Pattern Stitch
Instructions:
Pattern Stitch:
Row 1: [Tr, ch 1] 3 times in 6th ch from hook, skip 5 ch, sc in next ch, *ch 1, skip 5 ch, in next ch work [tr, ch 1] 7 times, skip 5 ch, sc into next ch, repeat from * to last 6 ch. Ch 1, in last ch, work [tr, ch 1] 3 times, tr in same ch. Turn.
Row 2: Ch 1, sc in 1st tr, *ch 6, sc in next sc, ch 6, skip 3 tr, sc in next tr*, rep from *, end with sc in 4th ch of ch 5 at beg of previous row. Turn.
Row 3: Ch 1, sc in 1st sc, *ch 6, sc in next sc, rep from * across. Turn.
Row 4: Ch 1, sc in 1st sc, *ch 1, in next sc work [tr, ch 1] 7 times, sc in next sc, rep from * across. Turn.
Row 5: Ch 1, sc in 1st sc, *ch 6, skip 3 tr, sc in next tr, ch, sc in next sc, rep from * to end. Turn.
Row 6: Repeat Row 3.
Row 7: Ch 5 (count as tr, ch 1), in 1st sc work [tr, ch 1] 3 times, 1 sc in next sc, *ch 1, in next sc work [tr, ch 1] 7 times, sc in next sc, rep from * to last sc, in last sc work [ch 1, tr] 4 times. Turn.
Repeat Rows 2-7.
Decreasing and Increasing Pattern Stitch:
Note: Unless specified, always decrease from Row 4 of pat st and increase from Row 7 of pat st.
To Decrease at Beginning of Row:
Ch 1, sl st in 9 sts, ch 1, sc in same st as last sl st. Cont in pat st across.
To Decrease at End of Row:
Leave last 9 sts of row unworked, ending row with sc in tr.
To Increase at Beg of Row:
Ch 6, [tr, ch 1] 7 times in 6th ch from hook.
To Increase at End of Row:
Do not turn. Work an additional [tr, ch 1] 3 times in last st, tr in same st. Turn.
FRONT:
Ch 150(174, 198, 222). Work Row 1 of pat st. 12(14, 16, 18) fan sts across.
Cont in pat st for 3".
Next Row: Dec at beg and end of row.
Next Row: Work in pat st.
Cont in pat st for 4".
Next Row: Dec at beg and end of row.
Next Row: Work in pat st.
Cont in pat st for 4".
Next Row: Dec at beg and end of row.
Next Row: Work in pat st.
Cont in pat st for 4".
Next Row: Inc at beg and end of row.
Next Row: Work in pat st.
Cont in pat st for 4(4, 5, 6)".
Armhole Shaping:
Next Row: Dec at beg and end of row.
Next Row: Work in pat st.
Cont in pat st until 3(3, 6, 9) rows completed.
Neck Shaping: Left Side
Next Row: Work in pat st to fan st at center of row. Turn.
Cont in pat st until 3 rows completed.
Next Row: Dec at neck edge of row.
Cont in pat st for 2.5". Fasten off.
Next Row: Skip 1st fan st at neck edge. Join thread in center of 2nd fan st. Ch 1, and work across in pat st.
Cont in pat st for 2.5".
Next Row: Inc at neck edge of row.
Cont in pat st until an additional 3 rows completed. Fasten off.
Neck Shaping: Right Side
Next Row: Join thread in center fan st on front. Ch 1 and work in pat st across unworked sts of front.
Work as for Left Side.
BACK:
Work same as Front until Armhole Shaping.
Next Row: Dec at beg and end of row.
Next Row: Work in pat st.
Cont in pat st for 8(8, 9, 10)”.
Next Row: Complete 3(4, 5, 6) fan sts on row. Fasten off. Skip 3 fan sts on row. Join thread in next st and work 3(4, 5, 6) fan sts in remaining sts of row.
SLEEVE:
Sleeve Bottom: Make 2.
Note: The sleeve bottom is worked in two separate pieces which are then joined.
Ch 54(54, 63, 75) and work in pat st for 4".
Next Row: For 1st sleeve bottom, dec at beg of row and work in pat st across. For 2nd sleeve bottom, work in pat st across and dec at end of row.
Work in pat st until piece measures 11.5". For 1st sleeve bottom, fasten off. For 2nd sleeve bottom, do not fasten off.
Lay sleeve bottoms side-by-side so that the straight edges are parallel.
Next Row: Work in pat st across 2nd sleeve bottom and cont in pat st across 1st sleeve bottom.
Work in pat st until sleeve measures 21".
Shoulder Shaping:
Next Row: Dec at beg and end of row.
Work in pat st for 9 rows.
Next Row: Dec at beg and end of row. Work in pat st for 3 rows. Repeat last 4 rows twice. Fasten off.
FINISHING:
Gently press pieces with steam iron. Using crochet cotton and yarn needle:
Sew front and back together at shoulder.
Sew side seams to within 1" of Armhole Shaping.
Sew sleeve seam along inner arm to within 2" of Shoulder Shaping.
Sew sleeve into armhole.
Lightly press all seams.
Trim:
Work 1 round of sc around bottom edge of top, neck opening, and sleeve bottom, making 3 sc in all corners.
Ties:
For sleeves, cut two 42" lengths of leather or suede cord. Knot ends and thread through sleeves at elbow just above sleeve slit.
For neck, cut two 15" lengths of leather or suede cord. Thread bead onto one end and knot as many times as necessary to keep bead on cord. With sewing needle and sewing thread, sew opposite end of cord to neck opening.
Read NextMotif Lace Wrap
Your Recently Viewed Projects

Thanks for your comment. Don't forget to share!
Morehouse17
Sep 30, 2017
Yes, the directions are long but they are clear. If you have the patience, at the end of this project, you will have a beautiful top that you can enjoy for years to come.
princess6860504
Apr 30, 2017
This crocheted lacy tunic is so beautiful and worthy of your time and effort. If you have ever wanted to challenge yourself and step up your game, give this pattern a try. You will get some good practice with following along a fairly lengthy pattern so try not to lose your place. Guranteed it will happen at least a couple times! The entire project surprisingly requires not as much yarn as I thought!
Tricia108
Apr 29, 2017
What a beautiful top. A crocheted top like this never goes out of style especially in a neutral color. The photo done in white is beautiful but I will probably use a light blue. You can wear all summer as well. The long sleeves come in handy on a cool night. Thank you.
Lynn K
Apr 24, 2017
So pretty and perfectly suited to me. Although I have used DMC embroidery silks for years I did not know they have crochet cottons too. Seems I have been living under a rock, lol! Anyway this is a lovely excuse to try out DMC crochet cotton and this top is going to be a really addition to my wardrobe.
Delphine Bryant
Apr 05, 2017
I have been reading the previous comments for the design and considering not making it even though there are directions for a size that I would be able to use. If anyone has completed this project any feedback would be greatly appreciated before I take on the project. Thank you in advance.
lsindler 3007451
Jun 09, 2016
Is there an updated version of instructions for this sweater? I am having several problems including When following current instructions, the upper front sides/shoulder are wider than in the photo on the website do you have instructions that include number of shells in particular row after increasing or decreasing per directions In general, the posted directions are vague and nonspecific, especially when stitches are added are decreased. I would be most appreciative if you have an updated version of instructions for size Small and/or Medium top. Thank you for your consideration and time. Linda
danajack 0719390
Jan 30, 2015
I can not tell from the photo if there are frilly bits on the sleeves or bottom of the cardigan! Also I can not read the other reviews because the text overlaps. I cant not get the full lenght of the coments because they wont load. The other questions asked through reviews have not been answerd and I would like to know the answers please?
marcytaber 4197583
Jun 10, 2013
I have been trying to crochet this sweater for a couple of days, and having so much trouble with the type of thread it says to use, I think I will have to try a heavier thread and larger needle and make adjustments for the size. I understand the pattern but the crochet thread needle size is a problem for me. A larger picture would be nice too!
barbsadams 1423780
Mar 14, 2013
This top looks so beautiful, I can't wait to try it,when I have finished my W.I.P.
lhtomlinson 318689 4
Jun 08, 2012
Row 5: Ch 1, sc in 1st sc, *ch 6, skip 3 tr, sc in next tr, ch, sc in next sc, rep from * to end. Turn. Is there something wrong with this line?
reilii
Nov 08, 2013
I am working on this top right now and do find the pattern a challenge and I am onto Row 5. Did you figure this one out? Did it mean ch6 for the ch? Thanks
horseyfolks
May 29, 2012
Is the first "next row" row 4 because its a decrease row or what? The next row: pattern stitch...all 7 rows? I wish you could number the rows. I'm afraid to start it and it's sooo pretty! '
sewlady1944 586365 1
May 26, 2012
I love the look and intent trying it. Love to crochet, do it almost every day, relaxes me.
bird399 0356566
May 26, 2012
I love to Crochet, I feel it is easier than knitting since it has once hook.
cinders19
Nov 20, 2011
Wow! this top came out beautifully and the directions were written in a way anyone can understand. Thank you so much for the wonderful patterns you give us. Keep up the awesome work.
rosedeluca
Sep 18, 2011
having a very hard time understanding the stitch i understand the shell stitch but the 2 rows of chains where they go.diagrams would be very helpful.yours truly newbie
lindaambrus 108137 3
Jul 27, 2011
This pattern is written in the customary manner, by describing the pattern stitch before starting a specific garment piece. The reason is for the crocheter to practice the stitch by making a smaller section than the garment piece (swatch) & to determine the gauge. What this pattern lacks in the Pattern Stitch section is the number of stitches in the pattern repeat. When this happens, the crocheter can look to where a garment piece starts, see whether to chain an odd or even number of stitches, then chain a smaller number of stitches, odd or even, & begin the practice swatch. Measuring the gauge over roughly 4 inches is necessary to obtain the desired garment size.
JessiCAN
Jul 01, 2011
@marienannery 4745209: The instructions for the foundation chain (Ch 150) are listed in the first row of the instructions for "FRONT," below the pattern stitch. Hope this helps! -- Editor of FaveCrafts
marienannery 47452 09
Jul 01, 2011
this top looks gorgeous but why dont you PRINT patterns correctly AS THE LADY RIGHTLY SAID IT DOESN'T TELL YOU HOW MANY CHAIN TO CAST ON FOR THE GARMENT? PLEASE please be more precise AFTER ALL YOU HAVE A BEAUTIFUL WEBSITE AND PATTERNS I HAVENT SEEN ANYWHERE ELSE. MARIE FROM EIRE
Adelina
Jul 01, 2011
I really love this top it appears to be very versatile by that I mean you could use it for a dressy occasion or a casual event, either way it will make what you wear so much more classy.
Cropperhopper
Jun 30, 2011
I love how lacey this sweater is and how light. It drapes nicely too. http://cropperhopper.blogspot.com
impchild
Jun 18, 2011
it says Ch 150(174, 198, 222). the first line after front: the link to the PDF is here. http://www.dmc-usa.com/mjRS/1/doc/US_freedesigns/crochetfashiontop.pdf
biancahornby 67539 11
Jun 18, 2023
Good daybr /The link is no longer available, do you know where I could find a PDF copy please? br /br /Thank you
Debbie Babski
Feb 28, 2011
it does not tell you how many ch to start with. so how is any one to make this
Crafter 7908253
Jan 05, 2010
Is there a way we can view a larger picture of this beautiful sweater? I would like to try and make it, but would like to see more of the details. Thanks, Loreta
Report Inappropriate Comment
Are you sure you would like to report this comment? It will be flagged for our moderators to take action.
Thank you for taking the time to improve the content on our site.