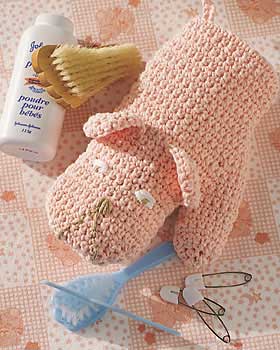
Bath Buddy
Crochet a bath mitt with animal features, including floppy ears, for bath time fun. Wash and entertain baby with this soft crochet bath buddy from Lily Sugar n' Cream.
Materials:
- Yarn: Lily Sugar’n Cream (Solids 2.5 oz/70.9 g/Ombres 2 oz/56.7 g) Solids or Ombres 1 ball
- Crochet Hook: Size 4.50 mm (U.S. 7) crochet hook or size needed to obtain gauge
- Small quantities of white and beige yarn for embroidery
Gauge: 14 sc and 16 rows = 4 ins [10 cm].
Instructions:
Ch 34.
1st row: (RS). 1 sc in 2nd ch from hook. 1 sc in each ch to end of ch. 33 sts. Ch 1. Turn.
2nd row: 1 sc in each st to end of row. Ch 1. Turn.
Rep last row 6 times more.
Shape thumb gusset: 1st row: (RS). 1 sc in each of first 17 sts. 2 sc in each of next 2 sts. 1 sc in each st to end of row. Ch 1. Turn.
2nd, 4th, 6th, 8th, 10th and 12th rows: 1 sc in each st to end of row. Ch 1. Turn.
3rd row: 1 sc in each of first 17 sts. 2 sc in next st. 1 sc in each of next 2 sts. 2 sc in next st. 1 sc in each st to end of row. Ch 1. Turn.
5th row: 1 sc in each of first 17 sts. 2 sc in next st. 1 sc in each of next 4 sts. 2 sc in next st. 1 sc in each st to end of row. Ch 1. Turn.
7th row: 1 sc in each of first 17 sts. 2 sc in next st. 1 sc in each of next 6 sts. 2 sc in next st. 1 sc in each st to end of row. Ch 1. Turn.
9th row: 1 sc in each of first 17 sts. 2 sc in next st. 1 sc in each of next 8 sts. 2 sc in next st. 1 sc in each st to end of row. Ch 1. Turn.
11th row: 1 sc in each of first 17 sts. 2 sc in next st. 1 sc in each of next 10 sts. 2 sc in next st. 1 sc in each st to end of row. Ch 1. Turn.
13th row: 1 sc in each of first 17 sts. Ch 2. Miss next 14 sts. 1 sc in each st to end of row. Ch 1. Turn.
14th row: 1 sc in each st or ch 1 sp to end of row. 33 sts.
Cont even until work from beg measures 8 ins [20.5 cm] ending with RS facing for next row.
Shape top: 1st row: 1 sc in first st. Draw up a loop in each of next 2 sts. Yoh and draw through all 3 loops on hook – sc2tog made. 1 sc in each of next 11 sts. Sc2tog. 1 sc in next st. Sc2tog. 1 sc in each of next 11 sts. Sc2tog. 1 sc in last st. Ch 1. Turn.
2nd row: 1 sc in first st. Sc2tog. 1 sc in each of next 9 sts. Sc2tog. 1 sc in next st. Sc2tog. 1 sc in each of next 9 sts. Sc2tog. 1 sc in last st. Ch 1. Turn.
3rd row: 1 sc in first st. Sc2tog. 1 sc in each of next 7 sts. Sc2tog. 1 sc in next st. Sc2tog. 1 sc in each of next 7 sts. Sc2tog. 1 sc in last st. Ch 1. Turn.
4th row: 1 sc in first st. Sc2tog. 1 sc in each of next 5 sts. Sc2tog. 1 sc in next st. Sc2tog. 1 sc in each of next 5 sts. Sc2tog. 1 sc in last st. Ch 1. Turn.
5th row: 1 sc in first st. Sc2tog. 1 sc in each of next 3 sts. Sc2tog. 1 sc in next st. Sc2tog. 1 sc in each of next 3 sts. Sc2tog. 1 sc in last st. Fasten off.
Thumb: With RS of work facing, join yarn with ss to ch sp. Ch 1. 1 sc in each of next 2 ch. 1 sc in each of next 14 sts. Join with ss to first sc. 16 sc.
Next rnd: Ch 1. 1 sc in each sc around. Join with ss to first sc.
Rep last rnd 4 times more.
Next rnd: Ch 1. (Sc2tog) 8 times. Join with ss to first st. 8 sts.
Next rnd: Ch 1. (Sc2tog) 4 times. 4 sts. Fasten off. Thread end through a tapestry needle and draw yarn through rem sts. Fasten securely.
Ear (make 2): Ch 7.
1st row: (RS). 1 sc in 2nd ch from hook. 1 sc in each of next 5 ch. Ch 1. Turn. 6 sts.
2nd and 3rd rows: 1 sc in each st to end of row. Ch 1. Turn.
4th row: Sc2tog. 1 sc in each of next 2 sts. Sc2tog. Ch 1. Turn. 4 sts.
5th row: (Sc2tog) twice. Fasten off.
Join yarn with ss to side of Ear at lower corner and work 1 row of sc around Ear to opposite corner. Fasten off.
Sew Ears in position. Embroider face as illustrated. Sew top and side seam.
Loop: Join yarn with ss at lower side edge at seam. Ch 15. Join with ss in same sp as first ss. Fasten off.
Read NextMini Octopus Crochet Pattern
Your Recently Viewed Projects

Thanks for your comment. Don't forget to share!
JennyBee1
Dec 02, 2011
@jwatkins 8063130, The even row instructions are listed after step 1. They are all the same, which is why the pattern designer grouped them together at the start of the pattern. I hope this helps! --editors of FaveCrafts
Report Inappropriate Comment
Are you sure you would like to report this comment? It will be flagged for our moderators to take action.
Thank you for taking the time to improve the content on our site.