This project was submitted by one of our readers, just like you.
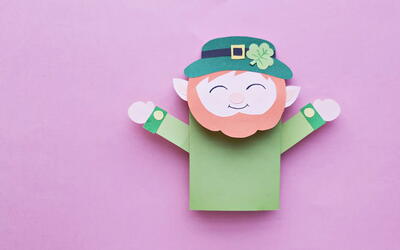
Papercraft Leprechaun Puppet

Papercraft Leprechaun Puppet
"This Papercraft Leprechaun Puppet is the perfect holiday prep for this springtime! You can have all kinds of fun with your kiddos when crafting this sneaky cheeky Papercraft Leprechaun Puppet. He is the perfect pal to go on all the colorful adventures with. Help your kids get into the holiday spirit with this adorable little Leprechaun friend! Just follow this template, these simple instructions, with these few supplies and your family will be creating in no time!"
Primary TechniquePaper Crafts

Materials List
- Colored paper
- Sharpie
- Craft glue
- Pencil
- Scissors
Instructions
-
Select 2 or more different shades of green colored paper along with orange, pink, black, yellow, and colored paper for the skin tone of the leprechaun puppet.
-
Trace the head and the hand patterns on the paper selected for the skin tone, the hat and sleeve patterns on green papers, the hat-strip on black paper, the belt buckle (small square) on yellow paper, the buttons (small round shapes) on yellow or any color of your choice, and lastly, the inner ear patterns and nose on pink paper.
-
Cut out the traced patterns.
-
Cut slits along the marked line of the small square of the buckle and insert the hat-strip through the slits.
-
Attach the inner ear cutouts on the ear parts of the head pattern and attach the sleeve borders and buttons with the sleeve cutouts.
-
Attach the hand cutouts with the sleeve patterns (on the border sides), attach the hat-strip on the hat, attach the hair (+beard) pattern on the head cutout, and then attach the hat on the top side of the head pattern.
-
Attach the nose of the leprechaun puppet and use a sharpie to draw the eyes and mouth of the puppet.
-
Select a piece of green colored paper to craft the paper bag. We used a 16 inches x 10 inches sheet.
-
Keep a cm extra along the longer side and then fold the remaining long side into half. Apply glue along the extra 1 cm part, fold it and attach it with the other open side of the folded paper. Now, 2 sides of the paper are closed.
-
Fold up 3 inches from the bottom open side of the paper.
-
Open the 3 inches part of the paper through its open end.
-
Neatly form the 2 corners and flatten the 3 inches part with the top part of the current paper.
-
Now, the current paper pattern has 2 flaps. Fold the flap inwards.
-
Fold the opposite flap inwards and overlap it with the other one. Apply glue to secure the bottom side of the pattern by attaching the flaps.
-
Notice the 2 square parts on the bottom side of the current pattern. Use them as a guideline to fold the 2 sides.
-
Now, unfold the last 2 side folds.
-
Fold in the middle creases of the sides and flatten the bottom side to complete the paper bag.
-
Attach the head pattern of the papercraft leprechaun on the bottom side of the paper bag.
-
Attach the arm patterns on both sides of the paper bag to complete the puppet.

Read NextKids Art Shrink Plastic Key Chain