Personalized DIY Luggage Tag

Going on a trip? Need a gift tag? Looking for a cute purse accessory? This Personalized DIY Luggage Tag is the perfect craft that can serve a number of purposes. Not only is this the perfect die cut craft that you can completely personalize and make your own, but you can also complete this craft in less than an hour. If you really need a new luggage tag for a trip but don't want to run to the store and buy one, this craft video can show you how easy it is to make your own!
Estimated CostUnder $10
Time to CompleteUnder an hour
MaterialsPaper
Primary TechniquePaper Crafts

Project TypeMake a Project
Materials List
- Sizzix machine
- Piece of mat board
- Ribbon
- Luggage tag die cut
- Washi tape in different colors
Personalized DIY Luggage Tag
How to Make a Luggage Tag
-
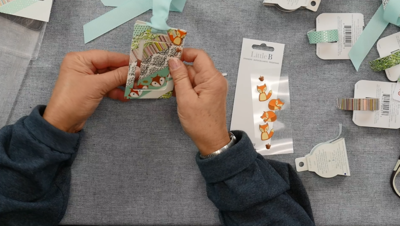
Begin to cover your mat board with the different colors and styles of washi tape. Lay it out on a diagonal to better cover the board. Trim off your end or tuck them under.
-
Make your sizzix sandwich by place your mat board on your die cut and place that between two cutting pads. Roll that through your machine.
-
Use a flat surface to fold along the line, so that your luggage tag is folded in half.
-
Fill in your luggage tag with your information on the blank part of the luggage tag.
If you do not want anyone to see your information you can take the piece that popped out from the die cut pattern and tape that back in place. -
Take your ribbon, yarn, or lace and thread it through the top.
Read NextNo Sew Upcycled Jean Coaster