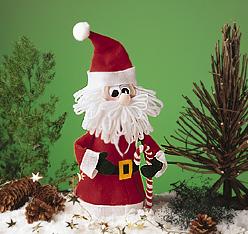
Wobbling Santa
Using different colored felt, some wire, paints and a few other materials you can have this fun wobbling santa moving around in your home. It's a great Christmas craft that the kids will love having in the house.
Materials:
-
STYROFOAM Brand Products:
- 1- 4" x 12" cone
- 1- 4" ball
- 2- white and 2- red chenille stems
- 1- 1" white pompom
- 1- 20mm wiggle eyes, pair
- 7- stems 24-28 gauge floral wire
- pink acrylic paint
- polyester batting
- 30- glass marbles (or other suitable items for weight)
- Scissors
- Thin floral wire
- Wire cutters
- Craft glue or glue gun and glue sticks
- Serrated knife
- Straight pins
- Soup spoon
- Pencil
- Compass
- Large-eyed needle
- Screwdriver
- Skewer
- Pattern
Felt:
- 1- 6" x 12" flesh
- 1- 2" x 2" gold
- 1- 4" x 4" green
- 1- 3" x 14" black
- 1- 10" x 18" white
- 1- 15" x 15" red
Instructions:
-
To make body and base, cut ball in half; slightly flatten bottom of one half. Cut off top 4" of cone; measure and mark 5" from cone base.
-
Use spoon to scoop out plastic foam from half ball and lower 4" of cone, leaving a 1/4" to 1/2" outer shell. Do not break through foam.
-
From flesh felt cut a 4" x 12" strip for head and 1 1/2"circle for nose (use compass to draw circle). Stitch around outside edge of nose; pull up gathers loosely and stuff with batting. Pull gathers tightly; twist ends together and cut excess wire.
-
Glue felt nose to center of head strip. Using your fingertip, pat on pink painted cheeks; let dry. Glue wiggle eyes above nose. Form tube with head strip, overlapping and gluing 4" ends together at center back.
-
Sew a running stitch around bottom of head tube. Place tube on top of cone so wire is even with marked line on core; pull wire to gather and twist to secure. Stuff head lightly with batting. Sew running stitch at top of head tube; pull wire to gather and twist to secure.
-
Cut (2) 4" x 12" pieces of white felt; fold lengthwise and glue long edges together. From fold to glued edges, cut slits to create fringe; do not cut through glued edges. Glue fringe around face for beard. Glue a piece of fringe around head for hair. Glue small piece under nose for mustache.
-
For hat pattern, draw (1) 11" diameter circle on paper. Fold in quarters and use one quarter as hat pattern; cut hat from red felt. Glue red chenille stem to one straight edge of felt hat; cut off excess stem. Overlap and glue straight edges together.
-
For hatband, trim 1" wide strip from bottom of hat pattern; cut hatband from white felt. Glue hatband around bottom edge of hat. Glue pom pom to tip of hat. Glue hat on head; shape as desired by bending chenille stem.
-
From red felt cut (2) coat pieces from Pattern A and (2) sleeves from Pattern B. Cut (2) belt pieces from black felt (Pattern A); buckle from gold felt (Pattern C); (4) mittens from green felt (Pattern D). From white felt, cut trim for sleeves (Pattern B) and coat (Pattern A).
-
Glue trim to coat, extending 1/2" beyond bottom edge. Overlap and glue together edges of two coat sections; glue in place. Placing seam at center back of cone, wrap coat around plastic foam body; overlap edges and glue in front.
-
Glue ends of belt together. Cut slits in belt buckle as shown in Pattern C; thread belt through slits in buckle; slide buckle to end of belt. Glue to coat at waist with buckle in center.
-
For each arm, cut one 5" length of white chenille stem. Glue two mittens together, with one end of 5" chenille stem sandwiched in the middle; repeat with other mitten.
-
For each sleeve, glue cuff to bottom edge, extending 1/4" beyond sleeve. With cuff on outside, overlap and glue straight edges of each sleeve to form a cone-shaped tube. With thumbs pointing up, insert one arm into each sleeve.
-
Gather stitch along shoulder of sleeves; pull up gathers tightly around top of arm. Using screwdriver, punch one hole in each side of body below head; glue top of sleeve in each hole. Shape arm as desired.
-
Turn body upside down; fill with marbles. Pin base to bottom of body; test for "wobbliness" and add or remove marbles as needed. Remove pins and glue base to bottom of body.
- Spiral wrap one white and one red chenille stem together around skewer; slip spirals from skewer. Shape to form candy cane; glue cane to one hand.
Read NextCrochet Heart Santa Ornament