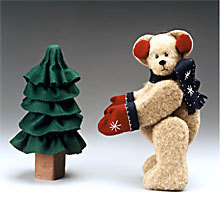
Teddy's Winter Tree
This Christmas you can put out a whole ensemble of Christmas decor. Start with making a teddy bear and his Christmas tree. This is an easy felt craft you can put out every year.

Materials:
- STYROFOAM* Brand Foam:
- Ball, 2"
- Cone, 9" x 4"
- Egg, 4"
- Sheet, 36" x 12" x 1"
- Embroidery floss: black; white
- Felt: 45" light brown plush, 1/2 yd.; 9" x 12" sheets, one each: navy; red; dk. brown; dk. green, five sheets; scrap of black
- Craft wire, 22-gauge, 6" length
- Black safety eyes, 8mm, two
- Needles: embroidery; sewing
- Serrated knife
- Candle stub or paraffin
- Fine-line black permanent marker
- Pencil
- Ruler
- Compass
- Scissors
- Pinking shears
- Tracing paper
- Strong white thread
- Wire cutters
- Low-temp glue gun and glue sticks
- Thick, white craft glue
Pattern
Steps:
TEDDY
- Wax serrated knife with candle stub or paraffin. Following STYROFOAM* cutting lines, cut two bear bodies, two arms, and two legs from foam sheet. Cut foam ball in half; set aside one half for another project.
- Following plush felt cutting lines, cut one body from plush felt; flip pattern over and cut one reverse body from felt. Cut two arms and two reverse arms from plush felt. Repeat for legs and ears. Cut remaining patterns from felt as indicated. In addition, cut two 1" x 3-1/2" strips (mitten trim) and two 2" x 12" strips (scarf) from navy felt.
- Slightly flatten small end of egg for bottom of head. Glue foam half-ball to head, 1/2" above flattened end, for bear's muzzle. Center plush head over top of foam head and smooth felt over surface. Glue plush edges together; glue excess to bottom of head.
- Referring to head diagram, poke two small holes into plush for eyes. Apply glue to eye shanks and push firmly into head.
- Using six strands of black embroidery floss, stitch bear's mouth, following numbered order of stitches on diagram. Glue felt nose in place.
- Glue two ears together, right sides out; repeat. Apply glue to bottom edge of each ear; curve slightly and glue to head.
- Glue two foam bodies together. Use fingertips to slightly round body edges. Centering seam at edge where bodies join, glue felt bodies to foam. Repeat for arms and legs, using single thickness of foam. Using patterns and photo as guide, glue arms, legs, and head to body.
- Use compass to draw two 3" circles on red felt. Sew gathering stitch around each circle; pull stitches tight to form earmuffs. Gently bend wire length into curve that spans head. Glue earmuffs over wire ends at center of each ear.
- Open each mitten flat. Place navy trim strip on each mitten, slightly overlapping mitten edge. Using six strands of white embroidery floss, blanket stitch trim to mittens (Fig. 1); begin by taking needle up through fabric at •, down at "1", and up again at "2". Stitch 1"-wide snowflake design, following numbered order of stitches on pattern. With right sides together, hand stitch each mitten closed, leaving trim end open. Turn right side out; place mittens on paws.
- Overlap and glue short ends of scarf pieces together to make long strip. In same way as mittens, stitch two 1"-wide snowflakes at each end of scarf, 1" apart and beginning 1-1/2" from scarf ends. Use floss to topstitch around edge of scarf, 1/4" from long edges and 1" from ends. Fringe 1/2" at each end of scarf. Center and tie scarf around bear's neck.
TREE
- Wax serrated knife with candle stub or paraffin. Cut two 2" x 3" blocks from foam sheet; glue blocks together to measure 2" x 2" x 3" (trunk).
- Use compass to draw one 4" and one 9" circle on green felt. Use pinking shears to cut out circles. Use sheers to cut 3"-wide strips from green felt; cut two of each length: 7"; 9"; 11"; 12". Use regular scissors to cut 3" x 8" strip and 2" square from dk. brown felt.
- Glue 8" dk. brown strip around trunk; glue 2" dk. brown square to bottom. Glue 4" green circle to base of cone. Glue trunk to cone bottom.
- Use marker to draw four lines around cone, 2" apart; begin 2" from bottom edge. Hold 12" green strips together as one; use knife point to insert felt edge into lower ring on cone, pleating slightly. Repeat for next three rows, working toward shortest felt strips at top ring.
- Center 9" green circle over tip of cone; glue felt to cone, pleating evenly. Place tree between bear's paws.
®™* Trademark of The Dow Chemical Company ("Dow") or an affiliated company of Dow
Read NextHo Ho Ho Christmas Pillow
Your Recently Viewed Projects
Thanks for your comment. Don't forget to share!
Crafter 19386
Dec 31, 2009
I am looking for a crocheted teddy bear jacket or coat, just something simple.
Report Inappropriate Comment
Are you sure you would like to report this comment? It will be flagged for our moderators to take action.
Thank you for taking the time to improve the content on our site.