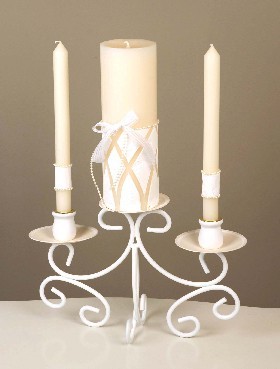
Unity Candle
This elegant unity candle from Delta Creative so simple to make --with the fun of Texture Magic as an extra bonus.
Supplies:
- Delta Creative Ceramcoat® Acrylic Paint
- White 2505
- AC Flesh 2085
- Delta Creative Ceramcoat® Satin Exterior/Interior Varnish 7003
- Delta Creative Ceramcoat® Metal Primer 7102
- Delta Creative® Sobo Glue
- Delta Creative Ceramcoat® All-Purpose Sealer 7005
- Delta Creative® Texture Magic White 28001
- Vanilla Wafers Pillar Candle 3”x9” (available at craft stores)
- 2 Candle-lite Ivory 10”
- Trina 3 pillar holder
- 2 Lara’s Crafts 1” Candle cups
- White ribbon of choice ¾” wide
- Cream pearls of choice
- Brushes from Loew-Cornell La Cornellie:
- Series Wash/Glaze 1”
- Series 7350 Liner Size #1
- Brush Tub
- Palette Paper
- Stylus
- Paper towel
- Scissors
- Low-tack painter’s tape
- Vinegar
- Bent blade palette knife
- Quilter’s ¼” tape
Project Design:
Preparation:
- Rub candle fairly hard with paper towel to remove the gloss on the candle.
- Wash candleholder with mixture of ½ cup water to 2 Tblsp. vinegar. Dry with lint free cloth. Apply an even coat of Metal Primer using the 1” wash brush to all parts of the candleholder.
- Always sand with the grain of the wood. Using fine grit sandpaper sand off burrs and rough edges of Candle Cups, use tack cloth to remove dust. Apply one even coat of All-Purpose Sealer using 1” wash brush. Allow to dry thoroughly. Sand with fine grit sandpaper (250-300 grit). Remove dust with tack cloth.
Candleholder:
- Basecoat the plates of the candleholder in AC Flesh using the 1” wash brush.
- Basecoat the legs and the candle cups in White using the 1” wash brush.
- Using the #1 liner paint narrow band on all of the candle plates ¼” in from the edge of the lip.
- Use Sobo Glue to glue candle cups in place and allow glue to dry.
- Using 1” wash brush apply as many coats of Satin Exterior/Interior Varnish as desired.
Taper Candles:
- On regular candles place stripe of low-tack painter’s tape up 2.5” from the bottom of the candle, skip 1.5” and place another strip of tape. Squeeze White Texture Magic straight from tube onto candle smooth out using the palette knife. Remove tape immediately.
- Lightly press pearls into the edge of the wet Texture Magic. Stand in candle cup to dry, do not lay down.
Pillar Candle:
- Place band of low-tack painter’s tape 4” up from the bottom of the candle.
- Using quilter’s tape start at the low-tack painter’s tape and pull down and around to the left every 1-1/4” curving as you pull. Quilter’s tape will stretch and curve.
- Repeat taping process going to the right.
- Squeeze Texture Magic White straight from the tube onto the candle use palette knife to spread out and smooth. Remove tape immediately. Tip: Remove tape in the reverse order that it was applied and it will come up a lot easier.
- Lightly press pearls into the edge of the wet Texture Magic.
- Tie a bow from the ribbons and pearls using approximately 18” and glue in place.
Read NextRing Centerpiece