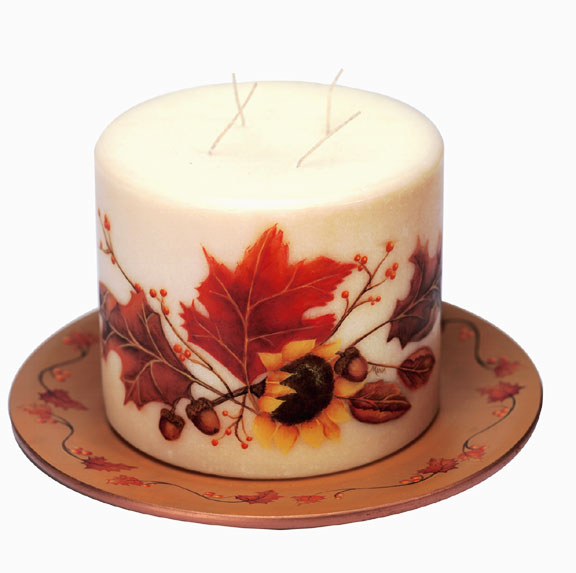
Harvest Candle and Plate
Celebrate the fall harvest with this festive candle and plate duo. With the help of a pattern, the beautiful design is easily painted.
Materials:
DecoArt Products Required
Americana Acrylics
- DAO14 - Cadmium Orange
- DAO16 - Burnt Orange
- DAO62 - Terra Cotta
- DAO63 - Burnt Sienna
- DA179 - Alizarin Crimson
- DA194 - Marigold
- DA221 - Traditional Burnt Umber
- DA222 - Traditional Raw Sienna
- DA223 - Traditional Burnt Sienna
- DA228 - Bright Orange
- DA259 - Cocoa
Americana Brushes
- DBL1502-B - Script Liner 2
- DBL1580-B - Script Liner 10/0
- DBR2002-B - Round 2
- DBF3012-B - Shader 12
- DBAS4025-B - Angular Shader 1/4"
- DBAS4037-B - Angular Shader 3/8"
- DBFB4508-B - Filbert 8
- DBDS5525-B - Deerfoot Stippler 1/4"
Easy Float
- DS20 - Easy Float
Americana Spray Sealers
- DAS13 - Americana Matte Spray
Paint Adhesion Medium
- DS39-3 - Paint Adhesion Medium
Supplies
- Pattern here
- Water container
- Palette or plastic plate
- Paper towels
- Tracing and transfer paper
- Stylus
- Rubbing alcohol
- Fine-grit sandpaper
- JansenArt Multi-Purpose Sealer
- Large ivory pillar candle
- 9.375" wood plate, Walnut Hollow 23732
Instructions:
CANDLE
Preparation:
Clean candle with rubbing alcohol and dry completely with paper towel or soft cloth.
1. Trace pattern onto candle using stylus and light pressure.
2. Thin Burnt Orange with Paint Adhesion Medium. Use mix to outline design and pull stems for bittersweet.
3. Basecoat flipped sections of oak leaves Marigold.
4. Brush mix of Terra Cotta and Burnt Orange to basecoat leaves and apply wash over flipped sections.
5. Thin Cocoa with Paint Adhesion Medium and outline leaf veins.
6. Sideload brush with Traditional Burnt Umber to shade leaves, walking color out. Keep edges clean and tips sharp.
7. Use stippler brush and Marigold to create subtle highlights. Tap brush with finger to soften.
8. Brush mix of Cocoa and Terra Cotta with small amount of water. Use mix and liner brush to pull veins, keeping ends next to main leaf vein.
9. Use liner brush and thinned Marigold to softly highlight veins in light areas.
10. Sideload brush with Traditional Burnt Umber. Shade very narrowly on each side of veins, darker next to main vein and lighter toward outside edge allowing them to fade off.
11. Basecoat maple leaf Marigold.
12. Wash Cadmium Orange over leaf, lighter toward top.
13. Use liner brush and thinned Marigold to pull veins.
14. Wash Cadmium Red over whole leaf, leaving center top lighter. Repeat to shade.
15. Wash bottom 1/3 with Alizarin Crimson, and then pat up next 1/3, ending very lightly at top.
16. Sideload brush with Traditional Burnt Sienna. Shade bottom 1/3 and pat color upward.
17. Use liner brush and thinned Marigold to pull veins again.
18. Sideload brush with Traditional Burnt Sienna. Shade both sides of veins very narrowly and then walk out "V" areas. Continue shading darker in "V" areas, lower 2/3 of leaf darker and lighter at top 1/3.
19. Use 8 filbert brush and Marigold to pull sunflower petals using teardrop stroke. Repeat. Basecoat stem Marigold.
20. Use stippler brush and Traditional Burnt Umber to stipple flower center. Repeat.
21. Use 8 filbert brush and Marigold to pull left top petals again. Use to place bright lights on center making sure to use a curved stroke.
22. Sideload brush with Traditional Burnt Sienna to shade top petals at base. Repeat for petals underneath.
23. Use brush and Traditional Burnt Umber to pull comma strokes at base of sunflower head, dragging strokes down stem to outside stem edges.
24. Basecoat acorns Marigold.
25. Sideload brush with Burnt Orange to shade sides with crescent shape, leaving center light. Shade under acorn cap. Repeat with Traditional Burnt Sienna.
26. Basecoat caps Traditional Raw Sienna. Shade lower left of acorn fairly dark with Traditional Burnt Umber. Shade with very light crescent shape on right side of nut and outside edge of cap.
27. Use liner brush and Traditional Burnt Umber to form "v" pattern on cap. With Traditional Burnt Umber, make small tip on cap and small circle on bottom tip of nut with tiny dot in center and outline bottom side of bittersweet stems.
28. Basecoat bittersweet berries Bright Orange.
29. Sideload liner brush with Traditional Burnt Sienna. Make crescent stroke on bottom of each berry.
30. Sideload liner brush with Marigold and highlight top of each berry. Place tiny dot in top right quadrant of each berry to highlight.
31. Basecoat small leaves on right Marigold.
32. Sideload brush with Burnt Orange and shade leaves.
33. Deepen shading in underneath and v areas with Traditional Burnt Sienna.
34. Use liner brush and thinned Marigold to pull veins.
35. With liner brush, brush mix of Traditional Burnt Sienna and Burnt Orange to shade both sides of veins.
36. Sideload brush with Traditional Burnt Sienna. Shade bottom and "v" areas on underneath sides of veins and flips.
PLATE
1. Trace outside edge of plate onto tracing paper. Fold circle in half. Repeat, folding twice. (This will make eight sections.) Mark these sections on plate. Design will go into each section.
2. Mix equal parts of Honey Brown and JansenArt Multi-Purpose Sealer. Basecoat plate with mix, ending brush strokes with wood grain. Repeat coats as needed.
3. Sand lightly. Remove dust with moistened paper towel and let dry completely.
4. Trace pattern onto plate.
5. Repeat same colors and painting instructions as candle.
6. Mist all with Americana Matte Spray, allowing to dry between coats.
HELPFUL HINTS
1. Work with small amounts of Paint Adhesion Medium and Americana Acrylics. Use very light touch on all steps. When working on candle, load brush with Paint Adhesion Medium and then dip into paint.
2. Handle candle carefully. Fingernails and jewelry can scratch painted surface.
3. Use folded towel to cradle candle while painting.
4. When sideloading, use patting motion and work away from edge until there is no paint. Keep outside edges clean and neat. Inside can be choppy for more natural look and color variation.
5. Add few drops of Easy Float in water to help in sideloading.
6. Use brush sizes you are most comfortable with when painting.
7. Make berries using handle end of paintbrush. For larger berries, use larger brush or sponge pouncer, or swirl brush handle tip on surface. Allow paint to dry completely before proceeding with shading or highlighting.
8. Use water to thin paint to ink-like consistency.