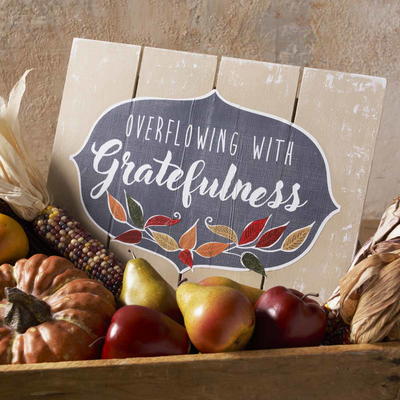
Overflowing with Gratefulness DIY Autumn Sign
DIY fall signs like this one are perfect to display through Thanksgiving.

Create a gorgeous, rustic chic fall sign using a free printable from Plaid Enterprises! This beautiful palette craft is easy as pie. Use Mod Podge to decoupage the graphic to a simple wood palette, then embellish it with fall colors and other rustic touches. This is a sweet sign to display on top of a hay bale or in a basket with an assortment of autumnal items. You can also hang it on the wall because the palette comes with a mount. If you can't get enough of decoupage crafts and you need a new decoration for the fall season, this is the perfect way to give thanks!
Be sure to enter to win the materials needed to make this Plaid project!
Time to CompleteIn an evening
Main MaterialWood
Primary TechniquePainting

SeasonFall
HolidayThanksgiving
Project TypeMake a Project
Materials List
- Plaid ® Wood Surfaces - Pallet Plaque, 15-3/4" x 11-3/4"
- Mod Podge ® Matte, 8 oz.
- Mod Podge ® 2-1/4" Brush Applicator, Gold Taklon
- Mod Podge ® Professional Tool Set
- FolkArt ® Acrylic Colors - Linen, 2 oz.
- Folkart ® Brushes - Smooth Basecoat 1" Carded
- Mod Podge ® Sparkle, 8 oz.
- Downloadable pattern
- Tissue papers – fall leaf colors
- Scissors
- Craft knife
- Ruler
- Cutting surface
- Tape
- Pencil
- Wax paper
- Paper plate
- Water basin
Instructions
-
Paint the pallet in two coats of Linen, letting the coats dry in between. Let dry.
-
Print out the downloadable art provided at 100% scale.
-
Cut out the two halves of the plaque shape leaving a 1/8” white boarder all the way around. Use a craft knife and the straight edge of a ruler to ensure a straight cut along the side.
-
Before applying to the pallet, overlap each half of the design to create one continue piece and tape lightly in place. Using your craft knife and ruler cut through both pieces and remove excess. The two halves should align to create one solid design when applied.
-
Layout the design and make light pencil marks at the corners of the overall design. Remove and set aside. See project photo for reference.
-
To Mod Podge the design to the pallet, coat the painted surface and the backside of the cut design in Mod Podge Ultra Matte. Place the design on the pallet using the pencil marks and smooth with hands. Roll with brayer to remove bubbles and wrinkles.
-
Topcoat with Mod Podge Sparkle. Let dry.
-
Choose 3-5 different fall tissue paper colors. Lay a small piece of tissue over a leaf and trace around the leaf shape in pencil. Cut out and lay back on leaf. Repeat for all leaves.
-
To Mod Podge tissue to surface, apply Ultra Matte Chalk to the surface and carefully apply the cut tissue leaf and topcoat. Let dry.
Read NextFall Book Page Leaf Banner