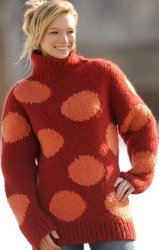
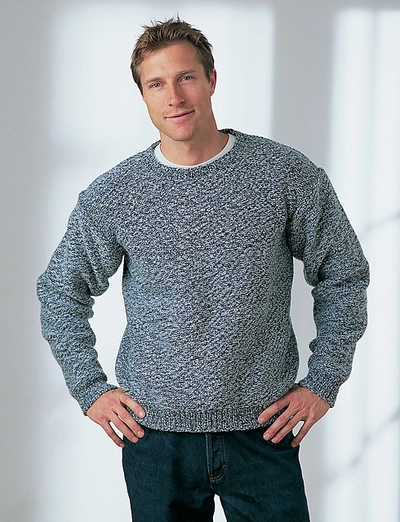
Cozy Red Pullover
During the winter months you can cuddle up in this free knitting pattern. It's a cozy pullover that you can where anytime you wish. It's turtleneck is sure to keep your neck warm too.

Stitches: Stockinette, Open Rib, and circles knit with graph enclosed.
The hemline, cuffs, and tall turtleneck are very dominant with the chunky Open Rib Stitch.
Materials:
- Knitting board 74+ needles (28” knitting board)
- Knit hook for lifting the loops
- Crochet hook
- Large sewing needle
Yarn:
- Brown Sheep Bulky wool.
- Small: Red=11 skeins, Orange=4
- Large: Red=12 skeins, Orange=4
Measurements: (sweater laying flat)
Hemline: sm 18” m 20” lg 22” xl 24”
Chest: sm 18” m 20” lg 22” xl 24”
Length: sm 24” m 26” lg 28” xl 28”
Sleeve: sm 23” m 25” lg 25” xl 25”
Gauge: 3 sts=1” 3 rows=1”
The large orange circles are randomly placed on front, back and sleeves. You can place them evenly across the sweater, or plan your own arrangement. If you plan to create an arrangement, it is advisable to make a sketch on paper. For this pattern, we will only state when a circle begins and at what point in the row. You will follow the graph for knitting the entire design.

Design:
When charting a design, start with piece of graph paper. Draw the design, the circle. Place an X or other mark in each square inside design. In this case, all design boxes are same color. Work one row at a time starting from bottom of graph. The first row has (4) stitches of orange. Weave those, front to back with Orange yarn. Lay the yarn down. Weave the row in stockinette st with red yarn, skipping the orange needles. Hook over all needles.
Next row of design has 8 stitches of orange. Pick up the orange yarn, weave the (8) stitches, front to back. Lay the orange down. Pick up the red yarn and weave the row skipping the orange stitches.
Hook over that row. Continue up the graph with each new row until the circle is complete. Cut and knot the orange yarn. If another circle is working in different area, you will have a different skein of orange yarn working for that circle. Your red yarn will just continue throughout the entire sweater piece.
Note: Since you are working the orange from front to back of needles, you will have only one pass down the board. The next row will go from the opposite direction. When you work with the red yarn, you are working a full circular down one direction, everyother needle, and then back to starting point. Be sure to stay in the stockinette stitch so that all needles receive the 2nd loop.
Sweater Front: (knit 2, front and back are the same)
- Cast On 54, (60), 66, (72) Stitches in Stockinette stitch at hemline.
- Lay anchor yarn. This will be removed and can be any yarn.
- Adjust stitches for the Open Rib Stitch
- Work in Open rib for 11 rows.
- Change to Stockinette Stitch by moving the loops over to cover all needles.
- Decrease 1 stitch at each end of board. Work row in stockinette.
- Work 1 row in stockinette.
- Next row: Start 1st design by tying in orange yarn at 20th needle from right end of board. Weave the 4 stitches in orange, front to back, covering 4 needles on each board. Lay the orange yarn aside. Do not cut. Weave row in Stockinette with Red yarn, skipping the 4 needles wrapped in orange. (full circular to cover all needles) Hook over all. Continue the circle design in orange, as you work the rows in stockinette.
- 2nd circle starts at needle #14 from left side after knitting a total of 4 rows in Stockinette.
- Work a total of 40, (46), 52, (52) rows from the ribbed hemline at the decrease, to the underarm sleeve shaping. This is all straight Stockinette knitting, so all you need to be concerned about are the circles. Our sample shows 4 full circles and 2 half circles competed at the sleeve shaping. When you do the half circle, just fold the graph in half, vertically, and follow the graph from the outer edge of the sweater front. You will need to do the other half when knitting the back of the sweater. Otherwise, keep all circles in between the side seams.
- Sizes sml will have 3 full circles, and medium will have 3 or 4 full circles before arm shaping.
Arm Shaping:
- *Decrease 1 stitch at each end of board. Work row.
- *Work 2 regular rows without decrease.
- Continue with these 3 *rows for a total of 7, (8), 8, (8) times.
- End with 2 rows of regular knitting w/o decrease.
Shoulders:
- Bind Off at both ends of board. Lay the working yarn across the stitches before bind off.
- Small-bind off 4 stitches at each end.
- Medium, Lg, X-Lg-Bind off (6) stitches each end of board.
- Place the last loop on crochet hook onto the next needle. That end needle will have 2 loops. You will lift them both next time you hook over.
- Work 1 row in stockinette stitch.
- The remaining stitches on the board will be the turtleneck. Remember that this will be knit with Open
- Rib Stitch. Adjust one side of board for open rib. This needs to be the side opposite the open rib side in the hemline. This means: one side of each piece has the open rib in hemline and the open rib of the turtleneck is on the opposite side. This will place the Open Rib to outside when you roll the
- turtleneck over. If you plan to wear the sweater with a mock turtle (not rolled) keep the Open Rib on same side as the hemline. (as in photo)
- Work in Open Rib Stitch for a total of 16, (18), 18, (18) rows or until the collar is as high as you desire.
- Bind Off loosely in pattern pulling 1 thru 1 with crochet hook.
Sleeves: (knit 2)
- Cast On 28, (30), 32, (32) Stitches in Stockinette stitch. Lay anchor yarn.
- Shift the loops on one side of board for Open Rib Stitch.
- Work in Open Rib for 11 rows.
- Change to Stockinette Stitch.
- All sizes sleeve have 3 circle designs.
- You will only need to work one design at a time as you work up the sleeve.
- Put 2 designs in main part of sleeve, and 1 design in upper sleeve.
- Place 1st design in center of sleeve.
- Place 2nd design on left side of center, and 3rd to right of center. Do this to both sleeves.
- Start the 1st design in orange yarn with the first row of Stockinette.
- *Increase 1 stitch at beginning and end of row. Work row.
- *Work 3, (4), 4, (4) rows without increase.
- Repeat these *rows for total of 11 times. This will complete the sleeve up to the underarm.
Decrease to shoulder:
- *Decrease 1 stitch at beginning and end of row. Work row.
- *Work 1 row without the decrease.
- *Repeat the decrease row 2 times.
- *Work 1 row without the decrease.
- Repeat these 5 rows for a total of 7 times (all sizes)
- Bind Off.
- Bind Off at all anchor yarns with loose bind off for stretchy edges.
Sewing the sweater together:
- Lay the pieces together. Place the front and back so that the open rib is facing on both pieces at collar. You want to see the chunky rib when the turtleneck is rolled down. The open rib will be to the outside at hemline. Or both will be to the outside if you are not rolling the collar.
- Sew the side seams with invisible inside stitch.
- Sew the shoulder and turtleneck with invisible inside stitch.
- Lay each of the sleeves folded matching the side seams. If you plan to roll the cuff, the open rib should be to the inside of sleeve. If you prefer no cuff, have the open rib to outside of sleeve.
- Lay the sleeves into the armhole opening of sweater. Match the side seams with underarm of sleeve.
- Match the shoulder seam of sweater with center of sleeve at bind off. Ease the 2 pieces together and do inside stitch. The bind Off of the sleeve will create a nice accent touch to the sewing. Be sure to sew with just the edge stitches.
- Tuck all tails of yarn into knitting.
- Do reinforcement stitches to underarms of sleeves.
Read NextSimple Men's Knit Sweater Pattern