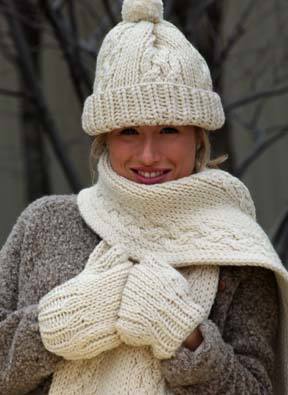
Made to Fit Double Knit Slippers
With a few simple measurements and calculations, you will be able to make slippers for anyone, from your child’s baby doll to Great Grandpa! Not only that, but you will be able to use any weight yarn, the stitch of your choice, and different gauge knitting boards. You truly get to be the designer of these loom knitting patterns.
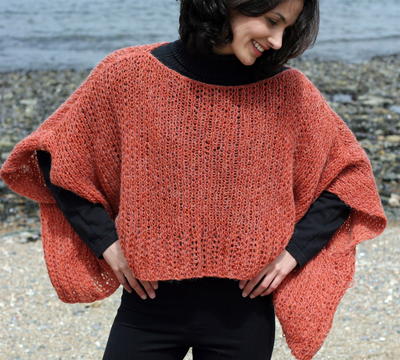
Make them big and bulky or lightweight. Design them with a stand up, bootie style, or moccasin cuff. Or, make them with no cuff at all. Stripes, novelty yarns, and different stitch patterns are all ways to make slippers that are unique. Let your imagination soar. These make great gifts, and are quick and easy. This may be the last slipper pattern you will ever need, thanks to Authentic Knitting Board. One of our loyal readers came up with this helpful guide to creating these slippers. View the Slipper Calculations Guide to gain some valuable assistance in knitting these cute slippers.
IMPORTANT NOTE: Read the “Help" section before getting started.

If you liked this simple knitting pattern, you'll love making
Grandma's Knitted Slippers!
Materials:
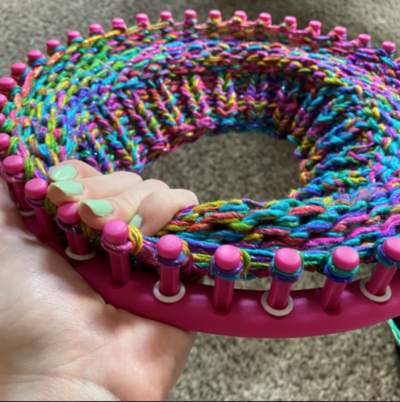
- Double sided knitting board with the number of needles required to cast on
- Yarn of choice
- Notions-Yarn needle, crochet hook
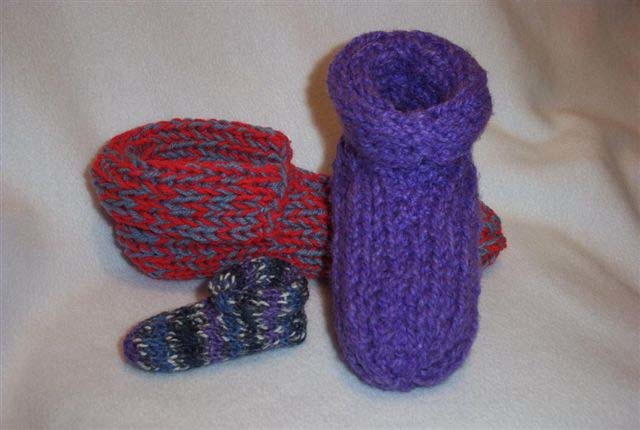
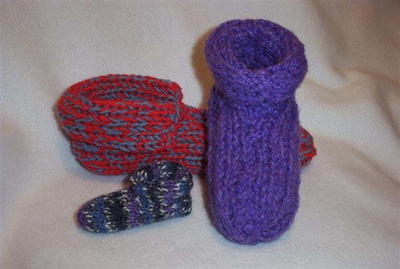
Samples were made with the 28” Authentic Knitting Board with Lion Brand Chunky USA—Purple Slipper, KK Blue Long Loom with 2 strands of worsted weight yarn—Red/Blue Slipper, and Décor
Accents 12” Fine Gauge AJAL with Lion Brand Magic Stripes—Striped Slipper.
Skill Level: Beginner
Skills Required: Casting on, binding off, decreasing, xtitch pattern of choice
Calculations:
- The first step in making these slippers is to measure the size of the foot. Four measurements are needed (measure to the nearest ¼”): A. From the top of the ankle bone down under the heel to the top of the ankle bone on the other side. B. From the heel to the middle of the arch. C. The width of the foot at the widest part. You may want to add ½”-1” to this measurement for more ease. The amount of ease your slipper will have will vary with the stitch you choose. A stretchy stitch won’t need as much ease, while a firmer stitch will require more. The amount of ease required also depends on how snug or loose you like your slipper to fit. Adding no ease will make the slipper snug and close fitting. Experience will tell. D. From the heel to the toe. You may want to add ½”-1” to this measurement if you want “grow room.” Record these here: A._____ B._____ C._____ D._____. Make sure to measure carefully so that the slipper will turn out the right size. There is also a place to record these numbers on page 2, for ease in doing the calculations.
- Now you need to make a swatch with your chosen yarn, stitch, and knitting board. I recommend casting on at least 12 needles, more for smaller gauge boards, and knitting for about 3-4 inches. Keep track of how many rows you knit. You will need that number later. Remove the swatch by binding off with a crochet hook (see step #3 in the pattern). Now, measure the width of the knitted piece. Record this here:_____. Divide this number by the number of needles cast on. Record this number here: W._____. This tells you how much knitting you get per needle. Measure the length of the knitted piece. Record this here:_____. Divide this number by the number of rows knitted. Record this number here: L._____. This tells you how much knitting you get per row. Make sure to measure carefully so that the slipper will turn out the right size.
- Divide (A) by (W). Record this here:_____. Add 8 to this number. If you added some ease to (C), are using thin yarn or a fine gauge board, or you just want a taller cuff, you may want to add 10-12 to the first calculation in the place of the 8, to give you more cuff. If you want a stand up cuff, you can add 6 or less in the place of the 8. If you want a “footie” style slipper (no cuff), don’t add anything to the first number. Round to the nearest whole number. Record this here: E._____.
- Divide (B) by (L). Round to the nearest whole number. Record this here: F._____.
- Divide (C) by (W). Double this number. Record this number here:_____. Now, subtract this number from the total number of needles cast on (E). Round to an even number, if necessary. Record this number here:_____. Divide by 2. Record this here: G._____.
- Divide (D) by (L). Record this number here:_____. Subtract (F) from this number. Record this number here:_____. Subtract 3 from this number. Record this here: H._____.
A._____ B._____ C._____ D._____ (From page 1)
- Decimal equivalents for common fractions (to help with calculations): 1/8=0.125 1/4 =0.25 3/8=0.375 1/2 =0.5 5/8=0.625 3/4=0.75 7/8=0.875
Sample Slipper: For those, like me, who like to “see” what they are doing, here’s an example of using the calculations to make a slipper on a fine gauge board with worsted weight yarn. First I’ll list the measurements and then show the calculations step by step.
- Foot Measurement: A.—7.5”, B.—3”, C.—3”, D.—6.75”
- Swatch Measurements: W—4” / 16 needles = 0.25” L—2.5” / 13 rows = 0.2”
- 7.5(A) / 0.25(W) = 30 8 = 38 E.—38 (Cast on stitches)
- 3(B) / 0.2(L) = 15 F.—15 (Knit this many rows)
- 3(C) / 0.25(W) = 12 x 2 = 24, 38(E) – 24 = 14 / 2 = 7 G.—7 (Bind off this many stitches from each end.)
- 6.75(D) / 0.2(L) = 33.75, 33.75 – 15(F) = 18.75 – 3 = 15.75 (I’ll round this up to 16) H.—16
(Knit 16 rows)
Pattern:
- Cast on (E)____ stitches with your favorite method. Leave a long tail that will be used to sew up the back of the slipper later. Instructions for the Stockinette cast-on are at the end of the pattern.
- Knit (F)____ rows in stitch of choice.
- Bind off (G)____ stitches on EACH end of the board. To bind off on the end opposite the working yarn, simply slip a crochet hook into the first stitch on the front and back board, and pull the first loop through the second loop. Now, pick up the next front stitch and pull it through the loop on the hook, then the next back stitch. Continue until the required number of stitches are bound off. At this point, you’ll still have one loop on your crochet hook. Place this loop on the end needle on the back board. There will now be 2 loops on the end back needle. (See top picture.) Do the same to the other side with the working yarn, but pick up the back stitch first and then the front stitch (where the working yarn is attached). Also, it is very important to lay the working yarn across the stitches as you bind off. (See middle picture.) It will be buried inside and then be right where you want it when you are finished binding off.
- Knit (H)____rows. On the first row, knit 2 stitches over 1 on the two back needles that have 3 loops on them from binding off. After the first row is knitted, all the needles should have 1 loop on them. Continue knitting the remaining rows as usual.
- Decrease half of the stitches. Do this by lifting stitch 1 onto needle 2 then stitch 3 onto needle 4. Repeat for the whole board, both front and back. You will end up with every other needle being empty. If you have an odd number of stitches cast on, the last 2 needles will not have an empty needle between them. Wrap the row, skipping the empty needles (see bottom picture). If an odd number of stitches are cast on, you will wrap the last 2 needles consecutively. Knit the bottom 2 stitches over the top stitch. You should now have 1 stitch on every other needle. Shuffle all the stitches together so that there are no empty needles.
- Knit 1 row.
- Repeat step #5, except you don’t have to shuffle all the stitches together after decreasing.
- Remove slipper by cutting the working yarn, leaving a long tail. Thread the yarn tail onto a yarn needle and slip the stitches, starting with the far left back needle (the one opposite the working yarn), back and forth across the board (1A, 1B, 2A, 2B, 3A, 3B, etc.) onto the yarn needle. Remove from the board.
- Finish up by binding off the cast-on stitches (if the stockinette cast-on was used). Bind off is the same as done in step #3 of the pattern starting with the stitch on the end opposite the yarn tail. After binding off the last stitch, wrap the yarn tail around the hook and pull it through the loop. The piece will look like a capital T. Fold it in half from side to side. Sew up the back seam using the long tail left from casting on. When about 1”-1 ½” (more for larger sizes, less for smaller sizes) from the bottom, bring the bottom of the slipper down to meet the seam you are sewing (this will look like a capital T—see picture below right) and finish sewing closed. This gives the back heel a nice shape. Thread the yarn tail at the toe onto a yarn needle. Run the needle back through the toe stitches again and pull tight, then sew up the top of the slipper. You can sew just the top of the slipper and leave the cuff open to fold over moccasin style, or sew all the way up the cuff and then fold over for more of a “bootie” look, or sew all the way up the cuff and leave it standing up. Weave in all the loose ends. Turn right side out.
- Congratulations!! You’re done. Now make another slipper.
Help:
When referring to the front board, this is the board nearest you when it is lying flat. The back board is the board furthest from you when lying flat. When making your calculations, you will run into partial numbers. You can either round up or round down. A lot depends on how stretchy your stitch or yarn is, if you want to leave “grow room”, and how you like your slippers to fit. I usually round up so the slippers won’t end up too small. When calculating (W) and (L) round the number to the nearest hundredth (2 places to the right of the decimal). For example if (W)=0.34373, record 0.34. But if the number in the thousandth place is 5 or above then you would round up. So, 0.34573 would become 0.35. If you have measured correctly, your slippers should turn out the right size. If you are unsure, or just want to check your measurements, measure the knitted piece at the end of step #2 and step #5. It should be the same as (B)(after step #2) and almost (D)(after step #5). If it’s shorter, add a row or two. If it’s a little longer, you could just leave it, or you could pull back a row or two. Remember when measuring after step #5 that the piece will be a bit shorter than (D) because you still have 3 rows to knit. When in doubt, take the time to measure. You’ll be glad you did. After binding off from each end, you may have to adjust how you wrap your needles to keep your stitch pattern. For example, when using ribbing you may (not always) have to switch from (1A to 3B) to (2A to 4B) to keep in pattern. By observing the pattern in the knitting, you will be able to tell if you need to adjust your wrapping. If using stockinette stitch, this will not be a problem. When wrapping the last 3 rows, I usually switch to stockinette stitch, as it’s easier to wrap with the empty needles. For a nicer finish when sewing up the front and back seam of the fold down cuff, sew the cuff seam on the right side (outside) of the slipper. The stitches will be hidden when the cuff is folded. This applies only to the part of the seam that makes up the cuff. The rest of the top and back seam is sewn on the wrong side (inside). Any size yarn can be used, but chunky/bulky yarn will give you more thickness and last longer. Ribbing is a very nice stitch to make slippers in, as it is thick and comfortable. If you are using a larger gauge knitting board, it may be helpful to wrap the board 3 times, when casting on, and then lift the bottom loop over the top 2. Then wrap as normal, always lifting 1 over 2. This will give more thickness. Using two strands of worsted weight yarn, held together, will make a nice thick slipper and give you many color combinations. Baby booties can be made by using baby or sport weight yarn and a small or fine gauge knitting board set at ¼” spacing. For closer fitting, lightweight “footie” style slippers, sock yarn and a fine gauge knitting board work well. Crochet a chain and weave it through the cuff of the slipper and tie into a bow. Be creative!! Keep a record of your swatches. That way when you want to make a pair of slippers out of the same yarn, you’ll already have that part done.
Definitions and stitches:
Working yarn: The yarn attached to the skein.
Stockinette cast on and stitch: Place a slip knot on the back left needle of the board. (“Back” meaning the board furthest from you when lying flat.) Call this 1A. Bring yarn down from 1A to 2B. (This is the front of the board.) Wrap around 2B and go back up to 3A. Continue wrapping every other needle for the desired amount of stitches. Then take the yarn straight across to the needle directly across from the needle that was wrapped last, and wrap back to the beginning, covering all the needles that are empty. Lay a long piece of yarn (this is called the anchor yarn—see picture), about twice as long as the stitches, across the stitches and then wrap again. Every needle will now have 2 loops on it. Hook the loops over by lifting the bottom loop over the top loop and off the needle. Push the ends of the anchor yarn through the boards and tie loosely under the boards. You are now cast on. Continue wrapping in this pattern for the stockinette stitch. You only lay the anchor yarn on the cast on row.

If you love making slippers, check out our 17 Cozy Crochet and Knit Slipper Patterns!

Thanks for your comment. Don't forget to share!
sahinkle 0829333
Jul 03, 2016
I made these a few years ago and love them. Lots of math but they turned out perfect. Unfortunately, my memory isn't great and I am stuck at trying to remove the slipper from the loom. It says to slip the stitches and what I've seen, slipping stitches didn't have anything to do with removing something from the loom. Can someone explain it please. Did it mean to just thread the yarn needle through those stitches on those pegs? I want to take this opportunity to thank you for giving us loom knitters these patterns. I simply cannot keep the yarn on knitting needles or a crochet hook and the looms are my only option. Also much better for my hands and eyes. I enjoy this craft so much and always looking for patterns. Thanks again from a grateful loomer.
cmoore2469 2758808
Oct 04, 2012
I cannot believe the whining people who are complaining about a FREE pattern. Obviously a lot of work went into this pattern whether it is for a loom or straight needles. Show a little gratitude ladies. BTW, guess how I found this pattern? I clicked on "Loom Patterns" in the sidebar. Don't believe it? Here's the address to this page where the pattern is. http://www.favecrafts.com/Loom-Patterns/Made-to-Fit-Double-Knit-Slippers/ct/1
editorKS
Feb 22, 2012
Hi, everyone. This pattern is located in the "loom patterns" sub-category of our larger knitting category. If you click on "Knitting" under our category tabs (along the left-hand side of the web page), you will see that we have all of our knitting patterns broken down into sub-categories to make locating the patterns easier. Loom knitting is a niche within the craft of knitting. Many people knit strictly on looms, and therefore we want to offer patterns to accommodate all of our readers. If you are looking for regular knit slipper patterns, please refer to the "Knit Socks and Slippers" subcategory. Hope this helps! --Editors of FaveCrafts
deerme20duff 12887 31
Feb 20, 2012
I can't believe that this is exactly the pattern I want to knit but, after reading all through to try an understand what it was all about, I discover it required a loom! Why on earth is it under "Knitting"?
db2s94 6513450
Jan 01, 2012
I too was looking for a double knit slipper pattern using regular needles. I don't own a loom either
dianaparker 992334 3
Oct 10, 2011
What is a knitting board??? I agree with the lady that knitted for 71 years!!
JennyBee1
Sep 02, 2011
@janetcaulfeild 3426754, A knitting board is also known as a knitting loom. We apologize for any confusion. --Editor of FaveCrafts
janetcaulfeild 342 6754
Sep 02, 2011
I have been looking for slipper patterns for a friend. These patterns look great. I made the mistake of copying out a couple not realizing a knitting board is required. What on earth is a knitting board first & why can't you give us some good patterns without requiring one of these boards. Very frustrating. Jan
Crafter 4378840
May 18, 2011
And just what is a knitting board? Knitting is with two needles, please have this pattern for knitting and keep "novelty" crafts under a different section. Thanks
craftymama86
Dec 26, 2010
First of all, "loom knit" should have been included in the title so those who were looking for loom knitting patterns would know to look here and for those who use needles would know NOT to look at this pattern. Two, it is hard to find loom knitting patterns whereas it is not hard to find knitting patterns for needle knitting. SO, for those who don't even like the idea of knitting looms, you should go look for needle knitting patterns. There are PLENTY out there, I've seen them.
Synthia
Oct 24, 2010
Hello, I don't use a knitting board and really don't want to go out and purchase this high priced item. When knitting slippers, why didn't you add the directions for standard knitting instructions? It would really made this so much easier for me and everyone else to read these patterns.
marybee
Sep 18, 2010
Never mind knitting boards! I have been kitting the usual way for 71 years - can't you put this pattern into a straight pattern, NO "KNITTINGBOARDS"????
pjstitches
Mar 09, 2010
I have never used a knitting board. Is there a way to convert this pattern to hand knitting? Thank you! pj
Report Inappropriate Comment
Are you sure you would like to report this comment? It will be flagged for our moderators to take action.
Thank you for taking the time to improve the content on our site.