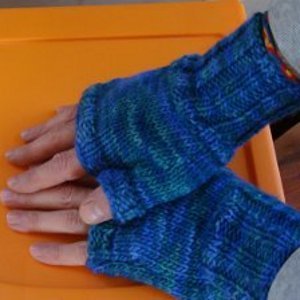
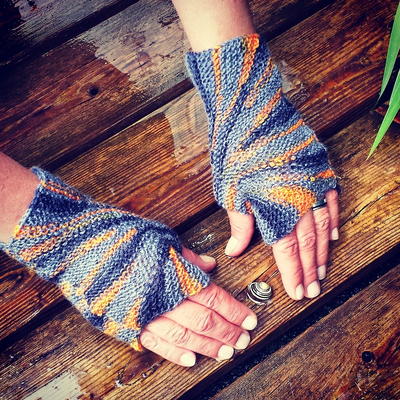
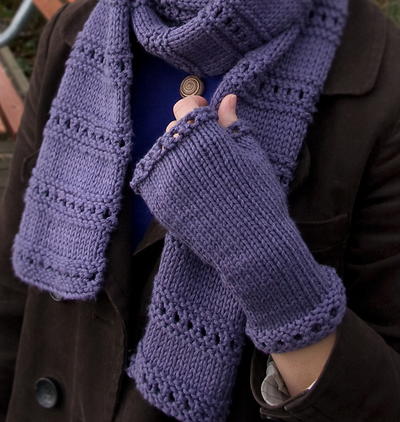
Beginner Montgomery Fingerless Mitts
These simple knitted fingerless mittens are perfect for beginner knitters (and beyond)!

These free knitting patterns are quick and easy! Make these beginner Montgomery Fingerless Mitts for a fashion-forward way to stay warm in the cold weather.

Knitting Needle Size8 or 5 mm
Yarn Weight(5) Bulky/Chunky (12-15 stitches for 4 inches)
Gauge16 stitches = 4 inches
Finished Size women’s medium, approx 7 inches around at the cuff
Materials List
- 1 x 100g (136 yds) Knit Picks Comfy Bulky (shown in Vinca)
- 5.0 mm, either 4-5 double pointed, or 2 circular, needles
Instructions:
Mitts (work two the same)
-
Cast on 28, being careful not to make the stitches tight. (To change the width of the mitts, increase the number of cast on stitches by 2’s). Split the stitches evenly over your needles. Join in the round, being careful not to twist the stitches.
Eyelet Band at cuff (8 rows)
-
Rows 1, 3, 7: Knit.
-
Row 2, 4, 6, 8: Purl.
-
Row 5: *K2tog, yo; rep from *.
Wrist
-
Knit 17 rows.
Shaping for thumb (18 rows)
-
Row 1: K1, kfb, knit until 2 sts are left in the row, kfb, k1. (30 sts).
-
Rows 2 and 3: Knit.
-
Repeat Rows 1-3 five more times. You now have 40 sts on your needles.
Separate the thumb stitches
-
On the next row knit the first 6 sts. Then, put these 6 sts AND the last 6 sts of the row onto a scrap piece of yarn. (These 12 sts are for the thumb, which you’ll knit later). Knit to the end of the row.
-
Now knit 7 more rows (on the first of these 7 rows, you’ll have to rejoin in the round).
Eyelet Band at Fingers (3 rows)
-
Row 1: Purl.
-
Row 2: K2tog, yo; rep from *.
-
Row 3: Purl.
-
Bind off, not too tightly.
Thumb (4 rows)
-
Transfer the 12 sts from the scrap yarn to your needles. Join your yarn, leaving a long tail (we’ll use this later).
-
Row 1: Knit.
-
Row 2: Purl.
-
Row 3: *K2tog, yo; rep from *.
-
Row 4: Purl
-
Bind off, not too tightly.
FINISHING
Weave in the ends at the cuff, fingers, thumb edge. You’ll probably have a gap where the thumb joins the hand. Turn the mitt inside out and use that long tail that you left when you started the thumb the sew up the gap.
Abbreviations
- k2tog
- put the tip of right needle through the first two needles on the left needle and knit them together yo bring yarn from back to front over right needle
- kfb
- knit a stitch, but leave it on the left needle, then knit again into the back of the stitch, and slide it off the needle
Thanks for your comment. Don't forget to share!
mulberrygalprinces s
Aug 23, 2017
I really like these. And even though I haven't knitted in a long time, after reading thru the directions, it is a very easy pattern that I can follow. It's basic and should go quickly. The only cI really like these. And even though I haven't knitted in a long time, after reading thru the directions, it is a very easy pattern that I can follow. It's basic and should go quickly. The only change I want to make is to agg some embellishment . Maybe some pretty small buttons.hange I want to make is to add some embellishment . Maybe some pretty small buttons.
saphy98
Feb 08, 2017
This fingerless mitt pattern is a great one for beginners. The pattern is very simple to read and contains the basic stitches. These can be done on double pointed needles or circular needles. I would prefer using the circular over double pointed. They would look cute in all colors.Beginners enjoy working on this one.
bestestsister50 75 96033
Dec 20, 2015
this is my first pattern at age 50 very easy. and gorgeous as well , doing mine in pink
Kaylee
Dec 21, 2015
Hi bestestsister50 75 96033! So glad you found the pattern to be enjoyable. I'm sure they look fantastic in pink. We'd love to see a photo if you have one. :) - Kaylee, Editor
Rebecca George
Jun 12, 2015
I love this pattern. Very easy to follow but I would like to be able to print it without all the extra comments which tack 13 pages opposed to 1 or 2.
Kaylee
Dec 21, 2015
Hello Rebecca, If you click on the "print" button below the title of this project, you should be able to print just the pattern. If that does not work, try highlighting the instructions, copying them, and them pasting them into a word document before printing. Hope that helps! - Kaylee, Editor
michellewaite 1997 519
Feb 20, 2014
I have made several pairs of this pattern. It is easy, looks nice and is nice to wear. If it is really cold, I pull these fingerless mitts over some stretchy gloves.
pahelmes 4819937
Feb 20, 2014
I enjoyed this pattern as they meet my requirement for mitts, short(er) cuff and a quick knit.
sewpraise9 7494239
Feb 20, 2014
I have made both the mittens and scarf. They really wear well.
sewpraise9 7494239
Feb 20, 2014
I have made this pattern. Mittens ans scarf. I like them very much.
dogspinner 8050070
Feb 20, 2014
I really love this pattern! The project looks do-able and also lacy and feminine. I always love the stockinette stitch!
knewbieKnitter
Jan 22, 2013
Hi! I am interested in trying those though I have not yet knit on. Ircular needles. I've read through the instructions and was wondering, after I save the thumb stitches, continue on, bind off at the top, and then come back to the thumb, where does my working yarn come from? Aren't the thumb stitches just hanging there with no working yarn attached? Thanks
JennyBee1
Jan 03, 2012
@tiggertaco 4854920, I'm sorry to hear of your trouble. I have two options for you: 1. You can contact the pattern designer directly for help. The designer is specified in the byline. 2. I might also suggest that you try posting your question to our sites Facebook page. It is monitored by the editor and is a great resource for helpful tips and suggestions from our Facebook friends; perhaps they can offer some guidance! Here is the link: http://www.facebook.com/FaveCrafts --editors of FaveCrafts
tiggertaco 4854920
Jan 01, 2012
I wish for a beginner pattern it explained a few things in better detail, like after decreases how many stitches to expect etc.
tiggertaco 4854920
Jan 01, 2012
I am doing this as my first dpn project after a cicular needle project and a scarf and hat on straight needles. My question is for *K2tog, yo repeat from * is it knit 2 together, yo and then knit 2 together (with yo) and then k2tog (with yarn under) and so on? So this would leave 15 stitches on needles? ( I started with 30 cast on)
p5celt
Oct 13, 2012
tiggertaco, when it says K2tog., yo... it means that you knit 2 stitches together, and then wrap your yarn once over the needle, and continue knitting the pattern. Thus you are forming a sort of "stitch" between the first k2tog. and the next k2tog. When you knit the next ROW, these yo "stitches" make a hole (see the lacy look of trim on the mittens.) I do agree if the designer had given the number of stitches it would have helped (if you started with 30, you would still have 30, many of them these yo "stitches".) I hope this helps anyone else who is confused. p5celt.
Julia L
Mar 28, 2011
Hi Crafts, Here is an article that will help you convert the project. Thanks! http://www.ehow.com/how_18632_convert-knitting-pattern.html
Report Inappropriate Comment
Are you sure you would like to report this comment? It will be flagged for our moderators to take action.
Thank you for taking the time to improve the content on our site.