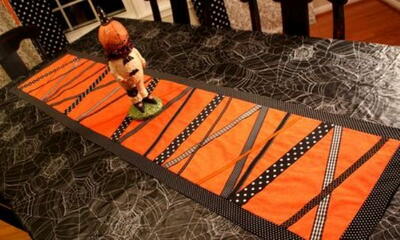
Halloween Ribbon Table Runner
Try these Halloween sewing patterns from Shelley Detton to make a festive table runner to spookify your dining room. The Halloween ribbon table runner is made from orange and black ribbon and fabric scraps.

Materials:
- 2 yards fabric for main background color (relatively solid color is best)
- 2/3 yard fabric for border
- Approx. 12 yards ribbon; assorted sizes, colors, and designs
- 1/4" double-sided fusible interfacing (approx. 12 yards), such as Steam-A-Seam
Instructions:
-
Cut main fabric into long rectangle measuring 14" x 70". Hint: cut the selvedge edge off one side (the entire length of fabric), then measure 14" from that edge. Make a small 1/2" snip at 14" mark with scissors, then rip fabric all the way down. It will follow the grain of the the fabric and you will rip a long strip 14" all the way down. To cut border fabric, fold with selvedges together and use a rotary cutting system. Cut 5 strips which are 4" wide each.
-
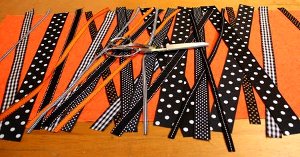
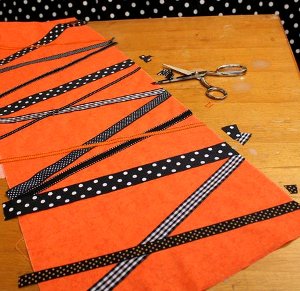
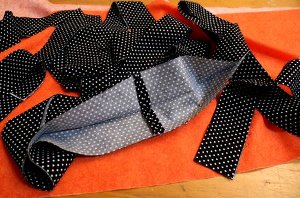
Precut your ribbon. Cut at least 4 of each variety if you're using 6 different ribbons, and more if you're using fewer different kinds. Cut the ribbon at least 16" long, because the length increases when ribbon is placed at an angle. If you want steeply angled ribbon, cut it 18". NOTE: if your ribbon has stitched thread details, "preshrink" it with a hot steam iron. It will shrink considerably and will pucker your project if you don't preshrink it.
-
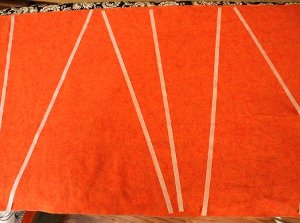
Place main fabric face up on ironing board. Arrange strips of interfacing in random fashion on fabric. Don't take off paper backing yet! Touch a hot iron VERY briefly (as in 1 second) to the paper-backed interfacing to fuse the first side a little, then peel off paper. NOTE: At this point, don't overlap lines. Do the first layer, lay the ribbon down, then lay down a second series of interfacing + ribbon on top after completing Step 4.
-
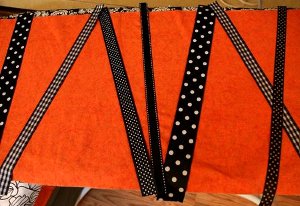
Arrange ribbon on top of interfacing in desired sequence. Fuse in place according to manufacturer's directions. The super wide ribbon needs 2 strips of interfacing. I like to tuck the second strip of interfacing under and fuse it after doing the first one so that the ribbon doesn't shift. HINT: Don't scoot your iron along ribbon with painted designs on it - the paint could smear under high heat and a wiggly iron. Repeat steps 3 and 4 if you want overlapping ribbon, such as the orange ribbon and a few of the black ribbons you see in photo below.
-
When all the ribbon is fused as desired, snip off excess ribbon along edges.
-
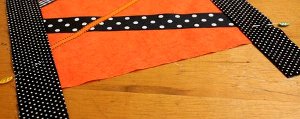
Prepare the border fabric by stitching 2 strips together at the ends with a 1/4" seam, then pressing strip in half lengthwise with the right sides facing out. Repeat with 2 other strips. The 5th strip just needs to be pressed in same manner but not sewn to anything. NOTE: There are other ways to sew the border on, such as sewing all the strips together and sewing it all the way around the rectangle with folded "miter" corners, but I didn't use that method in this tutorial. Those of you who know other methods of bordering are (obviously) more than welcome to attach border with alternate approaches.
-
Pin the 2 long strips to the 2 long edges of rectangle, with the raw edges of border facing outward to meet up with the raw edges of rectangle. You don't have to extend the border fabric beyond the edge of the rectangle as much as the photo shows: I was originally going to do standard miter corners but then changed my mind. Sorry if that confuses you. The ends should extend about 1/4" beyond rectangle for this method of sewing the borders on, not the 4" extensions I have pictured.
-
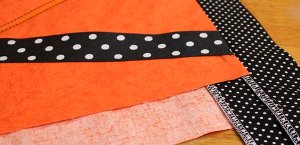
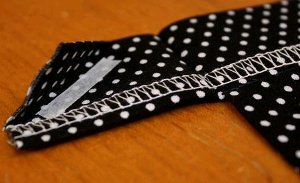
Using 1/4" seam, stitch long strips to the 2 long edges of rectangle. Serge if desired. Press borders out and press the seams toward center of rectangle.
-
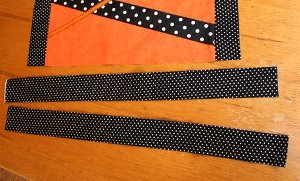
Clip off extra border fabric on ends of rectangle. Take the 5th border strip and cut it into 2 equal lengths, as shown above.
-
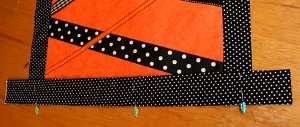
With raw edge facing outward to meet up with raw edge of rectangle, pin end borders onto ends of rectangle. Center so that equal amounts of extra fabric extend beyond each edge.
-
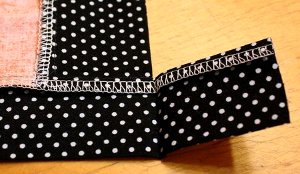
Stitch/serge end borders on. Press seams AWAY from rectangle, so they face border. Press extra fabric "tab" over the end border on the backside so that all excess is folded under, as shown in photo below.
-
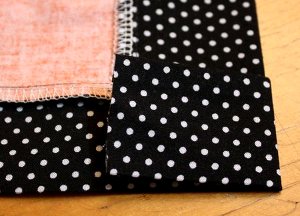
Open tab temporarily and press the corner down as shown in photo above. Use a bit of interfacing tape and secure flap.

-
Place 2 more bits of interfacing on open tab as shown. Remove paper backing.
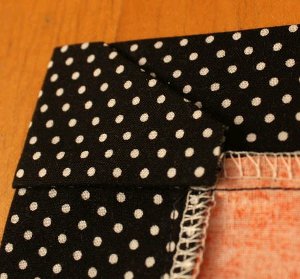
- Fold flap over and fuse well. Repeat on other 3 corners. Give your runner one final pressing and go give some striking bling to your table!