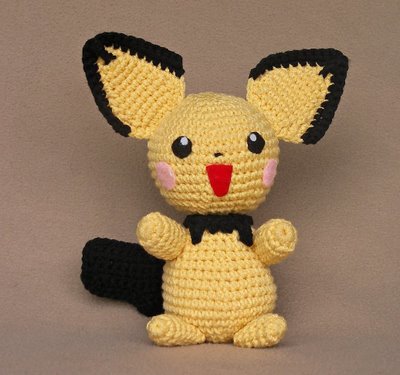
Pokemon Pichu Plush
I'm a 45 year old mother of four from Texas who has been crocheting for 30+ years and have always enjoyed making clothes, blankets, accessories and toys for my children and their friends. My children convinced me to start a website where I could share patterns of the dolls I make, so WolfDreamer Off the Hook was born. By far the most requested of my doll patterns are those inspired by cartoon and game characters, and one of the most popular is Pichu. Pichu was originally made for my 11 year old daughter who would like to believe she's the world's biggest Pichu fan. Making and sharing the patterns for the dolls has been a very rewarding experience, and with the hundreds of characters out there to choose from, I'm going to be inspired for years to come.


Materials:
- WW yarn in light yellow and a medium black
- G Hook
- Fiberfill
- Yarn needle
- Scraps of felt in black, red, pink and a very tiny bit of white
- sewing threads to match the felt colors
Notes:
- I tend to prefer to join my rounds, but if you prefer continuous rounds and using stitch markers, that's just as good. Whatever is most comfortable for you.
- Gauge isn't an issue, just make sure that your hook, yarn and tensions result in a fairly tight stitch, to prevent the stuffing from showing through.
- I also recommend using the 'invisible decrease' when making 3D pieces like this. It's done by making the decrease stitch in the Front Loops Only of the two sc. While the stitch isn't completely invisible, it does create a much neater looking piece with few to no 'gaps' where the decrease stitches are made.
Abbreviations:
- Number in ( ) at the end of each round or row, are the total number of stitches in that round or row.
Special stitches used:
- BPDC (Back post double crochet): Yarn over, insert hook from the back side of the work right to left around the post of the indicated stitch on a previous row. yo and pull up a loop (3 lps on hook) yo and draw through two lps (2 lps on hook), yo and draw through two lps (1 lp on hook)
- FPTC (Front post treble crochet): Yarn over twice, insert hook around the post (from the front side of your work) of the stitch indicated, yo and draw up a lp (4 lps on hook), yo and draw through two lps (3 lps on hook), yo and draw through two lps (2 lps on hook), yo and draw through two lps (1 lp on hook)
Instructions:
HEAD:
- Rnd 1: 6 sc in magic ring (6)
- Rnd 2: 2 sc in each sc around (12)
- Rnd 3: sc in next sc, 2 sc in next sc around (18)
- Rnd 4: sc in next 2 sc, 2 sc in next sc around (24)
- Rnd 5: sc in next 3 sc, 2 sc in next sc around (30)
- Rnd 6: sc in next 4 sc, 2 sc in next sc around (36)
- Rnd 7: sc in next 5 sc, 2 sc in next sc around (42)
- Rnd 8: sc in next 6 sc, 2 sc in next sc around (48)
- Rnd 9-12: sc in each sc around (48)
- Rnd 13: sc in next 6 sc, dec over next 2 sc around (42)
- Rnd 14: sc in next 5 sc, dec over next 2 sc around (36)
- Rnd 15: sc in next 4 sc, dec over next 2 sc around (30)
- Begin stuffing about this point if you haven't done so already.
- Rnd 16: sc in next 3 sc, dec over next 2 sc around (24)
- Rnd 17: sc in next 2 sc, dec over next 2 sc around (18)
- Rnd 18: sc in next sc, dec over next 2 sc around (12)
- F/O leaving tail, add any stuffing to finish filling out the head. Weave the tail through the last round worked and pull to close.
BODY:
- Repeat rounds 1-7 of HEAD.
- Rnd 8-11: sc in each sc around (42)
- Rnd 12: sc in next 5 sc, dec over next 2 sc around (36)
- Rnd 13: sc in each sc around (36)
- Rnd 14: sc in next 4 sc, dec over next 2 sc around (30)
- Rnd 15: sc in each sc around (30)
- Rnd 16: sc in next 3 sc, dec over next 2 sc around (24)
- Rnd 17: sc in each sc around (24)
- Rnd 18: sc in next 2 sc, dec over next 2 sc around (18)
- Rnd 19: sc in each sc around (18)
- F/O and stuff moderately firm, leaving opening at neck as is for now.
EARS:
Make 2.
Using yellow yarn,
- Rnd1: 4 sc in magic ring (4)
- Rnd 2: sc in next sc, 2 sc in next sc, around (6)
- Rnd 3: sc in next 2 sc, 2 sc in next sc, around (8)
- Rnd 4: sc in next 3 sc, 2 sc in next sc, around (10)
- Rnd 5: sc in next 4 sc, 2 sc in next sc, around (12)
- Rnd 6: sc in next 5 sc, 2 sc in next sc, around (14)
- Rnd 7: sc in next 6 sc, 2 sc in next sc, around (16)
- Rnd 8: sc in next 7 sc, 2 sc in next sc, around (18)
- Rnd 9: sc in next 5 sc, dec over next 2 sc (twice) sc next 5 sc dec over next 2 sc (twice) (14)
- Rnd 10: sc in next 5 sc, dec over next 2 sc around (12)
- Do not fasten off. Work one round of sc evenly around the edges of the flattened ear, working 2 sc together in the 'bends' on the sides and 3 sc together in the top point and both of the bottom 'corners'. Join to top of beginning sc. F/O yellow. Attach black to the 4th sc from the bottom of the ear (the end opposite the point). Ch1 and sc in same st as joining.
- Sc in each sc to the center stitch of the point (the middle sc at the point where you put three sc together) in that center sc, work the following - sc, FPTC (going around the center sc in the second row below), sc - work sc in each sc to the fourth sc from the bottom on the other side. Do not ch 1, turn. Skip first sc from hook and work to the point. In the point work the following - sc, BPDC (going around the post of the FPTC from row before), sc - work sc until the next to last stitch. Sl st in last stitch. F/O weave in ends.
ARMS:
Make 2
Using yellow yarn
- Rnd 1: sc 8 in magic ring
- Rnd 2: sc in next 3 sc, 2 sc in next sc, sc in 3 sc, 2 sc in next sc (10)
- Rnd 3-7: sc in each sc around (10)
- F/O. Stuff moderately without making them over stiff.
FEET:
Using yellow:
- Rnd 1: sc 6 in magic ring (6)
- Rnd 2: sc in next 2 sc, 2 sc in next sc, sc in 2 sc, 2 sc in next sc (8)
- Rnd 3: sc in next 3 sc, 2 sc in next sc, sc in 3 sc, 2 sc in next sc (10)
- Rnd 4-7: sc in each sc around (10)
- Flatten out the foot and sc thru both layers to 'close' end. Foot is not stuffed.
- F/O
TAIL:
Using Black make 2 of the following:
- Row 1: Ch 11. Sc in 2nd ch from hook and each ch across. (10)
- Row 2: sc in each sc across, do not turn but ch 7.
- Row 3: sc in 2nd ch from hook and each ch to previous row, sc in next 5 sc of row 2, turn (leaving remaining sc of row 2 unworked) (11)
- Row 4-7: sc in each sc across (11)
- Place the two pieces together and sc evenly around the edge going through both pieces. Use 3 sc together in each outside corner, and one sc on inside corners.
COLLAR:
Using black:
- Ch 22, sc in 2nd ch from hook and next 7 chs. Ch 4, sl st in 2nd ch from hook, sc in next ch, hdc in next ch, sc in next ch of foundation ch. Ch 3, sl st in 2nd ch from hook, sc in next ch, sc in next ch of foundation ch. Ch 3, sl st in 2nd ch from hook, sc in next ch, sc in next ch of foundation ch. Ch 4, sl st in 2nd ch from hook, sc in next ch, hdc in next ch, sc in next ch of foundation ch. Sc in remaining chs of foundation ch.
ASSEMBLY:
I strongly recommend that you pin all the pieces together before sewing them, just to ensure that you have everything as you want it. Sew head to body, arms and legs in place (using picture for reference). Sew ears to top of head as shown in the picture. Sew the tail to the center bottom of the back of the body as shown. It doesn't matter to which side the tail is turned. Whichever you prefer.
- Cut two dime sized circles of black felt, two quarter sized circles of pink felt and two very tiny circles of white. With red felt, cut a mouth the shape shown (it's probably easier to make a paper version first, and when you're pleased with the mouth shape and size, use that paper piece as a template to cut out the mouth from red felt.)
- Sew (or glue) the face pieces on as shown, add the 'catch lights' in the eyes as shown.
- Sew the collar around the neck, and sew the points of the collar down to the chest.
Pichu and pokemon are copyright Nintendo.
Reprinted with Permission from Linda Potts
Thanks Linda!


Thanks for your comment. Don't forget to share!
fairyraft 5716581
Apr 24, 2014
My daughter's 23rd birthday is in a few days. I made her and elephant (my first toy I've ever made), then I found Pichu. Since she has a pokiball tattooed I had to try this one. It's awesome.
simplewoman77 6213 379
Jul 27, 2013
the pokemon pichup lush is a great idea and will go over well with kids but i find the directionsl lacking info. I did all the other parts without a problem but the ears need better clarification. In addition it only tells you to stuff the head and body. Is that correct? I just fudged the ears rather than struggle.
cbcrafts 6445699
May 03, 2012
I am a grandmother of 4 and I know the two youngest will love Pichu - can't wait to try it. You did an awesome job on this pattern and I can't wait to see something else of yours
JennyBee1
Sep 12, 2011
@kristynelson79 5337153, We suggest contacting the pattern designer directly for information regarding purchasing her projects.The designer is specified in the byline. --Editor of FaveCrafts
fmproell 0583053
Mar 06, 2011
I personally love Pichu and my grandsons are really into Pokemon. I was very excited when I saw this pattern. THANKS so much!!!! Fran Roell (grandmother of 7 - 5 boys and 2 girls)
amliw
Jun 23, 2010
Please tell me what a magic circle is......How many stitches to create. I have been crocheting for years but this magic circle is a problem without knowing just how many stitches to start with. Thanks!
didough
May 28, 2010
If you do a Google search for crochet magic circle there are lots of links
concordiamom
Feb 26, 2010
Please tell me what a magic circle is--how many stitches to create, etc. I am experienced but never heard of this. Thanks.
Report Inappropriate Comment
Are you sure you would like to report this comment? It will be flagged for our moderators to take action.
Thank you for taking the time to improve the content on our site.