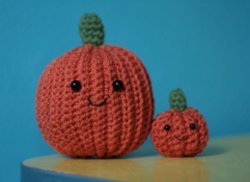
Halloween Crochet Pumpkin
This Halloween crochet pumpkin is too cute for words! Using worsted weight yarn and amigurumi crochet technique, this easy crochet pattern will get you ready for Halloween in no time. Make a little guy too for a cute pumpkin family!
Check out this project and more ideas in 17 Pumpkin Patterns: Free Projects for Halloween!

Finished Size: 14 inches around and 6 inches high
Materials:
- G hook
- orange worsted weight yarn
- green worsted weight yarn
- 2 black beads - about 3/4 inch in diameter
- black embroidery thread
- polyester fiberfill
- Tapestry and Embroidery needles
Instructions:
- With G hook and orange yarn, leaving a long (12-inch) tail, ch 25.
- Sc across. (24 sc)
- *Ch 1 and sc into the back loop only, all the way across.*
- Repeat between * * for 40 more rows.
Finish off, leaving a long (12-inch) tail.
- With tapestry needle, weave one tail back and forth along the long side of the rectangle and pull tightly in order to gather it. (This is either the top or bottom of pumpkin). Weave into the opposite end where you started, secure, and snip. Do this with the other tail along the other long side of the rectangle, but do not snip off tail this time.
- With embroidery needle and thread, adorn with eyes and mouth using the picture as guide and stuff with polyester fiberfill. With the other long tail, sew together the two sides of the pumpkin to close up. (You could also put the orange yarn back on the hook and sc down the back).
- With G hook and green yarn, ch 2 and make 7sc in the 2nd ch from hook. Join. Sc around for 4 rounds or until stem reaches approximately 1.5 inches (3cm). Finish off leaving a 6-inch tail. Sew the stem to the top of the pumpkin and secure in place.
Ta-da! Now make a whole bunch so that you can have the cutest pumpkin PATCH out there!
Note: these pumpkins like to stay inside where it’s warm or safe. They really don’t like front porches, back porches, stoops, but mantles, credenzas, buffets and desks are a-okay!

Read NextSpaghetti and Meatballs Costume
Your Recently Viewed Projects
Thanks for your comment. Don't forget to share!
EditorLP
Aug 29, 2018
This is such a cute idea for fall decor! I love pumpkins and this is even better than the real thing since you don't have to worry about it going bad.
bobbylonardo 50143 99
Oct 08, 2014
I just made a couple of these. Very easy and quick. Went with brown for the stem since they usually aren't green.
Melissa Ryan
Oct 09, 2014
Hi bobbylonardo-we're so glad you enjoyed this pattern. We'd love to see a photo! You can upload your own image of this project by using our Images from Other Crafters link above. Thanks and have a great day!--FaveCrafts Editors
heygirl4 9683956
Oct 07, 2013
omggggghgggggggggg i freaking love this pumpkin its soooooooooooooooooooooooooooooooooooooooooo cute i just have to make it so i will make many for my family and friends
JPKittee51
Apr 08, 2013
I suggest doing a needlepoint star a combination of an X and a + in place of the black beads with black yarn and then giving them each a sort of smiley face. I think that would be cuter.
kittkatlover109
Oct 06, 2012
Can you please post the pattern for the little pumpkin?
JMitchell
Oct 27, 2012
Kittkatlover, The small pumpkin is there to make you think outside the box... in other words, you have to come up with your own pattern, more or less. The original pattern uses a G hook, which is about mid-way through the range of hook sizes. Go with a smaller hook for a smaller pumpkin. Use sport or baby yarn for a smaller pumpkin. Use about half the stitches called for in the pattern for the larger pumpkin. Use smaller beads for the eyes of the smaller pumpkin. You will come up with something just as cute, and maybe about half the size of the original pattern.
kathleentaylor 575 2365
Nov 01, 2011
Hi - I am not a crocheter. but I do crochet now and then. I am a charity knitter. I saw this pattern and ended up making 11 of these pumpkins for my physician's little (and younger) patients. When I delivered them, well - all the nurses were thrilled. They were gone in a day, I was told. I did glue black felt faces. It's an easy pattern. If I can make them, anyone can. They weren't as perfect as I don't crochet that well. They were fast to make. They each had their own body shape and face. It was fun to see them all together.
bearld2u 9861096
Oct 29, 2011
I am confused - do you sew into each sc, ch1 space to increase each row?
JMitchell
Oct 27, 2012
bearld2u, As I read the pattern, there are no increases. You simply crochet a rectangle, and then weave in the long tales and gather the long sides of the rectangle. These become the top and bottom of your pumpkin. After you've added the stuffing, you will have the short sides to sew together, which can be done with the tapestry needle, or you can put the orange yarn back on your hook and make a row of single crochet to close that opening. I would choose the latter method myself, as it would then be more in keeping with the other stitches in your pumpkin.
JessiCAN
Oct 04, 2011
@suereitersj 2725884: Unfortunately we do not have the pattern for the smaller pumpkin at this time. We apologize for any inconvenience. -- Editor of FaveCrafts
suereitersj
Oct 03, 2011
Where are the instructions for the littlest pumpkin? I'd like to make one that size.
funhooks
Aug 07, 2010
I'd like to know how big these little pumpkins are. Can someone help? Thanks.
Report Inappropriate Comment
Are you sure you would like to report this comment? It will be flagged for our moderators to take action.
Thank you for taking the time to improve the content on our site.