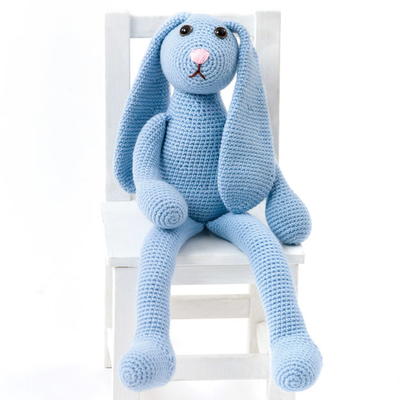
Blue Crochet Bunny Pattern
This long eared bunny crochet pattern would make the cutest gift for children of all ages!

The Blue Crochet Bunny Pattern isn't just for Easter (or just for boys). Crochet this fun bunny pattern for any child you know and watch their tiny face light up with joy. This real blue floppy eared bunny would make the cutest new addition to any nursery. Since it only uses one Caron One Pound skein, this economical bunny is also the perfect amigurumi toy to donate to children in need throughout the year. So, if you've been looking for a way to give back outside of making hats and scarves, this intermediate crochet bunny pattern is here just for you.
Get more free crochet patterns delivered straight to your inbox!
Sign up for FaveCrafts

Crochet HookG/6 or 4 mm hook
Yarn Weight(4) Medium Weight/Worsted Weight and Aran (16-20 stitches to 4 inches)
Crochet GaugeGauge is not critical for this project. Work tightly to ensure that the stuffing will not show through the stitches.
Finished SizeBunny measures approximately 21”/53.5cm tall (from head to toe), or 10”/25.5cm tall (seated)
Materials List
- Caron One Pound (454 g/16 oz; 742 m/812 yds): One skein Main Color (MC) Sky Blue (0508)
- One size US G-6 (4mm) crochet hook, or size to obtain gauge.
- Stitch marker
- Two safety eyes—18mm diameter (or buttons)
- Polyester fiberfill
- Scraps of pink yarn (for nose) and brown yarn (for mouth)
- Yarn needle
Instructions:
BODY
-
Rnd 1: Ch 2, 6 sc in 2nd ch from hook—6 sc.
-
Rnd 2: 2 sc in each st around—12 sts.
-
Rnd 3: [Sc in next st, 2 sc in next st] 6 times—18 sts.
-
Rnd 4: [2 sc in next st, sc in next 2 sts] 6 times—24 sts.
-
Rnds 5–10: Continue as established, increasing 6 sc evenly spaced in every rnd—60 sts.
-
Rnd 11: Sc in each st around.
-
Rnd 12: [Sc in next 9 sts, 2 sc in next st]—66 sts.
-
Rnds 13–18: Sc in each st around.
-
Rnd 19: [Sc in next 9 sts, sc2tog] 6 times—60 sts.
-
Rnds 20–23: Sc in each st around.
-
Rnd 24: [Sc in next 8 sts, sc2tog] 6 times—54 sts.
-
Rnds 25–34: Continue as established, decreasing 6 sc evenly spaced in every 5th rnd—42 sts.
-
Rnd 35: Sc in each st around.
-
Rnd 36: [Sc in next 5 sts, sc2tog] 6 times—36 sts.
-
Rnds 37–40: Continue as established, decreasing 6 sc evenly spaced in every other rnd—24 sts.
-
Rnds 41 and 42: Sc in each st around. Fasten off.
HEAD
-
Rnds 1–6: Work Rnds 1–6 of body—36 sts.
-
Rnds 7 and 8: Sc in each st around.
-
Rnd 9: Sc in next 17 sts, 2 sc in next 2sts, sc in next 17 sts—38 sts.
-
Rnd 10: Sc in next 14 sts, 2 sc in next st, sc in next 8 sts, 2 sc in next st, sc in next 14 sts—40 sts.
-
Rnd 11: Sc in next 19 sts, 2 sc in next 2 sts, sc in next 19 sts—42 sts.
-
Rnd 12: Sc in next 18 sts, 2 sc in next st, sc in next 4 sts, 2 sc in next st, sc in next 18 sts—44 sts.
-
Rnd 13: [Sc in next 10 sts, 2 sc in next st] 4 times—48 sts.
-
Rnds 14–24: Sc in each st around.
-
Attach safety eyes in Rnd 11, 3 sts before and 3 sts following the 2 sc increases.
-
Rnd 25: [Sc in next 3 sts, sc2tog, sc in next 3 sts] 6 times—42 sts.
-
Rnd 26: [Sc in next 5 sts, sc2tog] 6 times—36 sts.
-
Rnds 27–31: Continue as established, decreasing 6 sc evenly spaced in every rnd—6 sts. Fasten off. Thread tail through stitches of last round, pull tight, and secure.
ARM (make 2)
-
Rnds 1–4: Work Rnds 1–4 of body—24 sts.
-
Rnd 5: Sc in each st around.
-
Rnd 6: [Sc in next 7 sts, 2 sc in next st] 3 times—27 sts.
-
Rnds 7–11: Sc in each st around.
-
Rnd 12: [Sc in next 7 sts, sc2tog] 3 times—24 sts.
-
Rnd 13: [Sc in next 3 sts, sc2tog, sc in next 3 sts] 3 times—21 sts.
-
Rnds 14 and 15: Continue as established, decreasing 3 sc evenly spaced in every rnd—15 sts.
-
Rnds 16–39: Sc in each st around. Fasten off.
LEG (make 2)
-
Rnds 1–4: Work Rnds 1–4 of body—24 sts.
-
Rnd 5: [Sc in next 7 sts, 2 sc in next st] 3 times—27 sts.
-
Rnds 6–12: Sc in each st around.
-
Row 13 (heel begins): Hdc in next 8 sts, turn; leave remaining sts unworked—8 sts.
-
Row 14: Ch 1, sc in next 9 sts, turn; leave remaining sts unworked—9 sts.
-
Row 15: Ch 1, sc in first st, hdc in each st to last st, sc in last st, hdc2tog over side edge of row and next unworked st of Rnd 12, turn—10 sts.
-
Row 16: Ch 1, sc in each st across, hdc2tog over side edge of row and next unworked st of Rnd 12, turn—11 sts.
-
Rows 17 and 18: Repeat Rows 15 and 16—13 sts.
-
Rnd 19 (heel ends): Ch 1, sc in first st, hdc in each st to last st, sc in last st, hdc2tog over side edge of row and next unworked st of Rnd 12; continue working across sts of Rnd12 as follows, sc2tog, sc in next 8 sts, sc2tog, sc2tog over last st and side edge of beginning of rnd, do not turn—25 sts.
-
Rnd 20: Sc in next 2 sts, hdc in next 9 sts, sc in next 14 sts.
-
Rnd 21: Sc in next 3 sts, hdc in next 7 sts, sc in next 15 sts.
-
Rnd 22: [Sc in next 3 sts, sc2tog] 5 times—20 sts.
-
Rnds 23–66: Sc in each st around. Fasten off.
EAR (make 2)
-
Rnds 1 and 2: Work Rnds 1 and 2 of body—12 sts.
-
Rnd 3: Sc in each st around.
-
Rnd 4: [Sc in next st, 2 sc in next st] 6 times—18 sts.
-
Rnds 5–8: Continue as established, increasing 6 sc evenly spaced in every other rnd—30 sts.
-
Rnds 9–22: Sc in each st around.
-
Rnd 23: [Sc in next 4 sts, sc2tog, sc in next 4 sts] 3 times—27 sts.
-
Rnds 24–27: Sc in each st around.
-
Rnd 28: [Sc in next 7 sts, sc2tog] 3 times—24 sts.
-
Rnds 29–43: Continue as established, decreasing 3 sc evenly spaced in every 5th rnd—15 sts.
-
Rnds 44–52: Sc in each st around. Fasten off.
TAIL
-
Rnd 1: Ch 2, 6 sc in 2nd ch from hook—6 sc.
-
Rnd 2: Lp st in each st around.
-
Rnd 3: 2 lp st in each st around—12 sts.
-
Rnd 4: [Lp st in next st, 2 lp st in next st] 6 times—18 sts. Fasten off.
FINISHING
Sew head to top of body. Sew ears to top of head. Sew arms to sides of body. Sew legs to bottom of body along Rnd 11. Sew tail to back of body. Using photograph as a guide, with pink yarn embroider nose, and with brown yarn, embroider mouth. Using yarn needle, weave in all ends.
NOTES
-
Bunny is worked in continuous rounds; do not join and do not turn at the ends of rounds. Place a stitch marker to indicate the beginning of rounds and move marker as each round is worked.
-
Stuff body, head, arms, and legs as work progresses. Do not stuff ears or tail.
-
When fastening off, always leave a 12-18"/30.5-45.5cm long tail for sewing.
-
If desired, weight the bottom with a small nylon bag of beans or poly-pellets. Place the bag at the bottom of the body before beginning to stuff with fiberfill.
-
A yarn pompom may be used for the bunny's tail, instead of the crochet tail.
Abbreviations
- sc2tog
- Single crochet 2 together—[Insert hook in next st, yo and pull up a lp] twice, yo and draw through all 3 lps on hook.
- hdc2tog
- Half double crochet 2 together—[Yo, insert hook in next st and pull up a lp] twice, yo and draw through 5 lps on hook.
- lp st
- Loop stitch—Wrap yarn around index finger twice and hold behind work, insert hook into indicated st and between the yarn wrap and your finger, pull all lps through st, yo and draw through all lps. Note: Loops form on side of fabric that is facing away from you.
Read NextBlue Crochet Bunny Pattern
Your Recently Viewed Projects
Thanks for your comment. Don't forget to share!
cinchouse 5596478
May 30, 2019
I am making this bunny for my niece. It's been pretty easy so far but the heel has me totally confused. Rows 14-19 are throwing me off. Not sure about the hdc2tog over side edge.
cinchouse 5596478
May 08, 2019
I love this pattern but a little confused on round 25-34 decreasing 6 sc evenly spaced in every 5th round - 42 sts. Never seen this before. I know how to dec but not exactly sure what this means. Thanks.
Editor Dana
May 20, 2019
Hi there! I believe this means in rounds 29 and 34, you will decrease 6 stitches evenly spaced so that, at the end of 34, you will have decreased 12 stitches total, from round 24's 54 stitches down to row 34's 42 stitches. So in round 29, you'd decrease every 9th stitch (54 to 48 stitches). Then in row 34, you'd decrease every 8th stitch (48 stitches to 42 stitches). Then you would have 42 stitches across by then. If I'm not very clear or you'd like other insight, I might suggest checking out some of the other comments below. A number of our readers have spent time troubleshooting the pattern together, and hopefully their insights will be helpful! I'd also recommend joining the AllFreeCrochet community on Facebook and posting your question there. There are fantastic crochet experts in that group that can also probably help. Good luck!
mulberrygalprinces s
Jan 29, 2018
Look at those ears! How can anyone pass this by? I just fell in love looking at him. My friends grand daughter is going to be one on Easter. I think this will be almost as big as she is. I have to make it for her. But in pink with a crochet flower on its tummy.
Lyndellmb
Aug 16, 2017
Hi I'm trying to work out the quantity of wool I need for Blue Bunny. I live in Australia Caron isn't available. What ply wool did you use? What was his finished measurements? thanks
Editor Dana
Aug 21, 2017
Hi there! The Caron yarn is a 4-ply yarn. Bunny measures approximately 21/53.5cm tall (from head to toe), or 10/25.5cm tall (seated). Good luck, and enjoy!
Lyndellmb
Aug 16, 2017
Hi I live in Australia and unable to buy Caron wool. What ply wool is it? How many balls did you use in the pattern? Most of our wools are 50g balls 95m. Some 100g 210 -274m depending on ply. thanks
len10pin
Apr 22, 2017
I like to knit hats for the little ones. I also like to sew and stuff animals for them.
Snowbabies51 35046 15
Apr 21, 2017
I have made this Bunny about five times ( for grandchildren and friends children as gifts ) the pattern is so easy to follow. I've also dressed them as well. xx
mrsalley 7250843
Feb 27, 2018
Can you help me? The picture shows the start of the head as the nose area, right? that means I am sewing the head on, on it's side??? That means the 6 stitch opening that you put the stuffing in is the back of the head and not the place where you sew the head on?? Did that make sense?? Am I correct?
Kim Guzman
Apr 01, 2017
I believe that, when this pattern was corrected in the past, some extraneous text wasn't deleted at that time. Rnd 24 of Body Sc in next 8 sts, sc2tog sc in next 8 6 times54 sts. Should be Rnd 24 Sc in next 8 sts, sc2tog 6 times54 sts.
Stephanie Hantz
Feb 09, 2017
I think I will try this pattern. I have read through and it looks relatively easy, I have worked a lot in the round so that part will not bother me. However, I am used to making these types of patterns as a whole rather than sewing together. Believe it or not I have trouble with the sewing!
Laf
Feb 07, 2017
Hi, I've finished my blue bunny. Mostly pleased but the instructions above are lacking. Especially when sewing the pieces together. It wasn't until I zoomed in on an internet photo to help with the embroidery that I realized the head is put on with the rings of crochet stitches facing outwards to form the face. I attached it with the finishing stitches attached to the body. Likely my grandchild won't care but it would have made a difference to the look of the bunny. Good luck!
Editor Dana
Feb 08, 2017
Thank you so much for your helpful comment! This is a great resource for our readers. Much appreciated!!
SheLikesHats
Jul 26, 2016
This would be the perfect gift for a newborn! I will have to keep this in mind.
sears33 1533888
Jun 12, 2016
is there a video o this because im struggling with the legs at the heel part
Kaylee
Jun 13, 2016
@sears33 1533888 unfortunately there is not a video. You can check out the originally posted pattern over at Yarnspirations and reach out to the original designer for some help: http://www.yarnspirations.com/patterns/one-skein-bunny.html Hope that helps! Kaylee, Editor of FaveCrafts
Member 8576325
Mar 24, 2016
i cannot make sense of the legs at the heels. hdc2tog over the side edge? these legs are the last things i have left, can't wait to get this bunny done! i might have to just make longer versions of the arms for the legs. youtube isnt much help either.
Kaylee
Jun 13, 2016
@Member 8576325 I would suggest checking out the original posting of the pattern and reaching out to Yarnspirations with these question. I've never tried this pattern before. http://www.yarnspirations.com/patterns/one-skein-bunny.html You could comment some other readers on this page who have finished the project for some guidance as well. Hope that helps! -Kaylee, Editor of FaveCrafts
Member 2127803
Mar 04, 2016
Hello around, first of all i must say i like that pattern a lot and i am almost finished. But i got some problems with the legs. Maybe its cause im missing something in the description or my knowledge is not good enough. Anyway - between row 13 and 14 of the legs i have my problem. When i finish row 13 i got 8sts and in row 14 i need 9sts...but i dont know how and where to increase by one sts....i have no clue. maybe someone here can help me! Thanks a lot!
BeckySue
Mar 02, 2016
This is what I've been looking for-a long bunny for my granddaughter to drag around! lol I would love to make a set of these in different colors and different yarns, since the gauge doesn't matter so much. You could probably make a set of mommy, daddy, and baby bunnies just by using different weights of yarns and sizes of crochet hooks. I wonder what it would turn out like with Bernat blanket yarn! lol It sure would be soft and huggable!
Member 4684553
Jan 01, 2016
Having trouble with rows 37-40 figuring the math can you please help me thank you
Kaylee
Jan 04, 2016
Hi Member 4684553, For questions about specific patterns, I suggest reaching out to the designer (in this case Caron Yarn). Hope that helps! - Kaylee from FaveCrafts
christie1225c 3370 996
Aug 18, 2015
There are quite a few errors with this pattern (it also needs to more reader friendly) however, I just make it work. I am on the leg/heel now and will have to use the internet for help. I think it's a cute pattern and hope my GGbaby likes it o)
Julia L
Aug 19, 2015
Hi Christie - Thanks for your comment. I have updated the project to make it more user friendly and changed the directions according to reader feedback. Please let me know if you see more errors. Thanks! - Julia from FaveCrafts
kayla09jane
Feb 18, 2015
I see that I am not the only one with this problem...for the body, round 24 should have 54 stitches when you end. In order to achieve that, you should follow these directions sc in next 8 sts, sc2tog, sc in next 8 6 times=54 stitches. I cannot belive that nobody caught this yet. The pattern says to sc 4. by doing that you would end with 50 stitches which means you decreased 4 times too many.
Julia L
Aug 19, 2015
Kayla, Thanks so much for your input - I have updated the pattern. - Julia from FaveCrafts
Lorraine Cooper
Dec 15, 2014
I have not been very lucky with patterns but learned at my nannas knee by eye, using only what was available. Often unravelled jumpers we had grown out of. I am saying this as I tend to look at a pattern for. Stitches and increases/decreases etc. However, I never work in the round I make everything flat, then attach the various appendages sewing/joining as I go. Never had a problem.
BeckySue
Mar 02, 2016
Attaching various appendages is a skill itself! I'm making my first Amigurumi doll for my granddaughter, and I'm finding that crocheting is only a small part of it! Even though it's considered easy because it's only single crochet stitch, all the details are quite complicated, including how to correctly stuff the doll, so you don't have holes between the stitches or so the head isn't too heavy!
krankin2rankin 405 7916
Dec 02, 2014
I love this pattern and have made 12 so far. I find 8ply to give the best effect but it works ok with 5ply too. It's just the right size and shape for toddlers to cuddle and carry with them. It's also very easy to do. Great pattern. Thank you for creating it. ) Kristina.
BeckySue
Mar 02, 2016
Twelve?! I am in awe! I aspire to do that! I'll try an 8 ply when I finish my current WIP. But I will sew on the eyes. I don't feel the safety eyes are safe enough with little ones. Do you? What kind of stuffing do you use for plushies?
kstraub1971 218268 4
Nov 18, 2014
Hi, I am stuck with the body right now at round 12 were it says : 1.Rnds 27-31: Continue as established, decreasing 6 sc evenly spaced in every rnd6 sts. I am new to crochet and have no clue what this means. Thank you kindly for any info
FaveCrafts Editor JL
Nov 19, 2014
Hi there, This means that you continue from the previous step using the same stitches - the only difference is that in each row, you decrease by 6 stitches in each successive round. Hope that helps! - Julia from FaveCrafts
moxysea 5862252
Oct 18, 2014
so I am on step 11 for the body, it states sc 4, sc2tog then sc 4... it says you're supposed to get 54 stitches, but I'm not getting that at all.. I've tried 5 times already!!! I'm not a new crocheter and I know how to sc2tog, so what gives? has anyone else had problems with this? does it matter if the stitches are a little off ? thanks
Melissa Ryan
Oct 20, 2014
Hi Moxysea, thanks for your comment. Sorry you're having trouble with the pattern! We checked back with the original source and there have been no pattern updates, so what's written here is correct. How many stitches are you ending up with? More or less? Depending on how off you are from 54, you can make alterations here and there...for example, you can sc2tog if you end up with 55 stitches or sc 2 in one stitch if you're ending up with 53. Also, don't forget to use stitch markers! Sometimes I just miss a stitch in counting and that screws me up! :) Please let us know if there's any other way we can help you with this pattern! --FaveCrafts Editor
kayla09jane
Feb 18, 2015
Hi moxysea I was having the same exact problem that you were experiencing if you have not found the error yet I did In round of the body the directions say to sc sc tog sc and to do that times to equal stitches WRONG By doing that you are probably ending up with stitches like i was the CORRECT directions should be to sc in next sc tog sc in next times then you will end with stitches Sorry that I am figuring this out for you months after you were working on this project Good luck and i hope someone can get into contact with the original designer to give her this correction because i wasted over hours counting and recounting all of my stitches from the beginning to see where i made my mistake at when I really didnt make any mistakes and that the designer is the…Read More one who made the original mistake
FaveCrafts Editor JL
Feb 19, 2015
We have updated Round 24 to reflect the correct directions. Thanks!
Loo Shrloo
Oct 06, 2014
THIRD time ripping out and starting over - "continue as established" is confusing. Am I correct that you mean to repeat rows 3 and 4 alternately until 60 stitches around is achieved? Continue as established - to me - mean to repeat rows 1 - 4 until you get to row 10 - this is OBVIOUSLY incorrect.
Melissa Ryan
Oct 08, 2014
Hi Loo Shrloo--Thanks for your comment. Here's what it means...In rounds 3 and 4, you're doing this: Rnd 3: [Sc in next st, 2 sc in next st] 6 times18 sts. Rnd 4: [2 sc in next st, sc in next 2 sts] 6 times24 sts. For rounds 5-10, you're going to increase the number by 1, so Round 5 would be: [3 sc in next st, sc in next 3 sts] 6 times; Round 6 would be: [4 sc in next st, sc in next 4 sts] and so forth. By the time you get to round 10, you should have 60 sts completed. Hope that helps! --FaveCrafts Editor
staylor1970 301452 9
Sep 04, 2014
I am struggling to understand how to begin the arms, legs and head. The body was quite easy to understand but the beginning of the other parts is a bit difficult? How do i arrive at 36 stitches for rounds 1 to 6 when making the head? Do I start a magic loop first and increase till I have 36 sts? Sorry if this sounds a stupid question x
Melissa Ryan
Sep 05, 2014
Hi staylor--Thanks for your comment...What the pattern is telling you is to work rounds 1-6 of the body and then continue on with the head, legs, and arms. For example, the leg says "Rnds 14: Work Rnds 14 of body24 sts."...that means you're going to go back to the body section and work rounds 1-4, then go back to the leg section and continue with row 5 and so on. Hope that helps!--FaveCrafts Editor
stacilynn22 713275 8
Aug 04, 2014
I made this bunny in tan for a little girl on the way. It turned out very cute and I even added a little bow above the left ear to add a girly touch. The bunny is much bigger than I was expecting it to be, though! (It is bigger than the baby!) I expect the bunny will be used as a decoration until the child is of size and age to play with the bunny. Overall, a great pattern and I plan to make it again for some older children.
Melissa Ryan
Aug 06, 2014
Hi Stacilynn22--Thanks so much for your comment, and we're so glad you liked the pattern! If you'd like to share a photo of your bunny, you can use the Image Uploader above (click on the link under Images from Other Crafters). Thanks again!-FaveCrafts Editors
enojima 4518529
Jun 06, 2014
I am having problems with the body of the rabbit coming out long rather than round. In rows 3&4 when it says to do ( )'s instructions 6 x's, is this in this row only? or repeat this row of instructions 6 x's. I've started over several times and just don't seem to be getting it. Your help will be much appreciated.
Melissa Ryan
Jun 09, 2014
Hi enojima--thanks for your comment! The instructions mean that row only...for example: Rnd 3: [Sc in next st, 2 sc in next st] 6 times18 sts. Rnd 4: [2 sc in next st, sc in next 2 sts] 6 times24 sts. This means you're going to repeat what's in the [ ] 6x in that row...so for Round 3, you repeat [Sc in next st, 2 sc in next st] 6 times...and for round 4, you repeat [2 sc in next st, sc in next 2 sts] 6 times. By the end of row 3, you should have 18 stitches...and by the end of row 4, you should have 24 stitches, as noted above. If you're still having trouble, we suggest doublechecking to make sure you have the correct hook size and yarn weight to ensure proper gauge. Hope that helps!
aganganowicz 82522 42
Apr 03, 2014
Hi! I've made this bunny and I want to know if I can sell it? By the way, the pattern is really great and the bunny is soooo cute!
FaveCrafts Editor JL
Apr 03, 2014
Hi there, Although we have posted to the pattern on our site, we cannot provide you with the permission to sell products using it. Please contact the designer (Deb Richey) or manufacturer (Caron Yarn) directly for permission. Thanks! - Julia, FaveCrafts Editor
Dehardy1950 698496 2
Mar 11, 2014
Could someone please tell me the width of the body at the bottom amend the height. I just finished it but it looks big to me. Just want to make sure I am on the the right track. Thanks...
Jilli8an
Feb 19, 2014
A lot of the comments on this pattern seem to be mostly negative but I have to say I like this pattern and found it fairly easy to follow I don't know whether the pattern has been updated since those comments have been made but I did not have any trouble with the pattern My stitch count was always right on for every round The feet did take a little concentration but they turned out looking almost exactly like the bunny in the photo When the pattern calls for continuing as established I found it helpful to just write out the instructions for those rounds It's helpful to remember that you will always be increasing or decreasing by a factor of For example at when it asks you to continue decreasing by every rnds the pattern will be as follows Rnd - sc in each st around times sts Rnd sc…Read More tog sc in next sts times sts Rnd - sc in each st around times sts Rnd sc tog sc in next sts times sts All in all a cute and fun project
trigsgal 9314649
Feb 10, 2014
I really want to make this, and am new to pattern reading...step 5 continue as established...any way you can write out the patterns for those that are still learning? I'd hate to rip it all apart to find a different pattern.. Thanks!
Jilli8an
Feb 19, 2014
Hi, the pattern would continue as follows: Rnd 5: [2 sc in next st, sc in next 3 sts] 6 times (30 sts) Rnd 6: [2 sc in next st, sc in next 4 sts] 6 times (36 sts) Rnd 7: [2 sc in next st, sc in next 5 sts] 6 times (42 sts) Rnd 8: [2 sc in next st, sc in next 6 sts] 6 times (48 sts) Rnd 9: [2 sc in next st, sc in next 7 sts] 6 times (54 sts) Rnd 10: [2 sc in next st, sc in next 8 sts] 6 times (60 sts) Hope this helps!
dbstory0824 510252 9
Jan 23, 2014
Wish I had read the comments before starting this. I messed up round 12 but it will be ok - personalized touch LOL
cherazal 4622674
Dec 19, 2013
I made this as soon as I first saw this pattern and fell in love with my blue bunny. I made a few alterations to personalise it (stripes round chest in different shades of blue, bow-tie around neck). He's adorable and so cuddly.
dlmccormick 199430 2
Oct 26, 2013
need help with # 12. Can you explain in more detail?
tiffanyhearron 953 3591
Jan 15, 2014
not sure if you still need this information but I am making this pattern now and from what I've devised here is how step 12 should read: Round 25-28: sc in each st around - 54 Round 29: [sc in next 4 sts, sc2tog, sc in next 3 sts] 6 times - 48 Round 30-33: sc in each st around - 48 Round 34: [sc in next 3 sts, sc2tog, sc in next 3 sts] 6 times - 42
mrsbresnahan
Jun 15, 2013
I read others comments before starting this project but I didn't have any of the same problems. I understood the directions pretty well but wanted a little more guidance in putting it together. I added a ribbon around my bunny's neck because I couldn't make it look seamless like the other parts. I would do this one again.
tammyboswell 84046 90
May 14, 2013
The original pattern is here: http://www.caron.com/projects/op/op_bunny.html might help with some of the questions.
adobos93365 830202 7
May 03, 2013
Why aren't anyone's questions concerning this pattern answered? I just started, got to Rnds 5-10 and stopped in my tracks. Searching for explanations is futile. What's up, Favecraft?
tiffanyhearron 953 3591
Jan 15, 2014
Did you ever complete this project? I haven't finished the entire thing but I have worked out some of the issues with the pattern for myself. If you would like; I'd be happy to help
mocrayto
Apr 29, 2013
super cute bunny but a little frustrated here! could someone please clarify the body instructions for rows 11 and 12: at the end of row 10 I have 60 stitches, but at the end of row 11 I do not end up with 54 sts. also, row 12 says "decreasing 6sc evenly spaced in EVERY 5th RND (HUH?)...and it should end in 42 sts. any clarification would be great appreciated!!
lbunnies32 9343626
Jul 23, 2013
In #11 you should be single crotcheting two stitched together, a total of six times which will reduce your stitch count down to 54
tiffanyhearron 953 3591
Jan 15, 2014
not sure if you still need this information but I am making this pattern now and from what I've devised here is how step 12 should read: Round 25-28: sc in each st around - 54 Round 29: [sc in next 4 sts, sc2tog, sc in next 3 sts] 6 times - 48 Round 30-33: sc in each st around - 48 Round 34: [sc in next 3 sts, sc2tog, sc in next 3 sts] 6 times - 42
wickedc 3775392
Mar 27, 2013
This project requires some experience with increasing and decreasing. You have to understand what it means when it says "continue pattern as established." I had to keep a written tally. You must use a marking system, I chose to use yarn and you just count your stitches because it's important to end up with the required amount from row to row. This is my first stuffed project and the hardest part was sewing the parts together but I must say, even though it's not perfect, it makes me smile and I think my Grandson is going to cherish the dang goofy thing. Allow enough time because your hands will get tired doing rows and rows of single crochet. Not for the beginner, not quite east but it will challenge you and give you a feeling of accomplishment when completed.
Maz1968
Feb 25, 2013
I am a beginner and only been crocheting for a few months and can say this was a fab pattern and easy to follow, my nephew is going to love the completed bunny I have made..... Thank you
lilvalbug 4600713
Feb 18, 2013
I love this Bunny! Can any one tell me how to reduce this pattern for a smaller bunny? I am not good with math... :( and I re
lilvalbug 4600713
Feb 18, 2013
got cut off. Can anyone help me figure out how to mke a smaller blue bunny? PLASE!! Thanks very much. :)
sandra44240 283813 5
Feb 08, 2013
I recopied this pattern above and I am going to compare it with my directions copied last year (2012) and see if any changes have been made from the viewer comments. I also had a difficult time understanding some of this pattern and I have been crocheting for years. The number of stitches don't always agree, the size was never mentioned in the pattern (this is a large bunny) and most of all the feet....I finally gave up on the feet and just made a straight leg. Does anyone even double check these patterns before publishing?
catalissacakes 116 5050
Feb 07, 2013
I agree with some of the below comments- I was doing well up until we it says"continue as established...." - does it mean to sc or keep decreasing? I'm not clear and I love to do this pattern- in all colors. I'm trying to figure out by myself what to do and hopefully end up with the shape I need. in the meantime I'm just enjoying as i go. One more thing....what it the total height of the bunny- that will also help for all of us who are confused.
teedlum1961 333822 9
Feb 02, 2013
I have been crocheting 40 years and can say that this is the worst written pattern that I have ever seen! 'Continue as established, increasing 6 sc evenly spaced in every other rnd...' this tells a person absolutely nothing! There are multiple round above this statement and which rounds are to be worked again? another thing...do us all a favor and forget the number of stitches that are listed in the pattern! They are inaccurate! Please Please post updated instructions to this article!
rockmist 2361393
Dec 14, 2012
ARGH Sorry I'm typing on an android and it got away from me -P I was able to work out enough to actually make it Now I see there have been some changes made to the LEG part but not the whole pattern I may have missed something And they gave no clearer directions on where and how to attach the parts I ended up attaching to the best of my ability but since I had never crocheted an animal before I am STILL unclear on how that is done so I didn't do a great job And worse I put the head on sort of sideways snout up instead of forward That meant I had to remove the head and then remake it and the ears as I had sewn them on so tight I did in the end manage to get it done but wasn't looking forward to making…Read More another this one went to my great niece However since someone seems to have rewritten some of the confusing parts and I've learned from my errors I will give it another try Thanks to whomever for making it a better pattern cuz it is a real cuty
rockmist 2361393
Dec 14, 2012
I got the pattern over a year ago and went on to make it a couple months after. I consider myself an intermediate to advanced Rochester
milorox2 1049990
Sep 11, 2012
I USED THIS PATTERN ALONG WITH A FEW OF MY OWN TOUCHES TO MAKE MY BUNNY. I FELL IN LOVE WITH IT AND IT SI NOW SITTING IN MY BEDROOM WINDOW.....SIMPLY ADORABLE!!
ninjagrl12
Jul 12, 2012
To me this pattern is not written well at all I have been crocheting for years and several of the steps in the body portion of the pattern are done in correctly The amount of stitches in the steps do not add up to the amount at the end of each step I had to edit it myself on a Word document to help me keep track of what to do and what not to do This pattern should not be considered easy by anyone but intermediate at best And it is not quick at all since you need to use a small hook to crochet with and not everything is explained well as to how to assemble the bunny Beginners beware get someone with experience to help you if you hit a snag while making this And to admin on AllFreeCrochet com this pattern is noted as easy while on…Read More this website FaveCrafts com it is marked as intermediate for the less experienced crocheters amongst us this can throw some for a loop i recommend fixing it if possible
dey1960
May 15, 2012
This is a surprisingly easy pattern. At the moment I'm working on the first leg and although I've run into a tiny snag (due to the limits of my crocheting abilities NOT the pattern), I'm confident I can work through this with some trial and error. For any beginners, don't let complex looking pattern turn you away. As long as you can count and single/half-double crochet, you're good to go. I do, however, highly recommend using a marker as suggested. I've become very attached to mine as it has saved me many unravelings :-)
ninjagrl12
Apr 04, 2012
How do I get in touch with the designer to get permission to sell the finished product of this design?
Taura
Aug 31, 2011
Yes! I would make this cute bunny as a gift to anyone I thought could appreciate him. But I want one for myself, too. Thanks for the pattern. Taura
60smom
Aug 15, 2011
Any child would lo9ve this - give it to a hospital or the Fire Department if you have no children at home - good use of crap - multi color is very popular
JennyBee1
Aug 15, 2011
@barbaraa61 7171207, We are glad to hear you like this pattern! We do, however, recommend you contact the original designer for permission to sell it on your website. Thanks! --Editor of FaveCrafts
kyoung 7078369
Aug 15, 2011
I absolutely plan on making this adorable bunny! It looks so soft and would be just perfect for any child. Thanks for posting it!
Crafts By AP
Aug 14, 2011
I would definitely make this, for all ages, from baby to adult. Who doesn't like a stuffed toy, especially one that is hand made?
Member 14453
Aug 14, 2011
I plan to make this bunny.......it's so cute! The term "advanced" or "intermediate" might scare a few people off, but now-a-days with youtube videos, etc., if there's a stitch that one doesn't know how to do.....one can learn rather easily, including myself:)
anniefaron 5650536
Aug 13, 2011
I did this for my granddaughter and I am a novice at crochet, but it was worth all the time and effort for me. She was with me, when he got " stuffed".
artfullydone
Aug 13, 2011
I love the blue bunny and am going to make several in different sizes and colors!
cactec 8571165
Aug 13, 2011
I am making this now for my friends baby.. I've added it's own baby blanket to the bunny... I hope it turns out well..
maryfrances2005 78 45088
Aug 13, 2011
I have just returned to crocheting after almost 30 years away from it. (Grandmotherhood had a litle to do with it) :) I look forward to making this bunny!
barbaraa61 7171207
Aug 12, 2011
I love this bunny. I've printed a copy of the instructions and I can't wait to try it and sell it on my website: http://www.thats-sew-cute.com. I'll also probably make one for my little granddaughter to snuggle with.
Member 9813039
Aug 12, 2011
I've made this. It's a fun project. It's so floppy I've wondered about adding strings to make a puppet.
Maggie0215
Aug 11, 2011
I think it's great that you offer so many different projects. I have tons of your projects to make (now including this bunny for my granddaughter), I just need the time to make them.
ArweThereyet
Aug 11, 2011
I'm not big on yarn crochet dolls and animals, but I think this one is really cute and I plan on making it. You can only have or give, or afford to make, so many afghans.
Deggie
Aug 11, 2011
He is absolutely marvelous--even though reading crocheting patterns IS NOT my thing. I love the schematics, too. There has to be someone out there who will help me. Whoever designed him thanks so much.
pld
Aug 11, 2011
I'd make this for the holiday craft sale Three Rivers Crochet, a CGOA chapter, is hosting in December to raise funds for two charities we support -- Rwanda Knits and VA programs in Pittsburgh.
katandmel 1525583
Aug 11, 2011
I am going to make this bunny for my granddaughter and I also love to crochet afghans too.
Crafter 4099785
Aug 11, 2011
This is a very cute Bunny, it would make a great gift for a child 15 months old or older with a afghan, throw or just a small crocheted blankie. there are other colors of yarn, make it in bright solid or variegated colors. this would be a fun project to make. I will be making it for my Granddaughter in a few months may be for her Birthday, Christmas or better yet for Easter, she is eight months old so I have plenty of time.
Member 7615721
Aug 11, 2011
I have made him, and it came out good. I don't think it's right for a baby, because it's too big. I gave it to an eight year old and she loved it. I would make it again.
asusuzy43 5567732
Aug 11, 2011
I love this blue bunny! I am making it now for my great-granddaughter!
MMCM
Aug 11, 2011
SCHEMATICS PLEASE..... schematics like the ones for making dollies, or the ones that japanese crocheters use: they are UNIVERSAL. No text, only schematics......... tks!
gmamadea
Aug 11, 2011
This bunny is so cute.....just right for the next grandbaby. I love making stuffed animals for kids and I've made lots.
JennyBee1
Aug 11, 2011
To everyone that has had a problem with the pattern, we have contacted the company and are working on getting clarification on the issues you're having. We apologize for any inconvenience. --Editors of FaveCrafts
thprincess 9408790
Apr 21, 2012
I also am having problems with making the legs can you tell me how to get help? Please contact me cindygirl at thprincess@operamail.com thank you. cindy
bojeanna
Aug 11, 2011
I would most defenitly make this bunny. I like a variety of things to crochet, and I just love watching something grow from nothing. I like the solid color idea as it doen't show the end and beginning of a row. It would be precious in a multi-color, bright colors that would attract a small child as long as you could figure out how to hide the transition from one color to another.
totalrealtor 71725 44
Aug 11, 2011
Not only would I make him I have made him for several new babys! he is adorable.
fairyfey 6503063
Aug 11, 2011
I would deffinately make this bunny .he shouts love and comfort. I can just see someone cuddling him in a moment to feel better.
cyclops
Aug 11, 2011
I would definitely make this. As an avid crocheter I like to make "different" things all the time. This bunny is adorable.
delguidiceeileen 2 361001
Aug 11, 2011
I would definately love to make this bunny. I enjoy crocheting stuffed charcters more than afghans, it takes less time to make them and when you're done a child keeps it longer. although afghans are nice to make for special occasions
Galevrou
Aug 11, 2011
Yes I would crochet this cute bunny. I looked over the pattern and it looks uncomplicated. And I would probably crochet it in pink as well...
SIXN8POINT 5502101
Aug 11, 2011
No I would not. Although it is cute, I have found that crocheted toys dont go over as well as store bought. I dont like to spend the amount of time it takes to make something, and discover that the recipient does not appreciate the time and work involved.
HeeTinok
Aug 10, 2011
I will make this bunny. I make animals to take with me when I go to a deaf school in Nicaragua and give to the kids. Very cute! Plus it won't take long!
catnaps 7028372
Aug 10, 2011
Really cute; he has a lot of character, though the mouth makes him look a little sad. I'd be tempted to make this, but I have no one to make it for right now. It does look cuddly, though.
Runeshadow
Aug 10, 2011
I would not make this pattern because they don't specify how many stitches between the increases. and decreases "Increase 6 stitches evenly" and "decrease 3 evenly" are bogus instructions. I don't have time to mess around to figure out each row like that. I need to print it and start working from concise instructions. Cute bunny, thought I'd make it for my granddaughter but no way, once I read the instructions. One row, maybe, but repeatedly, no, thank you. I wish the pattern writer had taken the time to spell out the specific increases and decreases. I am truly disappointed.
maryannbyrne 05962 55
Aug 10, 2011
I love bunny and will most definitely be making him. I like making afghans, but there are just so many I can have lying around the house. Bunnies I can make for other people in a short amount of time and they don't cost a lot to make.
smnjfox 5898850
Aug 10, 2011
This is a Great Project. I made this for my granddaughter last year and another that she "stole" after I was finished. I did crochet the eyes as she is a toddler & likes to tear button eyes out. She still sleeps with her bunny.
crafter8
Aug 10, 2011
I love the bunny! I can't wait to try the pattern! I have two grandchildren on the way, so I'm looking forwarded to making one for them!!! I LOVE IT!!!!
makettle2 8677448
Aug 10, 2011
The bunny is adorable and works up super fast. I wish we could get patterns for several more free animals. Grandchildren love new animals when they come to visit.I sew in face features as glued eyes are dangerous when new babies are added to family.
sherrywylie 946967 5
Aug 10, 2011
I am erally looking for an elephant. My daughter and I saw them at our County Fair and she would like me to make her one. Does anyone have the pattern for an elephant? Please let me know. Thanks, Sherry
lamzdotes 1763964
Aug 10, 2011
Because my FaveCrafts email asked for comments on this pattern I will comply with the request. I would love to make this cute bunny for my great-granddaughter but, having read the other comments and noting the lack of response by any admin, I'm going to avoid the frustration. Since the site specifically asked for comments about whether we would make this pattern and why or why not, let's see if an admin bothers to respond.
Razzamatazz
Aug 10, 2011
I would not make this bunny because I have trouble making anything that is rounded for some reason. Plus, I don't think it's all that cute.
maxx12g 7957715
Aug 10, 2011
I wish someone would answer the viewers questions. This is a really cute bunny but I am not going to try it if there are these unresolved questions.
quistis1085
Jun 09, 2011
I too am having a problem with rows 13 through 19 of the legs. I don't understand where the hook goes for the over side edge part of the hdc2tog
dinkydana62 045477 0
May 24, 2011
yeah, i'm having a little trouble with this pattern too. i think the count on rows 15-19 are not correct. but i'm still ganna try it, marking my own count on my printed out pattern. i think the phrase " continue as established" means to single crochet but to add or take away a stitch evenly spaced in that round. if round 6 has 36 sts in it, you would add or subtract a stitch every 6th stitch. hope this helps. i hope i'm correct. that's the way i'm ganna try it.
ladyzdro 8041132
Apr 22, 2011
Continue as established??? Does this mean repeat the last row, last 2 rows, last 3 rows??? Can we please use proper pattern language if we are going to write patterns or at least explain? Anyone?
Caranee
Apr 22, 2011
roxstetzer said she made the bunny easily in 4 hours. I notice a lot of people are having trouble with the pattern, and I would like to make it, but not if it's unintelligible. Maybe you could help the rest of us out by answering at least some of the questions posted.
strawbaries4life 7 839712
Mar 25, 2011
Need some help with this pattern. I am a little confused on the leg row 13-19 where it talks about hdc2tog over side edge of row and next unworked st of rnd 12. In the hdc2tog over side edge is it talking about the back look of the row? and how do you keep returning to rnd 12? if anyone can clarify I would greatly appreciate it.
keishabrewer3 7999 454
Mar 07, 2011
what does this mean????( Rnds 510: Continue as established, increasing 6 sc evenly spaced in every rnd60 sts) I have tryed many time to do it but it never comes out the way the patterns says. PLEASE HELP MEEEEEE!!!!
sofia7shepherd 303 5420
Mar 06, 2011
It is really quite hard! The instructions are hard to understand.
Crafter 21664
Mar 02, 2011
I like a challenge, I got all the parts done but could not get them to go together. Can anyone help in directions on how to stitch them together without the thread showing
roxstetzer 1425595
Feb 08, 2011
I love this bunny!! I made him in about 4 hours, and can't wait to start on a pink one!! Thank you!
PrettyWoman
Jan 24, 2011
I think it was deceiving to say "it only uses one skein of yarn." One skein of ONE POUND .. that is quite a difference.
bampyschair
May 05, 2010
I'm a beginner looking for a project. The first picture said "easy" but then when you clicked on the instructions it said " intermediate". Any idea which one it is?
Report Inappropriate Comment
Are you sure you would like to report this comment? It will be flagged for our moderators to take action.
Thank you for taking the time to improve the content on our site.